Renovating our 1997 Fleetwood Mallard for Full-Time Living (Part 5)
This is the story of how my husband and I purchased a 20-year-old travel trailer and I DIYed the crap out of it to make it suitable for full-time living. In this series, I’m giving All of the details about the process step-by-step, as performed by me, a 26-year-old woman with No experience in construction. The first installment in this series details the purchasing process and the changes I planned to make. You can find that article in the link below and start at the beginning. Then, follow along in the series by clicking on the link for the next article at the bottom of each page.
What’s Up There, Anyway?
The demo portion of the interior of the Wind Rose was really coming along, and with the weather turning nice, I moved to the outside. The next thing I needed to deal with was the roof. The rotten wood framing I found inside the trailer was evidence that water was getting in from somewhere, and the roof was suspect. Even if it wasn’t leaking, there were some improvements I wanted to make.
- Air Vents: I wanted to change the vents that were in the trailer for newer vents with large fans that improve air movement through the trailer. Keeping cool is important when you live in a metal box, and I read so many rave reviews about upgraded vent fans that I knew I had to do it.
- Sewer Vents: I did not know sewer vents were a thing until I climbed up on my roof and saw the pipes sticking out. These vents divert the air from your gray and black water tanks up and out of your trailer, so you don’t have to smell it. The pipes need to be covered so that rainwater, or any small animals or insects, can’t get into your sewer tanks. The holes in the roof also need to be carefully sealed so rain/animals/insects can’t get into your ceiling. My vent covers were completely missing and needed to be replaced.
- Caulk: The caulk that was sealing the other roof attachments, such as the AC, the satellite antenna, and the refrigerator vent, was dry, cracked, and falling apart. At this point, that caulk isn’t doing much to keep out rainwater. I would need to scrape off all the old stuff and reapply fresh caulk. I was also considering using EternaBond roof tape instead of caulk.
- Roof Sealant Paint: I wanted to apply a coat of elastomeric polymer to my aluminum roof. The elastomeric polymer is like thin rubber paint. It’s waterproof and provides an extra layer of protection against water infiltration. It’s also white, which helps reflect the sun’s rays and keeps your interior cooler. I’ve heard great things about this stuff and many RV and trailer owners apply a new coat regularly. I definitely wanted some on my roof to improve the longevity of my aluminum.
Working on the Roof

So, now that the weather was turning towards spring, I climbed up on the roof.
I had to use a ladder that was a bit too short. Standing on the top of a ladder isn’t safe, and neither is putting your ladder on sloped ground. I wasn’t being safe, but the roof wasn’t going to fix itself and there was no other ladder. My husband wasn’t happy but… oh well! You see that this blog is sometimes a what-Not-to-do advice column, right?
Once on the roof, I was careful to put my weight directly on the supporting ribs (trusses?) and not step on the aluminum between them. This is Very important, as the roof is Not meant to bear weight. I also tried to spread my weight out so both feet weren’t on the same rib at the same time.
As a small, light woman I was pretty safe from breaking anything or falling through. A big guy would probably need to bring up a long piece of plywood to step on, thereby dispersing his weight over several support ribs. The aluminum roof is more like a tin can than it is like tin roofing you find on old barns. You need to be careful not to tear it or dent it.
1st: Air Vents
Once I was up there, I got to work on the air vents, scraping away the rotted old caulk with a putty knife that was probably used for drywall in its previous life. Once I removed layers of dirty and flaking caulk, I uncovered the bolts and saw that many of them were rusted. Yay, more rusted screws! I dealt with all of that nonsense once again, removing all of the bolts for each vent and vent cover.
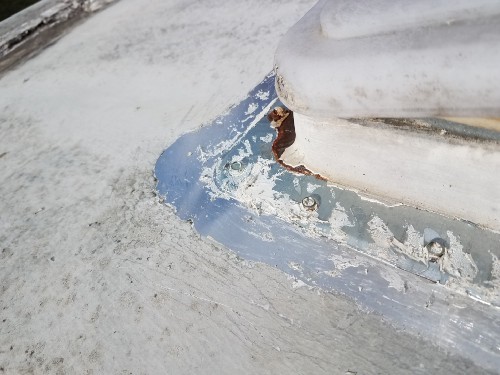
After removing the screws I found that between the plastic of the vent and the aluminum roof was a layer of butyl tape (putty tape). Butyl tape sticks the vent down and provides a waterproof seal between the vent cover and the roof, as well as keeping the screws sealed in. I had to wedge the putty knife under the butyl tape and pry gently at the vent to loosen it from the aluminum. Once the butyl tape was loosened all the way around, I could pry the vents away from the aluminum and expose the hole in the ceiling.
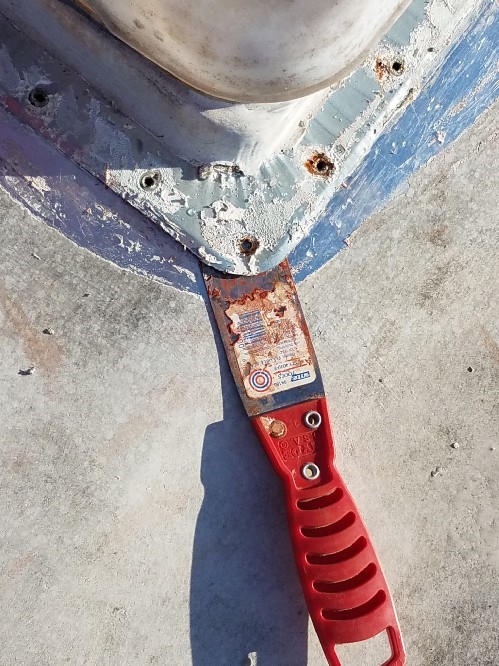
I recommend that you bring a plastic bag up on the roof with you to put the butyl tape in. It’s very sticky and I got tired of scraping it off my shoes, clothes, and the roof (again). Put it right into a plastic bag and you won’t have to deal with it a second time. You can also throw your scraps of putty and old rusted bolts in the bag instead of on the ground and save yourself having to clean up later. It’s good to always have a trash bag around when you’re doing demo. The old air vent cover itself went in the trash as well. The plastic was damaged by the sun and too brittle and cracked to save.
I repeated the same process with the other roof vent. Once I had both of the vents removed, I covered the holes in the roof temporarily with some thick, black plastic that had originally been under the vinyl flooring and duct-taped it down.
The most important thing about taping over holes in the roof is that you have to remember not to step on the black plastic while you’re up there. It sounds dumb, but your brain sees a solid surface and you have to actively remind yourself, “Don’t step on the black plastic”. Otherwise, you can seriously hurt yourself by going through a hole in the roof. I almost sat on the black plastic a few times, and I’m very wary of it when I’m up there.
I decided to replace these old air vents with a new and improved version, the Fan-Tastic Vent. These vents have pretty rave reviews and come in a lot of different versions. You can get ones that have rain sensors and automatically close, or that have thermostats and automatically open and turn the fan on, or Both. I don’t usually buy products with too many fancy automated electronics. In my opinion, that just adds one more thing that can break. I got the standard version where you have to crank it open and turn on the fan yourself. Also, make sure to choose the right model/size for your roof.
2nd: Caulk
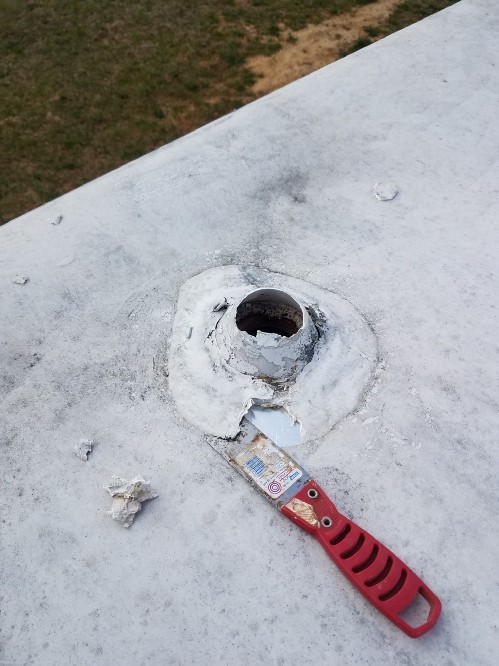
Then I moved on to scraping the caulk off all of the other roof fixtures. Even without evidence of a leak, I figured this would be a good time for a fresh start and to make sure everything was sealed. Even the fixtures that I wasn’t removing or replacing could use a fresh layer of caulk before I put down the elastomeric polymer roof paint (Kool Seal).
It was going along very nicely until I got to the front of the trailer. In the front of the trailer, the siding was curved up to overlap the roof and fastened about 6 inches back. It makes sense if you consider that the trailer will be moving along the highway at 70 mph and the rain will be driving into the front of it while it’s moving. Wrapping the front up and over the roof keeps there from being a seam for the rain to drive into.
However, the overlap created a ledge where rainwater pooled at the front of the trailer. Rainwater pooling on your roof is never a good thing. In this case, there were many layers of different kinds of caulk crammed into this seam. I think it was an attempt to fill in the low spot and keep the water from pooling.
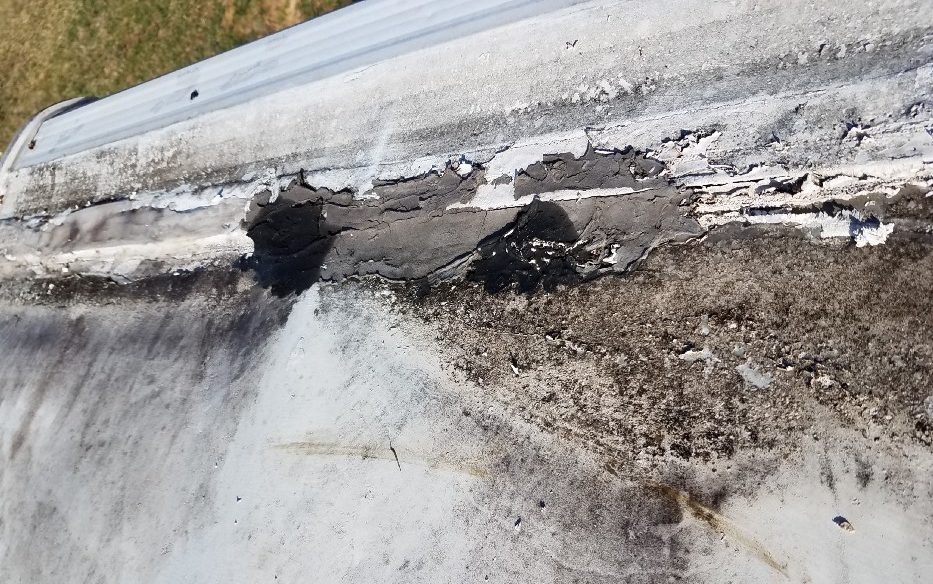
Once I got it all scraped away, I exposed screws that were attaching the siding to the roof where it curved over. I realized then that in order to remove the siding from the front of the trailer, I would have to unscrew it here, where it was fastened to the roof. That was something of a problem for me, as it didn’t align with my renovation plan.
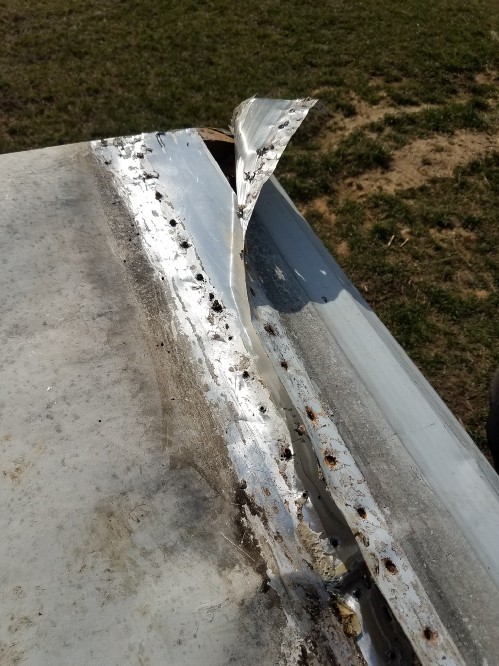
Remember that I found extensive water damage in the front of the trailer. The wood framing crumbled under my hand from years of water rot. The damage was extensive and all of that rotted framing needed to be replaced. The easiest way to replace it would be to remove the siding on the front of the trailer for better access.
In order to remove the siding, I would have to unscrew it from the roof. Unscrewing the siding on the roof After covering it in fresh caulk and a layer of Kool Seal would be stupid. Therefore, I decided that the smartest order of operations would be to repair the front of the trailer before resealing the roof. Then, once I sealed it all up I wouldn’t have to take it apart again, hopefully, Ever.
Unfortunately, that was not how I planned it. I thought I would do the roof first, and then work the framing at the front of the trailer. Now I realized the roof would have to come after I’d removed, repaired, and then replaced the front of the trailer.
New Plan – Remove Siding
Unfortunately, I’d already taken the roof apart and there were some pretty big holes that would let the rainwater come right into my trailer. It was too late to put everything back, and I couldn’t move forward with the rest of the renovation until the frame on the front of the trailer was fixed. However unfortunate it was, I didn’t really have a choice. My order of operations was off and all I could do was move forward.
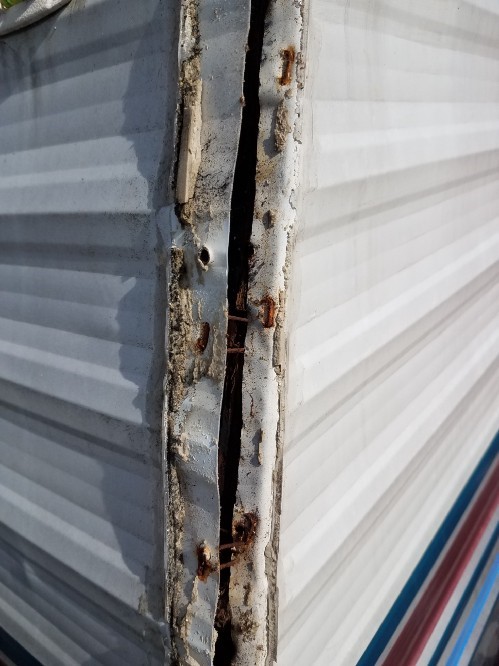
I taped over all of the holes in the roof with plastic and started unscrewing the siding from the front of the roof. Then I used a screwdriver to pry up the vinyl cover and peeled the plastic away from the corner molding on the front two corners of the trailer. The plastic covers the bolts that attach the aluminum corner molding to the wooden frame. I started unscrewing all of those (rusty) bolts.
Once the bolts were out, the corner molding was still being held on by a layer of butyl tape that needed to be scraped off. I pried up the corner molding carefully because I was planning to use it again. It was the vinyl cover on the molding that failed to keep the rainwater out, not the aluminum. Those corner pieces would be perfectly good when reapplied with some fresh sealant.
As I removed the corner pieces it was obvious that this was how the water got in to rot the frame. The plastic screw cover and the butyl tape failed to provide a waterproof barrier. Water had been slowly seeping into the gap between the two pieces of aluminum siding and soaking into the wood frame.
I was pretty happy to discover this because it’s a simple problem with a known solution. All I had to do to prevent it from happening again was reapply everything with fresh butyl tape and make sure the seal was good. Simple problem, simple solution. If the previous owner had taken the time to reapply fresh caulk every spring, I wouldn’t be taking everything apart right now to replace rotten wood. Maintenance! Maintenance! Maintenance!
Removing the Siding
Before taking off the aluminum siding I had to take out the plastic window cover, the front window, and the running lights on the front of the trailer. Lots of unscrewing bolts and dealing with more rust. I swear, I’m using rust-resistant screws on Everything when I reinstall. I put aside the window and window cover to be reattached later. I’m hopefully going to replace all the running lights with LED versions, but I saved them anyway.
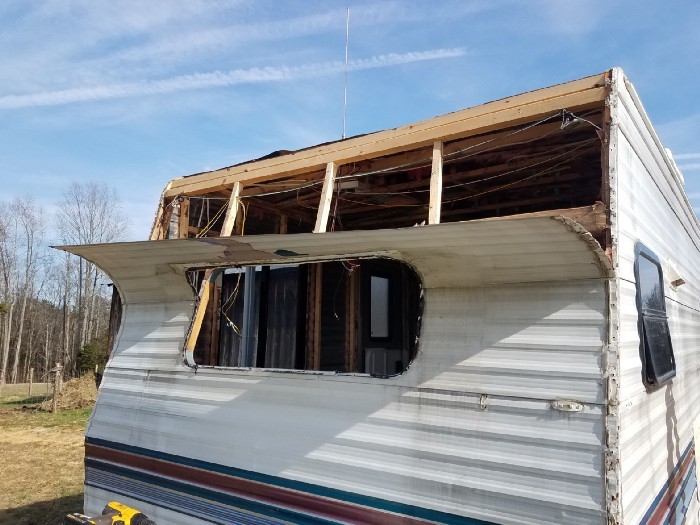
I also removed the propane tanks and the battery from the trailer hitch to make it easier to work on the front of the trailer. With those out of the way, it was easy to pull off the siding, one panel at a time. I carefully put it aside where it wouldn’t get bent or ripped. Corrugated aluminum trailer siding isn’t too expensive, but the cost of shipping is murderous and I wanted to reuse all of my siding panels.
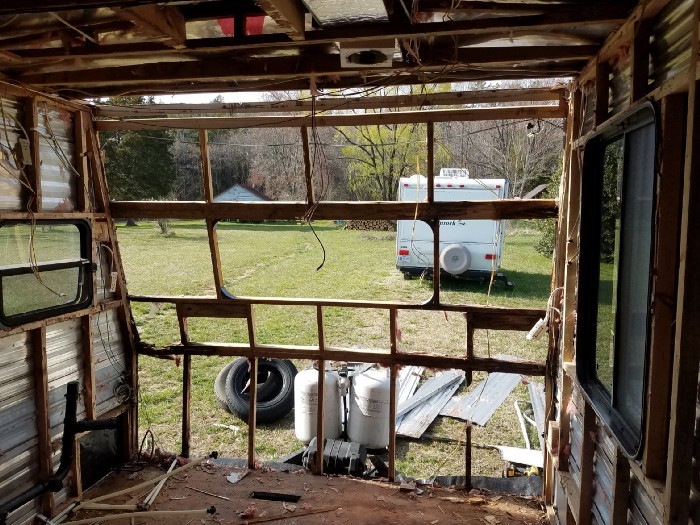
Now my trailer was exposed to the world and I was ready to start repairing the framing. I rigged up a tarp to cover the whole front for rainy days. I was hoping it wouldn’t take long to get the siding back on and the roof sealed up. Tarps are notorious for blowing away, ripping, and leaking. I didn’t want to trust my trailer to a tarp for any longer than I had to. A week or two, I figured.
Spoiler alert, it took longer than I thought! Click on the link below to see the next part of our renovation.

