Rebuilding the Wind Rose – Part 4
This is the story of how my husband and I purchased a 20-year-old travel trailer and I DIYed the crap out of it to make it suitable for full-time living. In this series, I’m giving All of the details about the process through every step, as performed by me, a 26-year-old woman with No experience in construction. The first installment in this series is below, detailing the purchasing process and the changes I planned to make. You can follow along in the series by clicking on the link for the next article at the bottom of each page.
Doing the Research
This next step covers a lot of time and effort all at once. I also did a lot of research while I was working on this step of the renovation. I work at a library so it was easy for me to search through the non-fiction section for books on electrical wiring, plumbing, woodworking, and general construction. I looked for “101” or “Beginner” or “For Idiots” type of books since I definitely qualified as completely ignorant on these subjects. I highly recommend doing a lot of reading when you’re planning your own DIY renovation. There were a few books that I found very useful.
- Woodworking 101 for Women: How to Speak the Language, Buy the Tools, & Build Fabulous Furniture from Start to Finish — Marilyn MacEwen
- Wiring Simplified: Based on the 2017 National Electrical Code — Frederic P. Hartwell, Herbert P. Richeter, W. C. Schwan
- RV Electrical Systems: A Basic Guide to Troubleshooting, Repairing and Improvement — Bill Moeller
- Tiny House Designing, Building, & Living (Idiot’s Guides) — Andrew Morrison, Gabriella Morrison
- Camper Rehab: A Guide to Buying, Repairing, and Upgrading Your Travel Trailer – Chris Peterson
I borrowed most of these books from my local library, as well as many other books that were helpful in some way or another. Your local library no doubt has a section for How-To Guides that you can borrow for free! Just be careful not to damage the books while you’re working. If your library doesn’t have the books, or you want to add them to your personal collection, I’ve added the links to Amazon.
I also read a Lot of blogs by other RV and travel trailer DIYers. Many of these blogs are fairly useless “re-decorating” blogs that don’t go further than paint and new curtains. However, there are a few that got down to the studs and gave me at least an idea of the steps in the process and the challenges I might face.
AxelAddict has multiple renovation articles about RVs and campers that I found helpful. I also posted some of the other gems I found to get you started.
https://axleaddict.com/rvs/2002-Palomino-RV-Floor-Repair
https://www.livesmallridefree.com/blog/rebuilding-the-toaster-before-during-after
http://makingmemoriesrv.blogspot.com/2012/07/making-memories-rv-remodel.html
The Bedroom
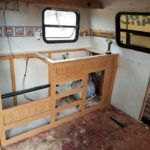
As I discussed in the previous article, water infiltration was the main issue with the Wind Rose. After opening up the walls in the front of the trailer and finding a lot of pretty bad water damage, the next task was to open the walls in the back of the trailer. I needed to see if the water infiltration back by the bed was as bad as in the kitchen. I had the same problem I’d had in the kitchen when accessing the damaged corners; cabinets in the way.
First thing was to get the bed out of there. The big block of cheap foam on the plywood platform was… gross. I got rid of it. I never wanted to touch that with my body.
Underneath the foam “mattress” was just plywood. Under that was the bed box. The plywood sticks out over the edges of the bed box by a good 6″ and lifts off the box on hinges, with pneumatic lifts to make lifting it easier and to make it stay up. This area is used for storage, with an outside access compartment against the wall and the converter/charger and circuit panel in there as well. There was also plenty of room for storing seasonal clothing.
I had to unscrew the pneumatic lifts and the hinges and remove the plywood platform to give myself some legroom in there. I stored the plywood and the hardware to put it back together later.
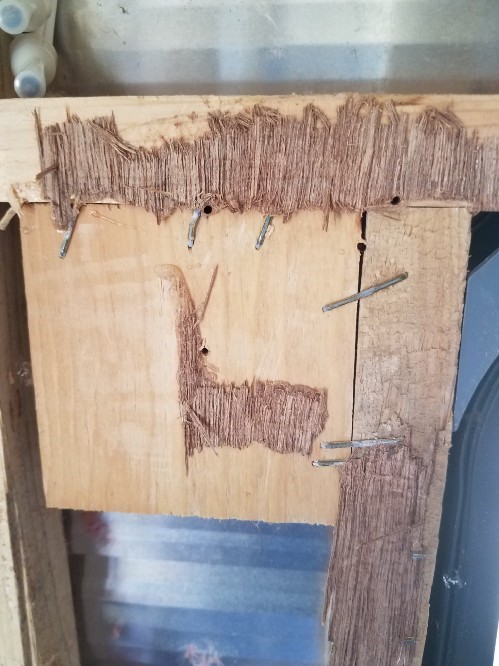
The hardest part of demoing this trailer is that almost Every screw was rusted. Badly rusted. The heads were so rusted that they were immediately stripped by the power screwdriver I was using. Some of the time I could get them by pushing down really hard, but most of the time I couldn’t. Other screws were so rusted they had partially dissolved into the wood and were stuck. Others were so rusted that they broke in half and the top part would easily come out while the bottom remained deep in the wood where I couldn’t get it.
There were lots of screws that I had to literally pry out of the plywood with a crowbar. Sometimes, I had to put the crowbar under the piece of wood and forcibly separate the two pieces, getting the screw out indirectly. This is Not recommended, as it splinters the wood and bends the screw, and also requires a Lot of muscle. I’ve since learned of a tool called an “Easy Out” that is used for rusted or stripped screws. I’ll update you on this tool when I get a chance to use it. Sometimes, ignorance just leads to a lot of unnecessary hard work.
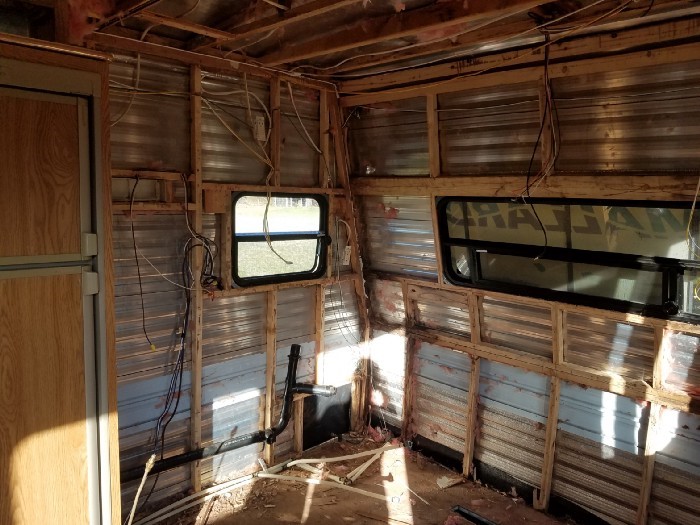
Next, I tackled the overhead cabinets and the bedside tables. More unscrewing rusted brackets and yanking with the crowbar. Again, I couldn’t save the cabinets. I’ll have to rebuild something myself, but at least this way I can customize the storage to my needs. Then I ripped the luan siding off and exposed the framing. Unfortunately, the luan, insulation, and the framing underneath was wet, which meant the leak was still ongoing. I ripped everything out of there and checked the state of the wood. Not too bad!
This was a huge relief. The leak in the back must be pretty recent since there was hardly any rot, just wetness. I wouldn’t have to do the same kind of huge project back here that I needed to do in the front. However, now I was feeling pretty paranoid about water infiltration. If this was leaking, what else was? And if the front was rotted, where else may rot be hiding under the walls?
At this point, I had to make a choice. I needed to decide whether I was going to rip All of the luan siding off of the Entire interior, or just hope for the best. I didn’t make the decision lightly since that would be turning some spotty repairs into a full-on renovation. I made a Pro-Con list to help decide.
Pros
- I could put in new, better insulation and bring our heating/cooling bills down by a lot.
- I would have an easier time painting fresh luan than going over old wallpaper.
- I could be Certain that our framing was in good condition and not rotted.
- I could do the wiring updates I was planning more easily with the walls open.
- Luan is cheap so the budget wouldn’t suffer.
Cons
- It would add a Lot more time to the completion date.
- It would mean a Lot more work for me.
- It was intimidating and frankly terrifying to think of ripping apart my brand new (old) trailer.
In the end, the lure of updated wiring and better insulation got me. I hate inefficiency and after seeing the cheap, thin insulation that came installed from the factory, I couldn’t stand the thought of all our money radiating out into the air. I’d read a lot about how drafty and difficult it can be to heat trailers over winter, and after seeing that insulation, I’m not surprised. Also, I wanted a few more outlets in some strategic places. Also, I couldn’t bear not knowing if there were more rotten places I didn’t know about. I needed to be Certain that there was no more rot and no other leaking behind the walls.
The Big-Deal-Full-Reno Begins
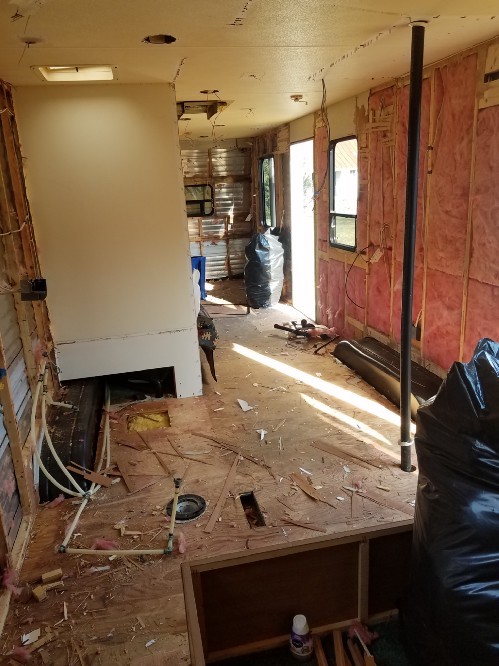
So, I dove in and went full-on Destruction Mode. I ripped and tore and pried. I spent days manhandling all of that luan and I was really glad it was January. I would not want to be doing all of that in the summer heat.
As it was, I had to buy a mask and safety glasses to keep all of the sawdust and fiberglass strands out of my eyes and lungs. After two days of a scratchy throat and itchy eyes, I was glad to have my Personal Protective Equipment (PPE).
The luan was Full of staples and glue. I swear, it’s like they thought it was going to try to get away. Maybe they were thinking if they put enough glue on it would hold those flimsy walls together longer? There’s no way I’m putting that much glue and that many staples on the new paneling I will install. I ended up leaving quite a bit of the old luan stuck to the studs in long splinters. It’s not going to be fun to get that off later.
I also had to remove all of the outlets and little appliances and other things that stick out of the trailer walls. Using the power screwdriver made this a lot faster, but some of the plastic covers didn’t allow the power screwdriver to get in there. I ended up using my hand screwdrivers quite a bit and I can tell you, it doesn’t take long for your wrist to get sore after a lot of twisting. In the end, I had a tote bag that was full of light covers and light sockets and meters and all the other random bits and pieces that came off the walls. I don’t know how many I’ll reuse, but I can always throw them out later.
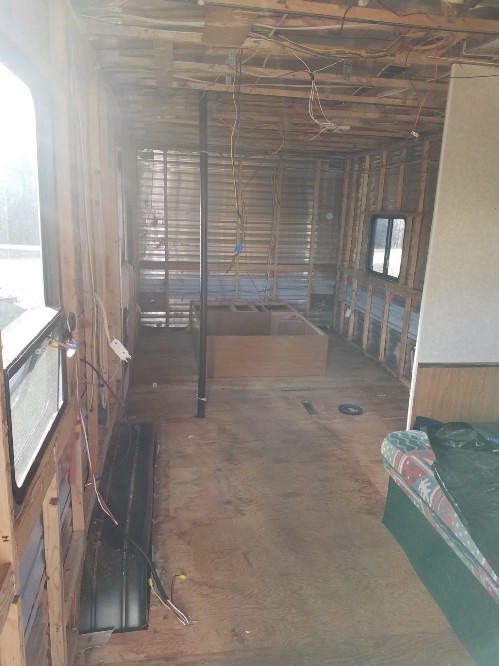
In full destruction mode, I decided to demo the bathroom area and the closet as well. I needed to completely reconfigure that area to fit in my bigger shower. The only thing I decided to leave alone was the couch area. Although, with a little bit of water damage showing under that window, even that area might eventually have to go.
I saved the insulation that came out in one piece since I might want to stuff it into the flooring or somewhere else. I could always throw it away later if I didn’t use it. The luan all went in the burn pile. I found a Ton of dead stinkbugs behind the walls. Gross. The builders had put all of the electrical wirings through the closet so I had to cut it to demo that area. It’s always distressing when I have to cut wires because I know I’ll just have to splice them back together later. Oh well.
The Bathroom
Taking apart the bathroom involved disconnecting all of the water tubings to the shower and sink, then unscrewing the tub from the wall and its wooden base and carefully taking out the toilet. They used a lot of screws on the shower and they were the “self-taping” type that has a plastic washer on the end to keep out the water. They were also covered by a plastic strip that I had to peel off. Again, rusted screws are a Huge pain. I was surprised by how high off the ground the shower was, but they had to fit a conventional p-trap pipe fitting under there. I’m going to have to come with another method because my husband needs all the height he can get in the shower with the short ceilings.
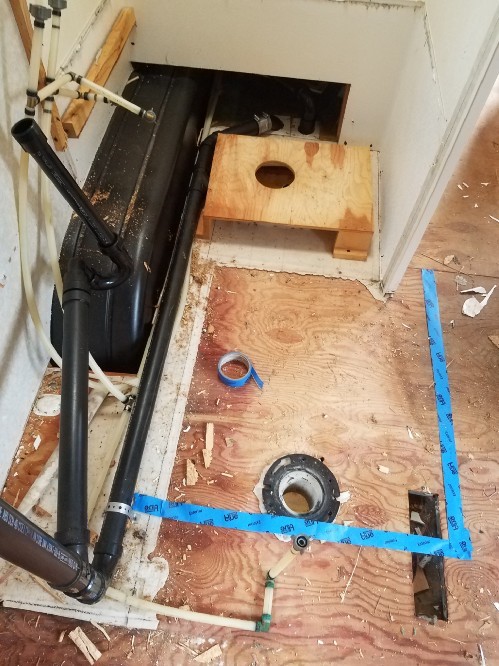
On the other hand, the toilet was surprisingly easy to remove. You just unscrew the four big bolts and then twist and lift. RV toilets are especially easy because they’re plastic and small. Next, I pulled the sink vanity apart and knocked down the flimsy walls separating the bathroom space from the bedroom and hallway. Easy as pie. I saved the toilet because it worked perfectly and was barely used. I will clean it very well before reinstalling it, believe you me. I did not save the shower because the plastic was yellowed and brittle. No one was going to want that. Same with the tiny sink. That cheap plastic did not age well.
The new configuration for the plumbing is going to be tricky. I’ll let you know how that goes when I get to that. I saved the wall that divides the bathroom from the couch since I plan to keep that division in place. I’m going to put the toilet where the shower used to be, right next to the couch. I’m going to make the walkway more navigable by using a heavy curtain instead of a door for the toilet room. Or maybe a folding door? Something like that.
I left the plumbing where it was for the most part. I did remove the black water vent pipe and the shower plumbing because I’m going to have to move those pieces later and with them out, it was easier to navigate the space. All I did was unscrew the metal pipe hanger from the floor and then twist off the pipe at the joint. I put the pipes outside because I wasn’t sure if I was going to reuse them and they weren’t going to get ruined by the weather.
Salvage!
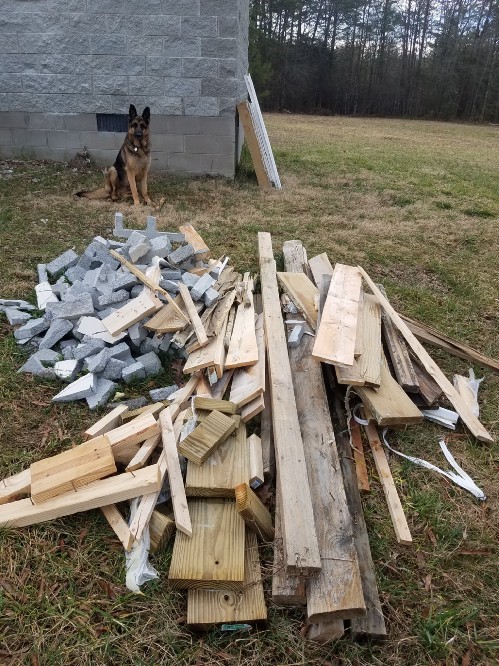
During this time I also took the chance to salvage some lumber scraps from another renovation project taking place on the farm. The good thing about the Wind Rose is that the dimensions are small so scrapped wood from a project like a house can still be useful. Anything that was too big could be ripped (cut lengthwise) or cut to size. As most of the framing was done with 1×1 lumber (technically 1.5×1.5 but they don’t call it that) I would probably be getting double use out of the 2x4s that I salvaged.
I tried to salvage anything I could during this project because saving money is a smart woman’s game. I didn’t want these pieces to get thrown out or burned, so I popped them in the back of my Subaru Outback and took them up to my trailer site.
After many days of demolition, I had my trailer stripped down almost to the studs. It’s funny to sum it all up like that because this was a Lot of work and a lot of hours. It wasn’t complicated, just involved muscle. I think a man could have done it faster because a lot of the time I was throwing my weight against the luan and it was just bending instead of breaking. Also, there was a lot of luan that was over my head and that made it harder to get good leverage on it. My husband is 6″ taller than I am and has a lot more man muscle that he could have thrown into it. I’ll admit, I was jealous of that height and muscle while I was doing this part of the job.
On the other hand, I definitely built some muscle of my own doing this demo work. Ladies, you can do it, it just might take longer.
The Ceiling
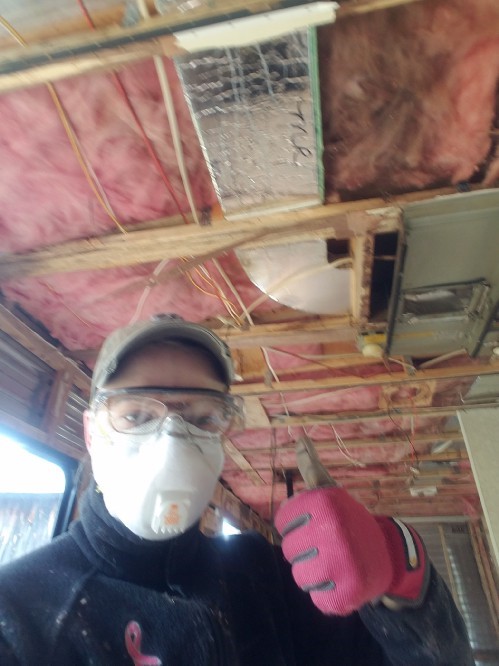
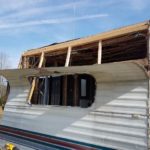
After stripping the walls, I moved on to the ceiling. I had to remove all of the lights and vent covers and the AC cover. Then I pulled down the luan and the insulation. My safety glasses and mask definitely came in handy during this part. My work gloves are a must-have for the whole project.
The hardest part about removing the ceiling was that the luan had been glued into place Before the roof went on. Yes, you heard me. The edges of the luan were sandwiched between the wall studs and the roof beams. I’m pretty sure that all four walls and the roof were built and finished with luan and wallpaper separately, then just put up like some kind of barn-raising. So, I couldn’t grab the edges and pull it off because the edges were underneath the wall supports.
I had to find a way to cut the luan at the edge of the studs so I could get it down. I hated the idea of using some kind of power-cutting tool over my own head. That’s a horror movie situation if there ever was one. I also didn’t like the idea of accidentally cutting too deep and ruining my roof. Worst of all, no matter how I did it, I was going to have a layer of sandwiched luan remaining between the wall studs and the roof supports. *sigh* Nothing is ever easy.
I ended up using a Dremel with a drill bit. It’s light, not too dangerous, and it was what I had on hand. The drill bit in the Dremel went through the luan and then I slowly and carefully dragged it along the edge, letting the drill bit slowly cut the luan. This wouldn’t haven’t worked if luan weren’t so thin and I ran the risk of snapping the drill bit with the sideways pressure. It’s definitely not designed for this use. However, I successfully cut the luan edges without breaking the drill bit, cutting the roof, hurting myself, or any other disaster.
I had to add earplugs to my PPEs at this point because the Dremel was Loud and it screeched awfully when it was cutting the luan. Luckily, that part when pretty quick. I didn’t manage to make all of the edges neat and nice, but I can always trim them up later. I’m realizing now that there will be a much more finely tuned portion of the demo that will involve neatening up all the rough work I did so quickly. I could have used a Sawzall (reciprocating saw) if I had one. I also could have used a multi-purpose oscillating tool with an edging bit, if I had one. I discovered these tools later in the process and I’ll tell you all about them when they get their first use.
Demolition Despair
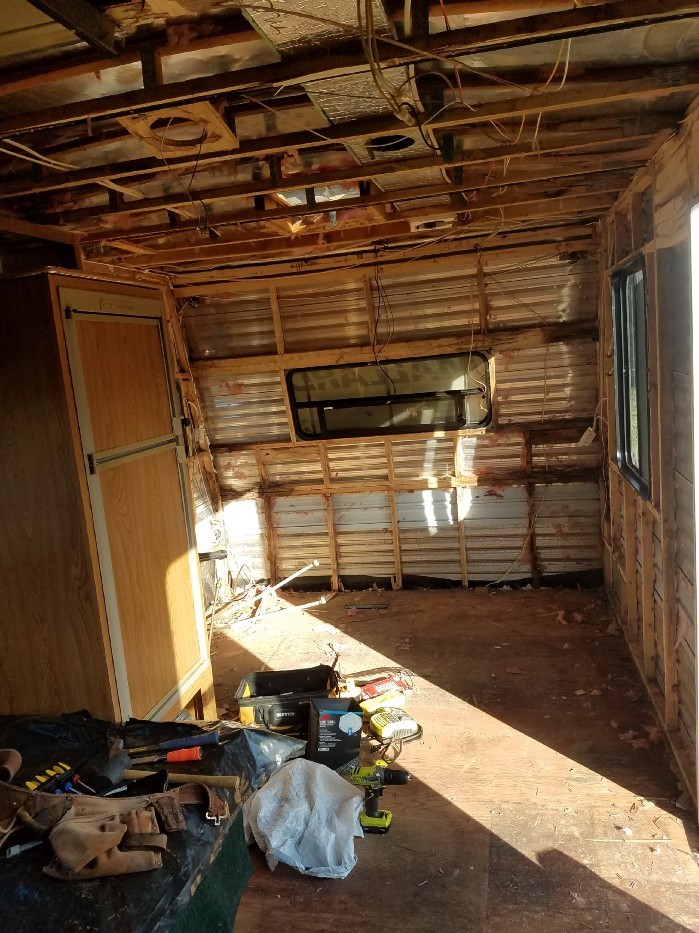
At this point, after many long days of exhausting work, I had to fight back despair. The trailer looked like a pile of trash. I wouldn’t have bought this from someone for $500, never mind the $3,500 I paid for it! I can’t help but look at this mess and think… “What have I done?” I took my “perfectly good” (it wasn’t, actually) trailer and turned it into a lifeless, gutted hulk! If only I’d known beforehand I could have bought a gutted one and saved myself the trouble! How did I get here?!?
It was so overwhelming to think of the steps needed to get this trailer looking like I dreamed it. I had to keep reminding myself of the logical, necessary choices that brought me here. Although the trailer looks horrible, it’s not fair to judge at this point because it’s not finished. Also, realistically, the value of the trailer remains. Google what a 30′ steel trailer frame costs and you’ll see that $3,500 would have been a good deal even if we’d only bought the frame! The rest of the value is in the appliances that I’ll reinstall (AC, range/oven, water pump, furnace), the propane/electric refrigerator ($1,000 value), the good aluminum roof, the windows ($300 each), and the aluminum exterior. The truth is, even with no interior walls or furnishings, I couldn’t build a trailer for the price I paid for this one.
So, I tried my best to block out the panic and negative voices in my head and kept my head up. I was learning so much, practicing new skills and making progress! Even if the progress feels like going backward. I couldn’t think about the insanely long list of things that I needed to do to complete the project. It was too stressful and panic-inducing. I focused on the next step. Just the next step. I highly recommend this if you’re ever renovating Anything; from your whole house to a single room to a camper trailer. I’ve discovered that this moment of panic and regret is universal. Everyone faces it at some point in the project. Push through and just do the next step.
My next step would be getting the roof ready to reseal since by this time it was March (2 months later!) and the weather was getting nicer. I didn’t want to start putting new stuff in the interior until any chance of leaking was taken care of. No sense repairing things and then having them get wet. So, to the roof, I went!
Click on the link below for the next installment.