Renovating our 1997 Fleetwood Mallard for Full-Time Living (Part 6)
This is the story of how my husband and I purchased a 20-year-old travel trailer and I DIYed the crap out of it to make it suitable for full-time living. In this series, I’m giving All of the details about the process step-by-step, as performed by me, a 26-year-old woman with No experience in construction. The first installment in this series details the purchasing process and the changes I planned to make. You can find that article in the link below and start at the beginning. Then, follow along in the series by clicking on the link for the next article at the bottom of each page.
Full-Frontal Demolition
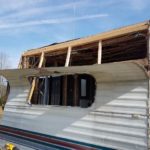
At the end of the last post, I had stripped the aluminum siding off of the front of the Wind Rose in order to start working on the water-damaged framing. I have to finish reframing the front of the trailer before I can re-seal the roof.
This is the last big demolition project for the trailer! Once I take down the rotted wall, I’ll have demolished everything in the trailer that needs to go and can officially begin to rebuild. That’s not to say there won’t be a little more demolishing here and there as I go, but for the most part, I’ll be done destroying. I’m very ready to be done destroying. I want to start creating.
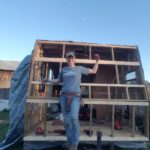
My first order of business was to take a lot of pictures of what the frame looks like and draw a diagram. I got measurements of each dimension in the frame and wrote it all down in my project notebook. I knew that I would need an accurate reference when it came time to rebuild the frame.
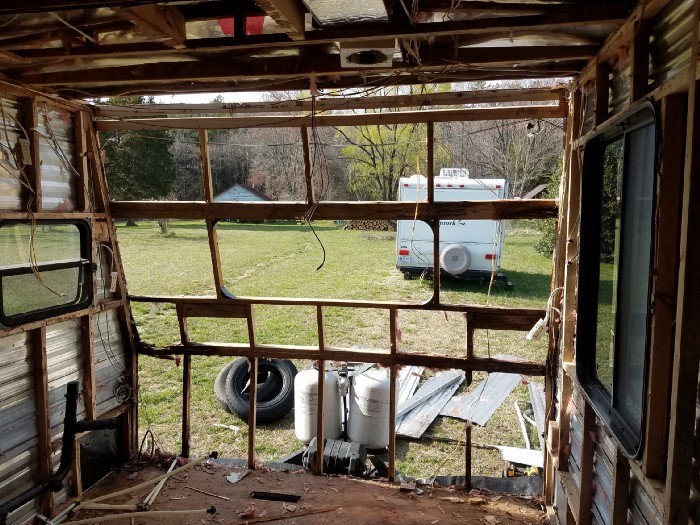
In a lot of trailers, you wouldn’t have to remove the whole wall, just a few rotted sections of wood. Unfortunately for me, the rotted sections were at all the edges and corners. I ended up just pulling out everything and trying to save individual boards when I could.
I advise you to be careful and measure twice when you’re creating your diagram. Make notes of what size boards are being used as well. Most of the boards in my trailer were 1.5″ x 1.25″, officially called a 1×1. Other boards were actually 2x3s, and very rarely there was a true 2×4. I did not do as good a job with this as I should have and I ended up having to make some adjustments on the fly and re-do parts of the frame. You will be referring to the diagram constantly, so make it detailed and accurate.
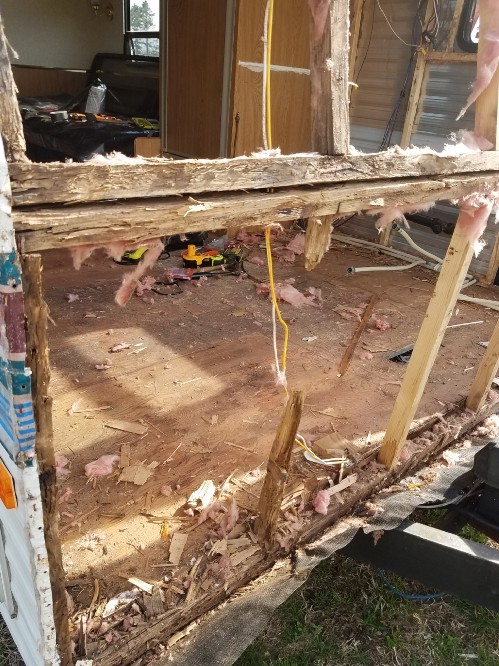
Pay careful attention to where the boards join. Do they join at an angle? Which board is the end and which is the T? The front of my travel trailer, the Wind Rose, comes together at an angle. The bottom half of the front wall leans out slightly, and the top half of the front wall leans back in. This is to make it more aerodynamic when it’s being towed, but I did not put the angle in my diagram. I ended up having to guess and that meant cutting and recutting until something fit well enough to make do.
Once I had my diagram all drawn up I started ripping out the front framing. I wasn’t too careful with it since so much of it was badly rotted. There were a few wires that I had to cut in order to draw them through the holes in the wood. Wires are easier to cut and splice back together than wood is.
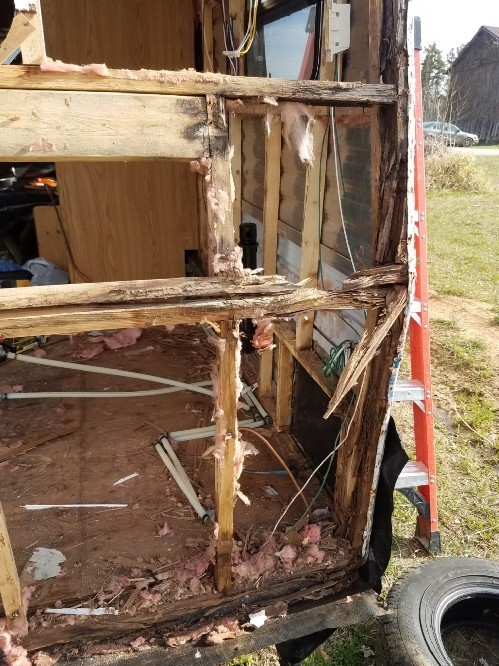
I also had to remove the rusted staples on the corners and peel back the aluminum that was wrapped around the corner pieces. Be careful, the aluminum is thin and will tear pretty easily. It’s also sharp on the cut edge. I always wear my leather gloves so I didn’t get cut, but the siding did catch on my clothing and it also tore the tarp I put over it for the night. I ended up dealing with a lot more rusted screws and bolts, as I’ve now come to expect. However, most of it came apart very easily because it was already rotted and falling apart. Water damage is no joke!
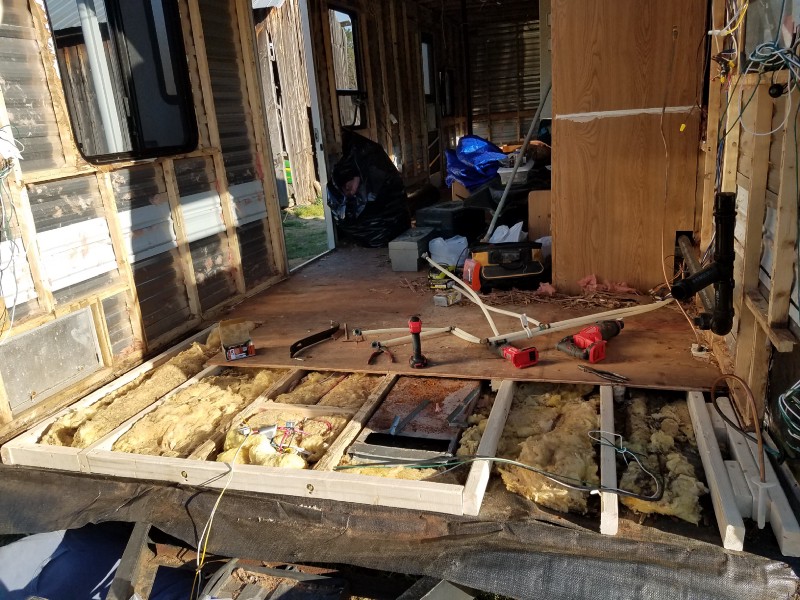
Surprise Floor Demolition
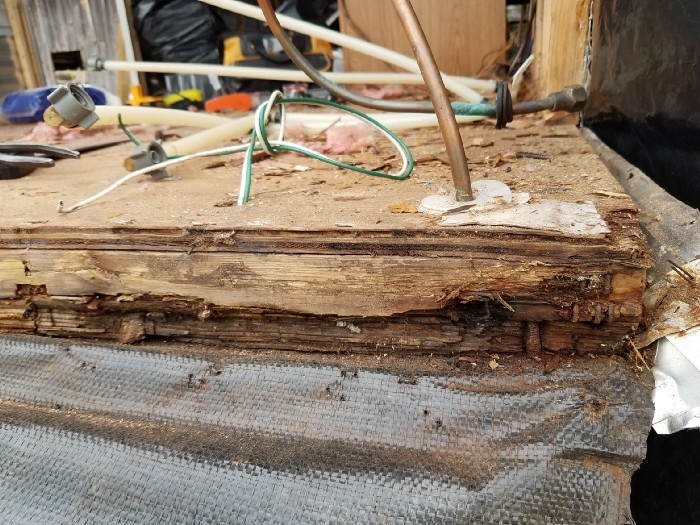
Once I had the framing off, there was an unwelcome surprise for me. The floor joist that had been touching the rotten framing was also badly rotted. Apparently, the water that leaked in at the corners ran down the inside of the wall and onto the floor, where it was strapped by the vapor barrier and pooled inside the floor. The vapor barrier is wrapped around the underside of the trailer to prevent water from splashing up off the road while it’s being towed and rotting the floor. That’s great, except the water barrier works both ways and trapped the water from the leak in the floor. The rot had spread to the floor joists! That’s part of the problem with water rot; it will spread from board to board wherever they’re touching.
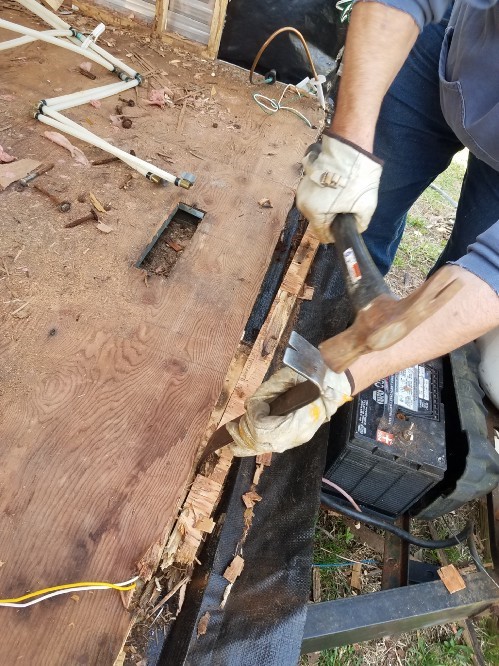
We had quite a time getting that end cap joist off because it was bolted to the steel frame of the trailer. I had to crawl under there and get a wrench into some very tight spaces to get the carriage bolts off. The bolts were so rusted that a few of them broke off rather than unscrewing.
Then we realized that the plywood was glued AND stapled to the floor joists all along the length, with a staple every inch or so. They certainly made sure it would stay down. So we ended up using a battery-powered circular saw to cut the plywood at the edge of the rotted joist. Circular saws have a way to set the depth they will cut, so we set it to 3/4″ (the depth of the plywood) and managed not to cut into the other floor joists while cutting the plywood. With the half-rotted plywood scraped off, we used a crowbar and a hammer to separate the rotted joist from the rest of the subfloor.
At this point, we discovered that the floor joists ran lengthwise down the trailer, from front to back. The end joist that we removed was the only one that ran across the trailer, from side to side. That made it easier to work with because we could see into the underfloor without having to cut more plywood. Unfortunately, what we could see is that the water had damaged the bottom of the floor joists for a way along their length. The water must have pooled on the vapor barrier and turned into a little pond that the joists were sitting in, rotting where they touched the vapor barrier.
Replacing the floor was not in my plan! But, now that we knew about it, we couldn’t leave it like that. Luckily, there was a steel bar about 4ft down from the front of the trailer that ran across its length, supporting the long floor joists. That steel bar was a high point in the vapor barrier that stopped the water from going down the whole length of the trailer. So our joists were only rotted at the front 4ft of their length.
We decided to cut away the plywood in order to access the rotted joists and replace them. While we were at it, we also cut away the part of the plywood that used to be the outdoor access storage area. It was water damaged, probably from people putting wet hoses and things into the storage compartment. We could replace that soft spot while we were at it.
After a lot of consideration and discussion, we figured the easiest thing to do would be to cut off the most rotted parts of the joists and then slide new joists in next to them and attach the two together. The new supports would be slightly offset from the original ones, but it would still hold the floor up and we wouldn’t have to cut too deep into the floor. I didn’t want the project to just keep getting bigger and bigger.
Figuring out these little problems can be difficult and frustrating, as well as time-consuming. You can spend a long time just staring at the problem, working it through in your head. Technically, you’re making progress, but it doesn’t feel like it! Cutting is easy; deciding what to cut is hard. Finally, we made a list of the supplies we would need; lumber and hardware.
Shopping
Next, we took a trip to Lowes! Why Lowes? It’s the same distance as the Home Depot, but I once worked a seasonal job there so I know it better. I have since learned that Lowes is usually the slightly lower quality and cheaper option of the two stores. Whatever floats your boat.
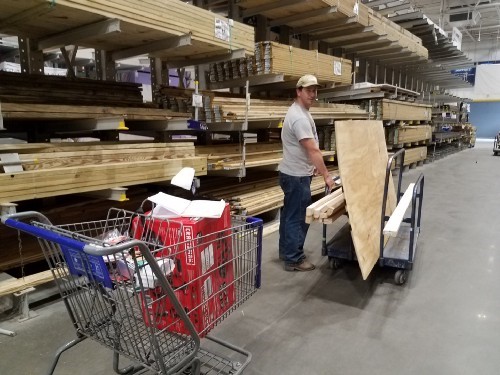
We went looking for a Sawzall because my husband swore up and down that it would come in handy in so many different ways. We ended up buying a $300 set of 7 tools with 2 batteries and a battery charger. I was surprised to be bringing it home but I shouldn’t have been. Show a man a set of power tools… In all seriousness, it was a good deal. The cost of the set meant getting each tool for about $25, and it came with a tool bag and basic accessories for the tools. I hate being upsold, so I was pretty skeptical, but in the end, it made sense. I used every tool in the bag in the first week, so at least there’s that.
We got a circular saw, an oscillating tool (multitool), a reciprocating saw (Sawzall), an angle grinder, an electric screwdriver, an impact driver, and an LED lamp. That came with 2 rechargeable batteries and a battery charger, a blade for the saw, a blade for the multitool, and a sanding set for the angle grinder. All of these were the lower-powered (cheaper) versions meant for home repair, rather than the high-powered versions meant for commercial or professional work. The people at the store were very helpful in choosing a good brand.
Some tips for the store: bring the old bolts and screws that you’re planning to replace. It’s a lot easier to hold up the new and the old and see if they’re the same than try to guess. Bring your notes and diagram so you’ll know how much of what size lumber you need. Be specific when you’re looking at plywood; they have a million different sizes and types.
Fixing the Floor
We cut out the rotted joists and sawed the new timber to fit. We didn’t replicate the old layout of joists exactly, but in retrospect, we should have. We thought we understood how the weight distribution and support worked, but we didn’t. Word to the wise, the people who put these things together aren’t Complete idiots. They might have a good reason for how they do it.
Originally, there was one long 2×3 that went across the whole font. We decided to make longer joists going front to back, and use smaller pieces across the front to join them. We now understand that the one long piece was bolted to the steel frame and prevented the trailer from sliding forward on the frame. We’re pretty sure our configuration will also work, but the other way was better.
Once the new boards were bolted down to the steel frame at the front and securely bolted to each other, I drilled holes for the electrical to run through the floor. I don’t like drilling holes in my freshly finished framing, but it has to be done. Putting a hole in the middle is better for the strength of the wood than cutting a channel at the top or bottom. The wood will strain and flex at the outside edges before it flexes in the middle, so the outside edges need to be stronger.
After the electrical wires were run through the frame and properly spliced I hauled out the bag of insulation I saved from the walls and layered it thickly in between the floor joists. Remember that there is nothing but a layer of thick plastic tarp under those joists to separate the floor from the road. Without even a second layer of plywood, the insulation value of the floor is very low.
Unfortunately, I’m not planning to rip up the entire floor to re-insulate it. The plywood is too difficult to remove since it’s glued and stapled to the joists. I’d end up having to replace it all and it would just be a huge pain. As it is, I’ll do what I can with this piece of floor. At least the floor will be a little more insulated. The insulation that was in the floor originally was deteriorated from the water and I trashed it. I put about 3 new layers of insulation in the newly repaired section where they had only put in 1 layer. It’s not a good idea to pack insulation in tightly because the loft is what insulates, but you can pack it in a little bit. I think that part of the floor is much better insulated now.
I did have a little trouble here with an unexpected and sudden downpour. Without the tarp protecting my trailer, the downpour poured itself directly into our subfloor, putting a fresh puddle of water under the joists. We soaked it up with towels and had to let it air/sun dry for a few days before putting the insulation in. These kinds of delays are inevitable but So aggravating! I kicked the tires and growled in frustration and bemoaned the time lost. But there was nothing more we could do. If we didn’t let it dry out sufficiently, we would just be creating more problems for ourselves down the road.
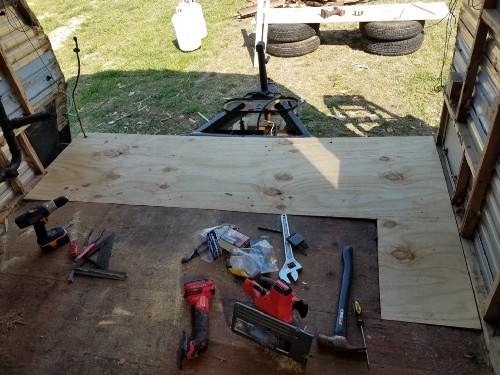
While waiting for the floor to dry, I cut up a piece of plywood to match the hole we cut in the floor. I drilled holes for the wires and for the propane pipe that will go to the water heater. I cut a hole for the heater vent and ended up having to trim some of the edges a few times before I got a tight fit. There were still thin gaps at the edges. Cutting in a straight line is more difficult than it seems. Those handheld circular saws are not the easiest tools to use either.
However, I was happy with how it turned out in the end. I screwed it down with several screws on each joist, paying careful attention to the edges. After that, I was finally ready to start cutting wood for the frame. We needed to get the floor done first in order to get accurate measurements up from the new plywood.
With that unexpected problem solved, I was ready to move on and rebuild the frame for the front of the trailer! Click on the link below for the next post.