Renovating our 1997 Fleetwood Mallard for Full-Time Living (Part 11)
This is the story of how my husband and I purchased a 20-year-old travel trailer and I DIYed the crap out of it to make it suitable for full-time living. In this series, I’m giving All of the details about the process step-by-step, as performed by me, a 26-year-old woman with No experience in construction. The first installment in this series details the purchasing process and the changes I planned to make. You can find that article in the link below and start at the beginning. Then, follow along in the series by clicking on the link for the next article at the bottom of each page.
Just a Tiny Bit More Waterproofing
After weeks (WEEKS) of working on the outside of the trailer trying to get it waterproof so that I could start working on the inside, I was finally ready to move on.
Except that the windows started leaking. And the exterior hatch.
It turns out that when I removed the interior paneling of luan and unscrewed the interior frame from around the windows, the windows became loose. That interior frame is all that’s holding the windows in beside some butyl tape and caulk. They started to lean out under their own weight and the silicone caulk started to separate. By now, three of my windows were pouring in water every time a thunderstorm came in (read; almost every day).
I knew that putting more caulk on would be a waste because I’d have to scrape it off and re-caulk once I got the windows secured again, which couldn’t be until after I put in new paneling. New paneling was a long way down the road, though, so I needed a cheap, temporary fix. And the King of Cheap-Temporary-Fixes is Duct Tape! So, I got out my duct tape and taped up the edges of the leaking windows, sealing them tight to the trailer siding and protecting my plywood subfloor from being repeatedly drenched.
The hatch, on the other hand, wasn’t going anywhere or getting any kind of upgrade. So I grabbed my self-leveling caulk and battened down the hatches. No more leaking from that corner of the trailer! After a few more storms and some more tape, I think I finally have the leaks under control, for now. I think the very inexpertly resealed exterior corners will need some more caulk shortly, but I’m too ready to start the next part of the process to worry about that now.
Understanding Electricity
It’s finally time to start renovations on the Interior of the Wind Rose! I’ve been dreaming of interior renovations since before I bought it, and all that exterior stuff always seemed like a necessary but unwelcome prelude to the real work. Now on to the Good Stuff!
The first step in getting the interior ready is electricity. I picked electricity as the first step because it was either electricity or plumbing, and if the electricity is fixed then I can turn on the AC. May in southern Virginia was hot enough, June is going to be hotter, and I know July and August will be hell in a little metal box under the blazing sun. AC would be a great help for the future progress of my renovations.
The interior walls of the trailer are all still gaping open to the studs, so it’s a perfect opportunity to upgrade the old electrical work with new outlets and LED lights and any other improvements that my little heart desires.
Now, electrical work is certainly daunting and a little terrifying. It’s the most likely thing in the trailer to kill you if you make a mistake. It’s also very expensive to get someone to do it for you. So, I’d been checking books out of the non-fiction section of the library for a few months and reading up on electricity.
I didn’t find the “Do-It-Yourself for Dummies” electrical books very useful because they didn’t actually explain how anything worked or how to decided what to do. Clear pictures of step-by-step instructions on installing a receptacle (laymen call them outlets) or splicing in a new wire were handy, but it wouldn’t help me reconfigure my electrical system. Also, most of those books don’t include any information on DC electrical systems, since houses don’t have any DC power. Your trailer or RV, on the other hand, is mostly DC with some AC wiring.
Required Reading List
Here are the books that were most useful to me in planning out and enacting my electrical wiring upgrades.
- Wiring Simplified: Based on the 2017 National Electrical Code® by Frederic P. Hartwell, Herbert P. Richter, W.C. Schwan
This book is not intended as a How-To guide and it is definitely not intended for beginners. Nevertheless, this is the book I read first. It’s something of a refresher or study guide for electricians, with updates on the new codes and an overview of the basic knowledge of electrical systems. I read this one all the way through, even the sections I probably didn’t need (like how to wire a barn).
I wanted to understand how electricity works, what about it is so dangerous, and how to mitigate that danger. I didn’t only want to know the right way to do things, I wanted to know why that was the right way and what could happen if I did it the wrong way. I know I don’t legally have to follow electrical codes in my trailer, but the codes are there for a reason and I wanted to know which ones I could skip and which ones I needed to follow. This book was an excellent resource for that.
Some parts of it I had to read twice, and a few things I had to look up, but by the time I finished it I felt like I had a solid grasp on the whys and how for of electrical wiring. This book gave me the confidence to do my own electrical work. I borrowed it for free from my library.
- RV Electrical Systems: A Basic Guide to Troubleshooting, Repairing, and Improvement by Bill Moeller, Jan Moeller
This book was highly recommended by RVers in all of the blogs and forums I read. It’s very helpful because it’s the only RV-specific book on electricity that I know of. It has all of that information on DC systems that I couldn’t find in the common electrical books for houses. The authors are long-time RVers and have some good experience to back up their information.
This book taught me a lot about calculating load and amp draw, how RV appliances work, how my converter/charger works, RV batteries, campground hook-ups, and a ton of other things. I referred to this book a lot while deciding how many lights and outlets I wanted on each circuit and which appliances I should buy to prevent tripping the breaker. It was published in 1994, but since the Wind Rose is from 1997, I figured it was perfect. Also, DC wiring and batteries haven’t changed that much. I think you’ll find this helpful for figuring out your DC system even in a brand new RV or trailer.
- Complete Guide to Wiring: Current with 2017-2020 Electrical Codes by Black and Decker
This book was my How-To reference for when I was actually doing the electrical work. I brought it with me to the trailer and used the pictures to make my first splices and outlet connections. The Necessary Tools section helped me put together an electrical tool belt and decide what to buy at the hardware store. This book also helped me decide how to connect my lights to switches and how to make the shortest wire runs through the ceiling. It’s very practical, even if it doesn’t have any DC information. I borrowed it for free from my library.
Planning Ahead
As for what I actually did with the electrical work in my trailer, I’m going to have to sum it up for you rather than taking you through it step-by-step. I could probably write 10 articles about the electrical work I did in the Wind Rose but I think the best way for you to learn about this is to read a book by some professionals. I would hate to spread dangerous misinformation due to a lack of understanding on my part. Electricity is dangerous, but not that complicated. You can learn it the same way I did, and maybe even better, by reading a book!

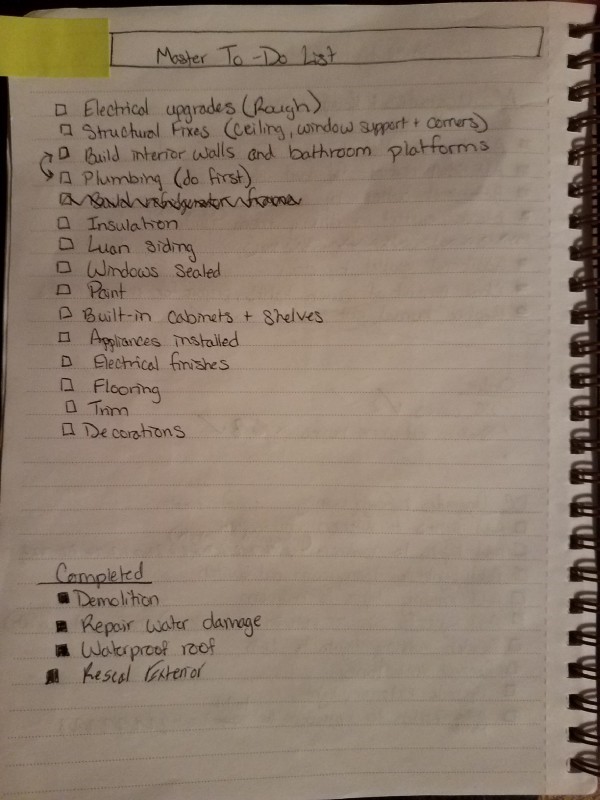
It’s time to introduce you to my (handy-dandy) notebook. When I bought the Wind Rose intending to remodel it, I knew I would need a project notebook to keep track of my thoughts, ideas, projects, and To-Do Lists. I used a notebook that I already had on hand, given to me by someone for some occasion or another. It struck me as appropriate that the cover says “Simpler is Sweeter,” since a simpler life is my goal in doing this renovation. I also thought it would be a good reminder if I ever got too bogged down in my designs.
This notebook has everything in it. It has lists, lists, and more lists of every kind. Shopping lists, To-Do lists, Project Lists, Pro/Con Lists, and more. It has conceptual drawings (not good ones) of multiple-use, space-saving furniture, and shelving.
It has daily logs of the work I completed on the trailer and the work I’m planning to do next. It has multiple iterations of floor plans and special features I’d like to build in. It has measurements, tips, and techniques I read about and noted down. The notebook has everything my brain needs to get this project done. I couldn’t possibly keep track of it all without my notebook. I’ve included a few pages from my notebook here to give you an idea of what I use it for.
The reason I’m bringing up my notebook right now is becasue my electrical work required a lot of mental work before any physical changes were made. Even after all of that reading electrical work shouldn’t be done on the fly, but carefully planned out for maximum efficiency. I also didn’t want to waste money buying supplies I wouldn’t use or waste time having to make multiple trips to the hardware store.
So, at this point in the renovation, my notebook is probably the most helpful visual aid I can give you to describe the changes I made in the Wind Rose. Taking pictures of a bunch of wires and then the same bunch of wires, only with more wires added, doesn’t seem helpful to me.
DC v AC and the Converter/Charger
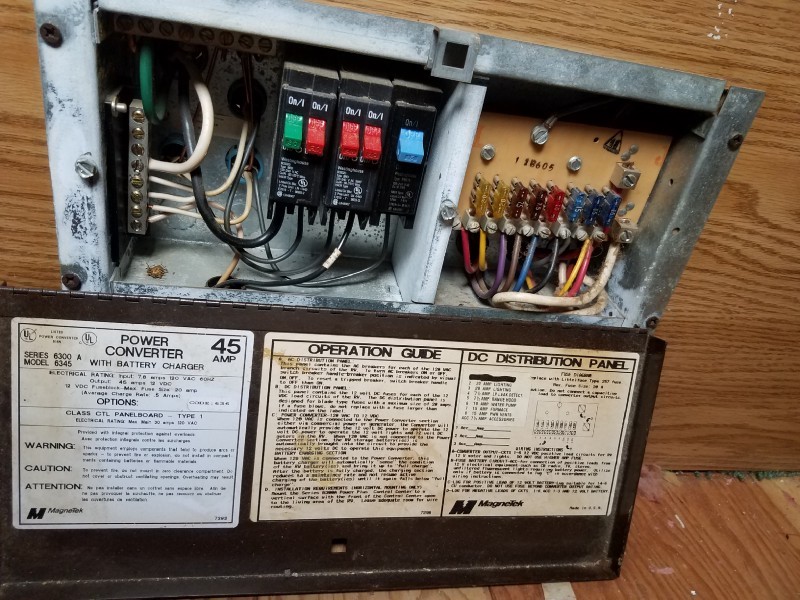
I started by sitting down in my trailer and opening my circuit box to take a look at what was going on in the electrical hub of the Wind Rose. Your circuit box is the most important part of your electrical system. The Wind Rose has an all-in-one AC circuit, DC fuse box, converter/charger model as was common back in the day when she was put together. Luckily, things haven’t changed much with electricity since then.
I determined, after careful study and a lot of research, that I didn’t need to make any major changes to my circuits. Although I saw a lot of people talking about the wonders of 50amp service, I decided not to upgrade from a 30amp system to a 50amp system because it would cost $1,000 and the primary use for the upgrade seemed to be running multiple air conditioners at once. The Wind Rose is a fairly small trailer with only one A/C unit and I’m interested in using less energy anyway. I decided we would stick with 30amp and learn to monitor our electricity uses as necessary. You know you’re a real adult when you start yelling at other people to turn off the light and saying things like “Are we trying to heat the outdoors?” Less electricity means a cheaper electrical bill and it’s definitely simpler.
I also considered making the changes necessary to add solar power to the travel trailer. It Would be handy to lower the electricity bill even more by using the free energy of the sun. However, expense ruled that out as it’s a big up-front investment of cash. As we eventually ended up settling on the Oregon coast where solar power isn’t really as practical, I think it was a fine decision. A retrograde to add solar power in the future might be worthwhile, but it didn’t need to be done right then.
Making an Electrical Circuit Diagram: AC
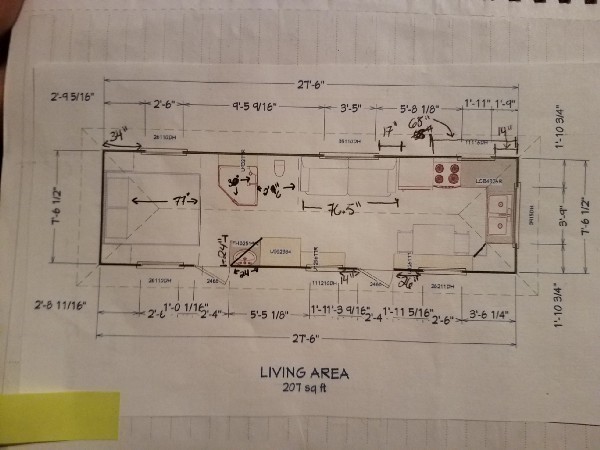
With major changes ruled out, all I had to do was decide where I wanted to add outlets, lights, and switches and which circuit to add them to. The first thing to do was to make an electrical circuit diagram for the Wind Rose. If you have a new RV or trailer you might find this diagram in your user manual bundle or you might be able to find it online. However, with a 1997 trailer, I had to make my own.
I kept it simple and used colored pencils for each different circuit. My husband traced the lines along the walls and ceilings, marking them with a sharpie, while I sat on the floor and drew in my notebook. Here are the diagrams I came up with. They’re simple, but they worked perfectly to help me understand how the electricity flows through my trailer.
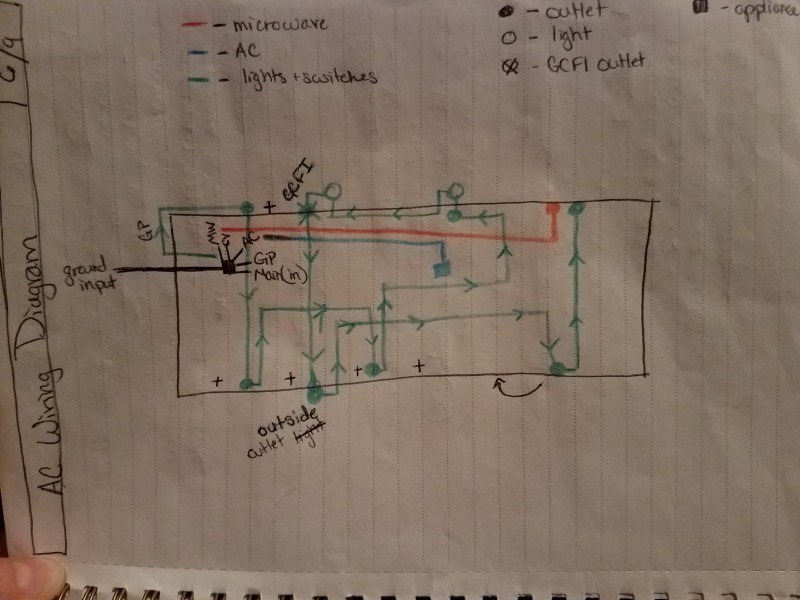
I started with the AC diagram because there were only 3 circuits and therefore a lot fewer wires to keep track of. I thought I’d practice on the simpler system before moving up to the wildly chaotic DC wiring. As you can see, I originated the circuit at the circuit box under the bed at the back of my trailer. I used colored pencils to differentiate the lines and included a key of symbols and colors. When the lines cross the middle of the trailer they’re running through the ceiling.
What I found was one AC triplex wire running to the A/C unit, one running to the microwave plug, and one wire crisscrossing the trailer to provide all of the outlets and the two AC reading lights. This system was actually fairly simple. I didn’t need to alter the A/C connection or the microwave wire, but I was planning to add outlets in several places in the trailer. I used arrows to indicate the direction of the wire, which wasn’t necessarily important but I thought more information was better than less.
One thing to note, the outlets are all wired in series, which means the one GCFI that was previously above the sink also provides GCFI protection to all of the other outlets after it on the circuit, which includes the exterior outlets and the kitchen and dining room outlet. I decided that was a good idea and left it as is.
Making an Electrical Circuit Diagram: DC
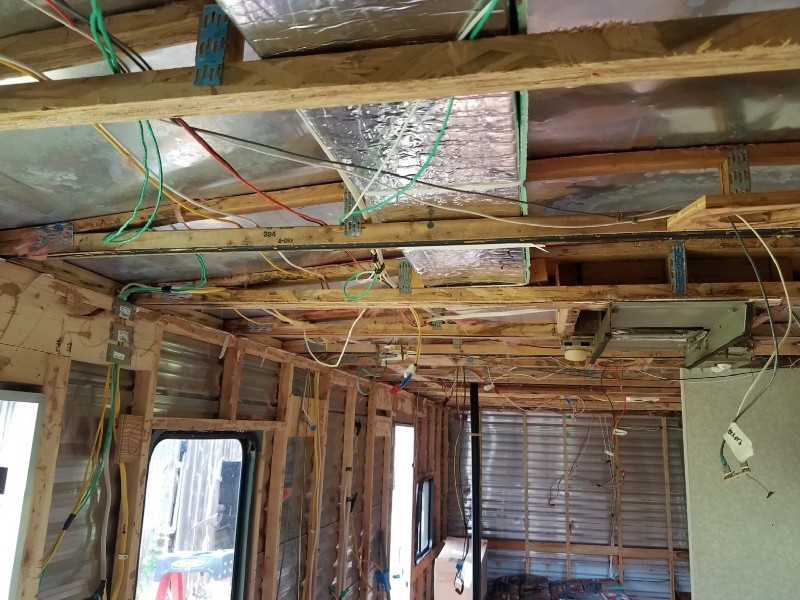
Next, we diagramed the DC wiring. This was a lot more difficult. Some of the wires ran under the floor, which left us guessing about where they came up. Some of them ran behind the one cabinet I didn’t take down and somehow split in mysterious ways. Also, there were so many of them that it was bewildering. For every colored line, there was a white neutral line next to it. The ceiling looked like a clutter of cats had gotten into the yarn bag and had a wild night.
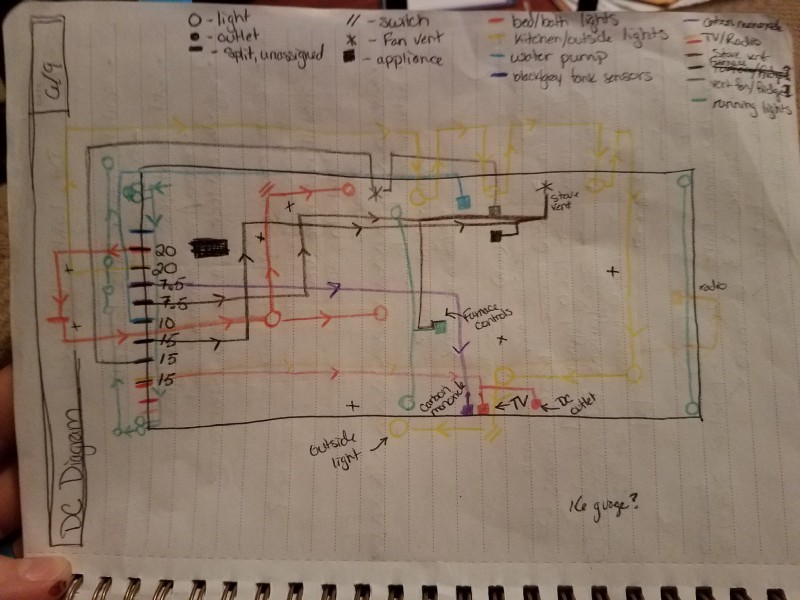
Nevertheless, we methodically followed each line, one by one, around the trailer until we knew where they went and how they got there. This diagram was also more complicated because I needed to add a lot of lights, change everything to LED, and understand the amp capacity of each circuit before I added anything to it. I put the amp capacity of each circuit along one edge of the diagram so I would have it as a reference. Another complication was that not all of the wires were common 12 gauge. A few were 14 gauge and a few were 16 gauge. My shopping list was a confusing blend of colors and gauges not normally used for DIY work.
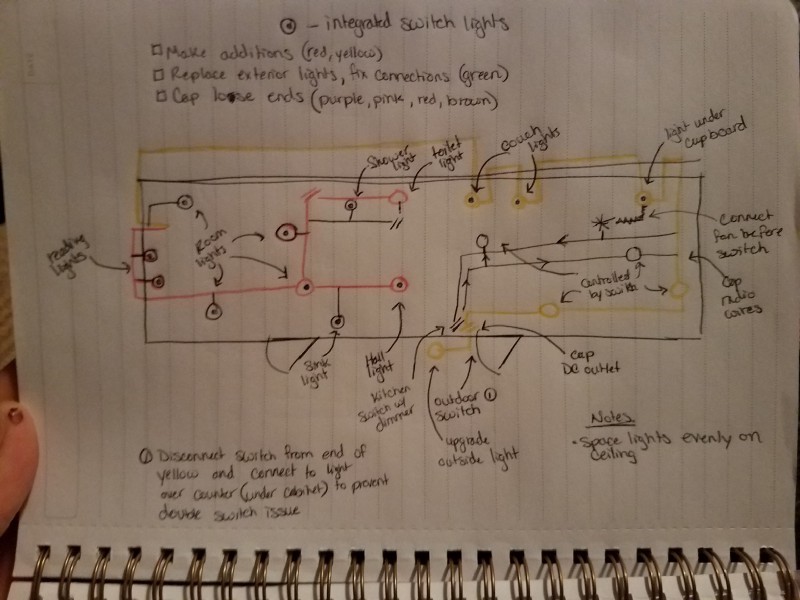
Consider Your Lighting Needs
Next, I considered where around the trailer it would be nice to have additional outlets. I added another one on each side of the bed, planning to have them be USB integrated outlets. I added a few near the kitchen, and one at the new location for the sink. That was fairly easy.
Then I laid out my plan to switch all of the lights to LEDs to save amperage and energy. I was going to switch all of the exterior running lights to LED, which is a simple and cheap swap. I also wanted to upgrade our porch light to an LED, motion-sensing light. In the interior, I wanted all of the ceiling lights to be LED.
LEDs use about 0.5amps or less per light, as opposed to 1.5amps for incandescent lights. LEDs are generally dimmer than other types of lights, and DC 12V lights tend to be dimmer than AC 120V as well. I calculated how many lumens I would need per square foot for each room (Google it) and searched for LED 12V DC recessed lights on Amazon until I found out how many lumens each light would give out. That’s how I decided how many lights I would need in each room and how many I would need to add from what was already there.
The hardest part was deciding which lights to add switches to and how to run the switches to the entrances from where they needed to be spliced in. I also had to connect the new electric vent fans I put in the ceiling and I wanted some task lights for the shower, sink, and under the cabinets, as well as two reading lights for over the bed.
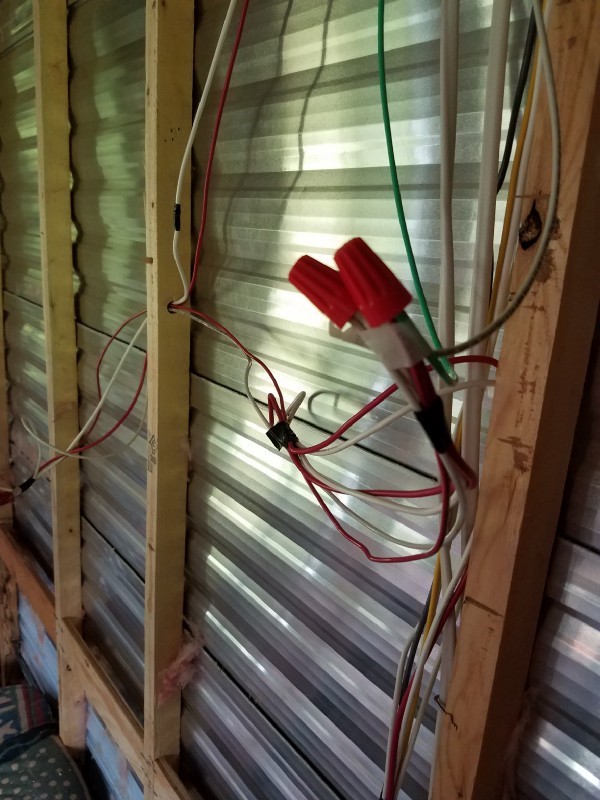
Working With Wires: AC
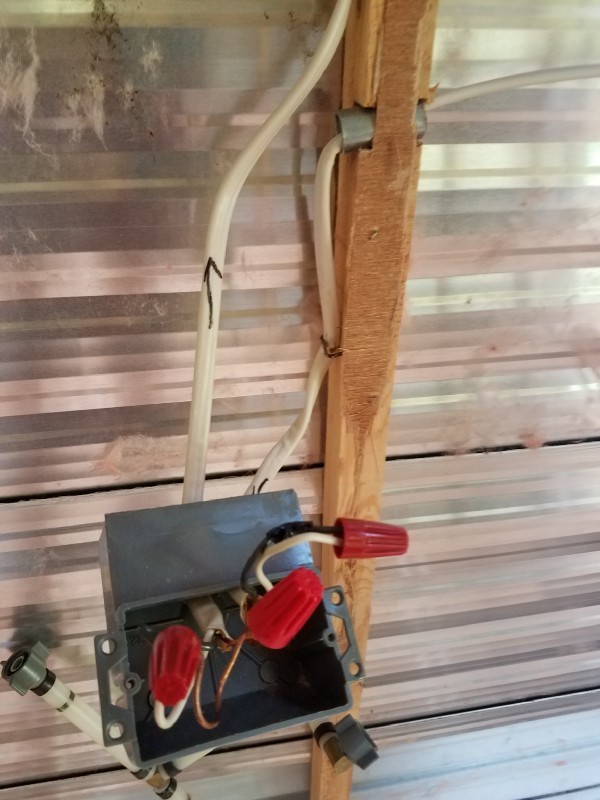
These wires are WRONG. DO NOT WIRE YOUR OUTLET THIS WAY.
Now, the Wind Rose has been completely and utterly disconnected and without power for months, ever since I was demoing and started cutting wires to alter the framing. Make sure your power is off. I pulled the battery out and everything. I really didn’t want to die of electrocution. Read your electrical books and follow all of the safety precautions they recommend.
The AC wiring updates went pretty quickly. The original outlets were a type called “quick wire” and have an integrated electrical box at the back where the wires snap in. It’s not how the outlets in your house are configured, I can promise you. It’s a time and space-saving method used for RVs and trailers.
I bought regular house outlets to add and also bought some plastic, shallow, “old work” electrical boxes to put them in. With electricity, better safe than sorry, and boxes are important. You need them to be shallow because your walls are much shallower than house walls. The walls of my trailer are only 1.5″ deep, the same as the width of the framing boards. Most houses use 2×4’s for framing and the walls are 4″ deep. Standard outlets designed for 4″ walls won’t work in your thin-walled trailer or RV.
I bought some more triplex wire and got to cutting, stripping, splicing, capping, and taping. I had my How-To electrical book to reference for technique. I had my tool belt loaded up with the relevant electrical tools and supplies, according to my book. There were a few instances where I needed to drill new holes in the frame for the wire to pass through the walls, but I always tried to run the wire through already existing holes and spaces, even if it added extra length.
It went pretty quickly, but wear gloves because those wires are sharp and stiff. I have a few nasty puncture wounds from when I wasn’t wearing my gloves. Also, leave yourself a lot of extra wire at the receptacles, lights, and ends of the wires. You’ll want some maneuverability and flexibility to make changes and once you cut it you can’t make it any longer without a lot of trouble. Once all of the wires were capped and taped until after the walls were paneled and painted, I moved on to DC wiring.
Working With Wiring: DC
I tackled the DC wiring one circuit at a time, just like with the diagram. I used the same colored wire for the additions and a whole roll of electrical tape. I referred to my How-To electrical book to figure out how to run DC LED light switches and prepare splices for lights. I used my floor plan, laid out in masking tape on the floor, to plan for future walls and doors that only existed in my mind. Again, I tried to avoid putting new holes in my frame.
This project took quite a bit longer than the AC wiring did and my arms ached for days from holding them over my head constantly. This is because I was making a lot more changes to the lighting and needed to add a lot of wire. I planned to replace the old dome lights with new LED dome lights and switch many of the dome lights to puck lights that wouldn’t stick out of the ceiling. My husband is tall, so he needs all the headspace he can get.
I didn’t do anything with many of the circuits since I wasn’t changing anything about the appliances. I left the connection for the radio with the intention of putting in a new one. The house we’re currently living in has a radio in the kitchen and I like it, especially since we have horrible cell service and unreliable satellite internet.
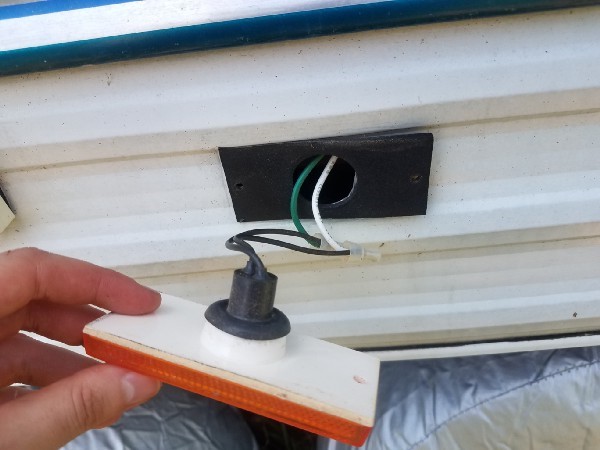
Working with Wiring: Exterior Running Lights
I also updated all of the exterior running lights, which was extremely easy. I bought a pack of red and yellow LED running lights from Amazon that were approximately the right size. They came with easy-to-connect wires and just needed to be capped, taped, and screwed in. However, there were 12 of them and many of them required a ladder, so it still took a long time in the hot sun. I haven’t caulked them yet because I need to hook up the truck and make sure they work. Some LEDs are polarized, which means you have to get the wires connected in the right sequence, and it isn’t always easy to tell which wire goes to which. If they don’t work I have to disconnect and reconnect them correctly, and I don’t want to have to scrape caulk and then reapply it.
Check Your Work
Once I had all of my additional lights, switches, and outlets set up, I carefully went over every circuit and wire and added wire staples and tape for support. Trailers move and that makes the wires vibrate and shake. If they vibrate their way out of the caps then you could have a fire, or electrocute yourself.
So I capped And taped all of the connections. I put down a lot of wire staples to fasten the wires to the frame and reduce the movement of the wires in the walls. I bundled wires together with more tape and used tape as an extra layer of protection when they passed through holes. I used a lot of tape and wire staples. Electrical issues tend towards the “smoking ruin” more than the “mild inconvenience” when it comes to the consequences of shoddy work. Better safe than sorry.
Then I went along and used those metal protector plates over the notches in the frame where the wires passed close to the surface. On a trailer, almost everything is close to the surface. But, I could see myself doing some DIY in the future and nailing directly into a wire and electrocuting myself. So, the nail guards went in.
The final step was to plug everything back in and, one circuit at a time, use a multimeter to check that all of my appliances, lights, and outlets would work. Mostly, I want to be able to use the A/C. But, I need everything to be safe and functioning before I move on to the next step. I bought a multimeter at Lowes for about $20.
I re-connected the battery, plugged in the shore power, and started turning on the circuits one at a time, starting with the AC circuits. I used the multimeter to check that there was an appropriate flow of electricity at each outlet and light, about 120V. I got stuck for a bit when I couldn’t get any electricity out of the DC wires, but then I learned that you need to have the converter circuit on to make the DC power flow. So, once I ironed out that wrinkle and flipped the converter circuit on, I was able to check each DC receptacle as well for 12V of flow.
The battery was very low from being unused for months, so I attached a portable battery charger to bring it up to charge in about an hour. You should make sure that your battery remains charged, since letting it run low can ruin its capacity permanently. Many RV and trailer owners who leave their units in storage have a small solar-powered charger that feeds a tiny bit into the battery when it’s sunny, to keep it topped off.
Finally, after checking everything, I had my husband pull the truck around and plug in the pigtail so we could check that the taillights and new LED running lights work. Unfortunately, I realized I’d wired all the running lights backward. With auto parts, the red wire is hot and the black wire is neutral. With house parts, the black wire is hot. I had a 50/50 chance and got it wrong. So, I’ll need to go back and switch all those wires. No big deal, but I’ll have to test those again as well.
The great news is that the A/C works! I can now work in relative comfort while I move on to plumbing!!
Running Lights Update
The incorrectly wired running lights blew a fuse in the truck’s trailer power system. To figure this out, I replaced the 7-prong pigtail connector with a new one and then rigged it to the battery to power it. All of the lights worked with the battery, but not when plugged into the truck. That helped us isolate the problem to the truck, not the camper. What a relief!
Word of caution: When I finally got all of the running lights working and went back into the trailer after checking them, I smelled smoke and scorched plastic. That was a huge warning signal for me. Obviously, there was an electrical short somewhere in the system of the running lights.
I went through and checked every wire until I found where a small nick in the plastic coating had allowed a short. The short melted the plastic coating of the wires around it and scorched the stud it was passing through. This is how trailers burn down, people! I cut out the damaged section of wire and spliced in some new wire, then taped up the part that passed through the stud for extra protection.
When we first turned our circuits on, one at a time, we were careful to look, listen, and smell for any sign of electrical shorts. We have a fire extinguisher in the trailer just in case something happens during construction. We stood very still and quiet and watchful until we felt certain there was no short causing a fire. By checking the power at each receptacle we confirmed that there was no mysterious loss of power somewhere along the line, indicating an arc or short. However, since the running lights weren’t working at the time, we weren’t able to test those.
I’m very glad that I took the time to check the wires again. I feel pretty confident that the wiring is sound and that I’ve taken all of the reasonable precautions I can take to prevent loose, nicked, or worn wiring from traveling.
Up next, the thrilling world of Plumbing! We’re covering all of the blue-collar bases in this project, that’s for sure.