Renovating our 1997 Fleetwood Mallard for Full-Time Living (Part 10)
This is the story of how my husband and I purchased a 20-year-old travel trailer and I DIYed the crap out of it to make it suitable for full-time living. In this series, I’m giving All of the details about the process step-by-step, as performed by me, a 26-year-old woman with No experience in construction. The first installment in this series details the purchasing process and the changes I planned to make. You can find that article in the link below and start at the beginning. Then, follow along in the series by clicking on the link for the next article at the bottom of each page.
Waterproofing: In it to Win It
It turns out that waterproofing is the most frustrating, most time-consuming thing I’ve had to do with the trailer yet. Just when I think I finally have everything buttoned down, it rains and there’s water leaking in everywhere again!
Unfortunately for me, it’s also one of the most important steps and I can’t skip it or cut corners. I Need the trailer to be absolutely waterproof before I go on. I can’t have little leaks getting into the wall and rotting things from the inside.
However, it’s very frustrating to be working on this same task for weeks. I feel stuck in a morass of caulk, sealant, and butyl tape. The number of seams, cracks, holes, hatches, windows, doors, and vents in this trailer is unbelievable. Even more frustrating is the fact that I have to wait for the caulk or paint to dry in-between layers and projects. I have to wait for good weather so I can be sure my caulk and paint have time to dry before it rains. Basically, this step took a very long time and happened over many days.
Sealing the Corners
After I finished sealing up the cracks and holes in the roof, I needed to reseal the corner molding on the front of the trailer. Before, I had just taped it up and moved on the roof as the more urgent source of water infiltration. Now it was time to finish the job on the front of the trailer for good.
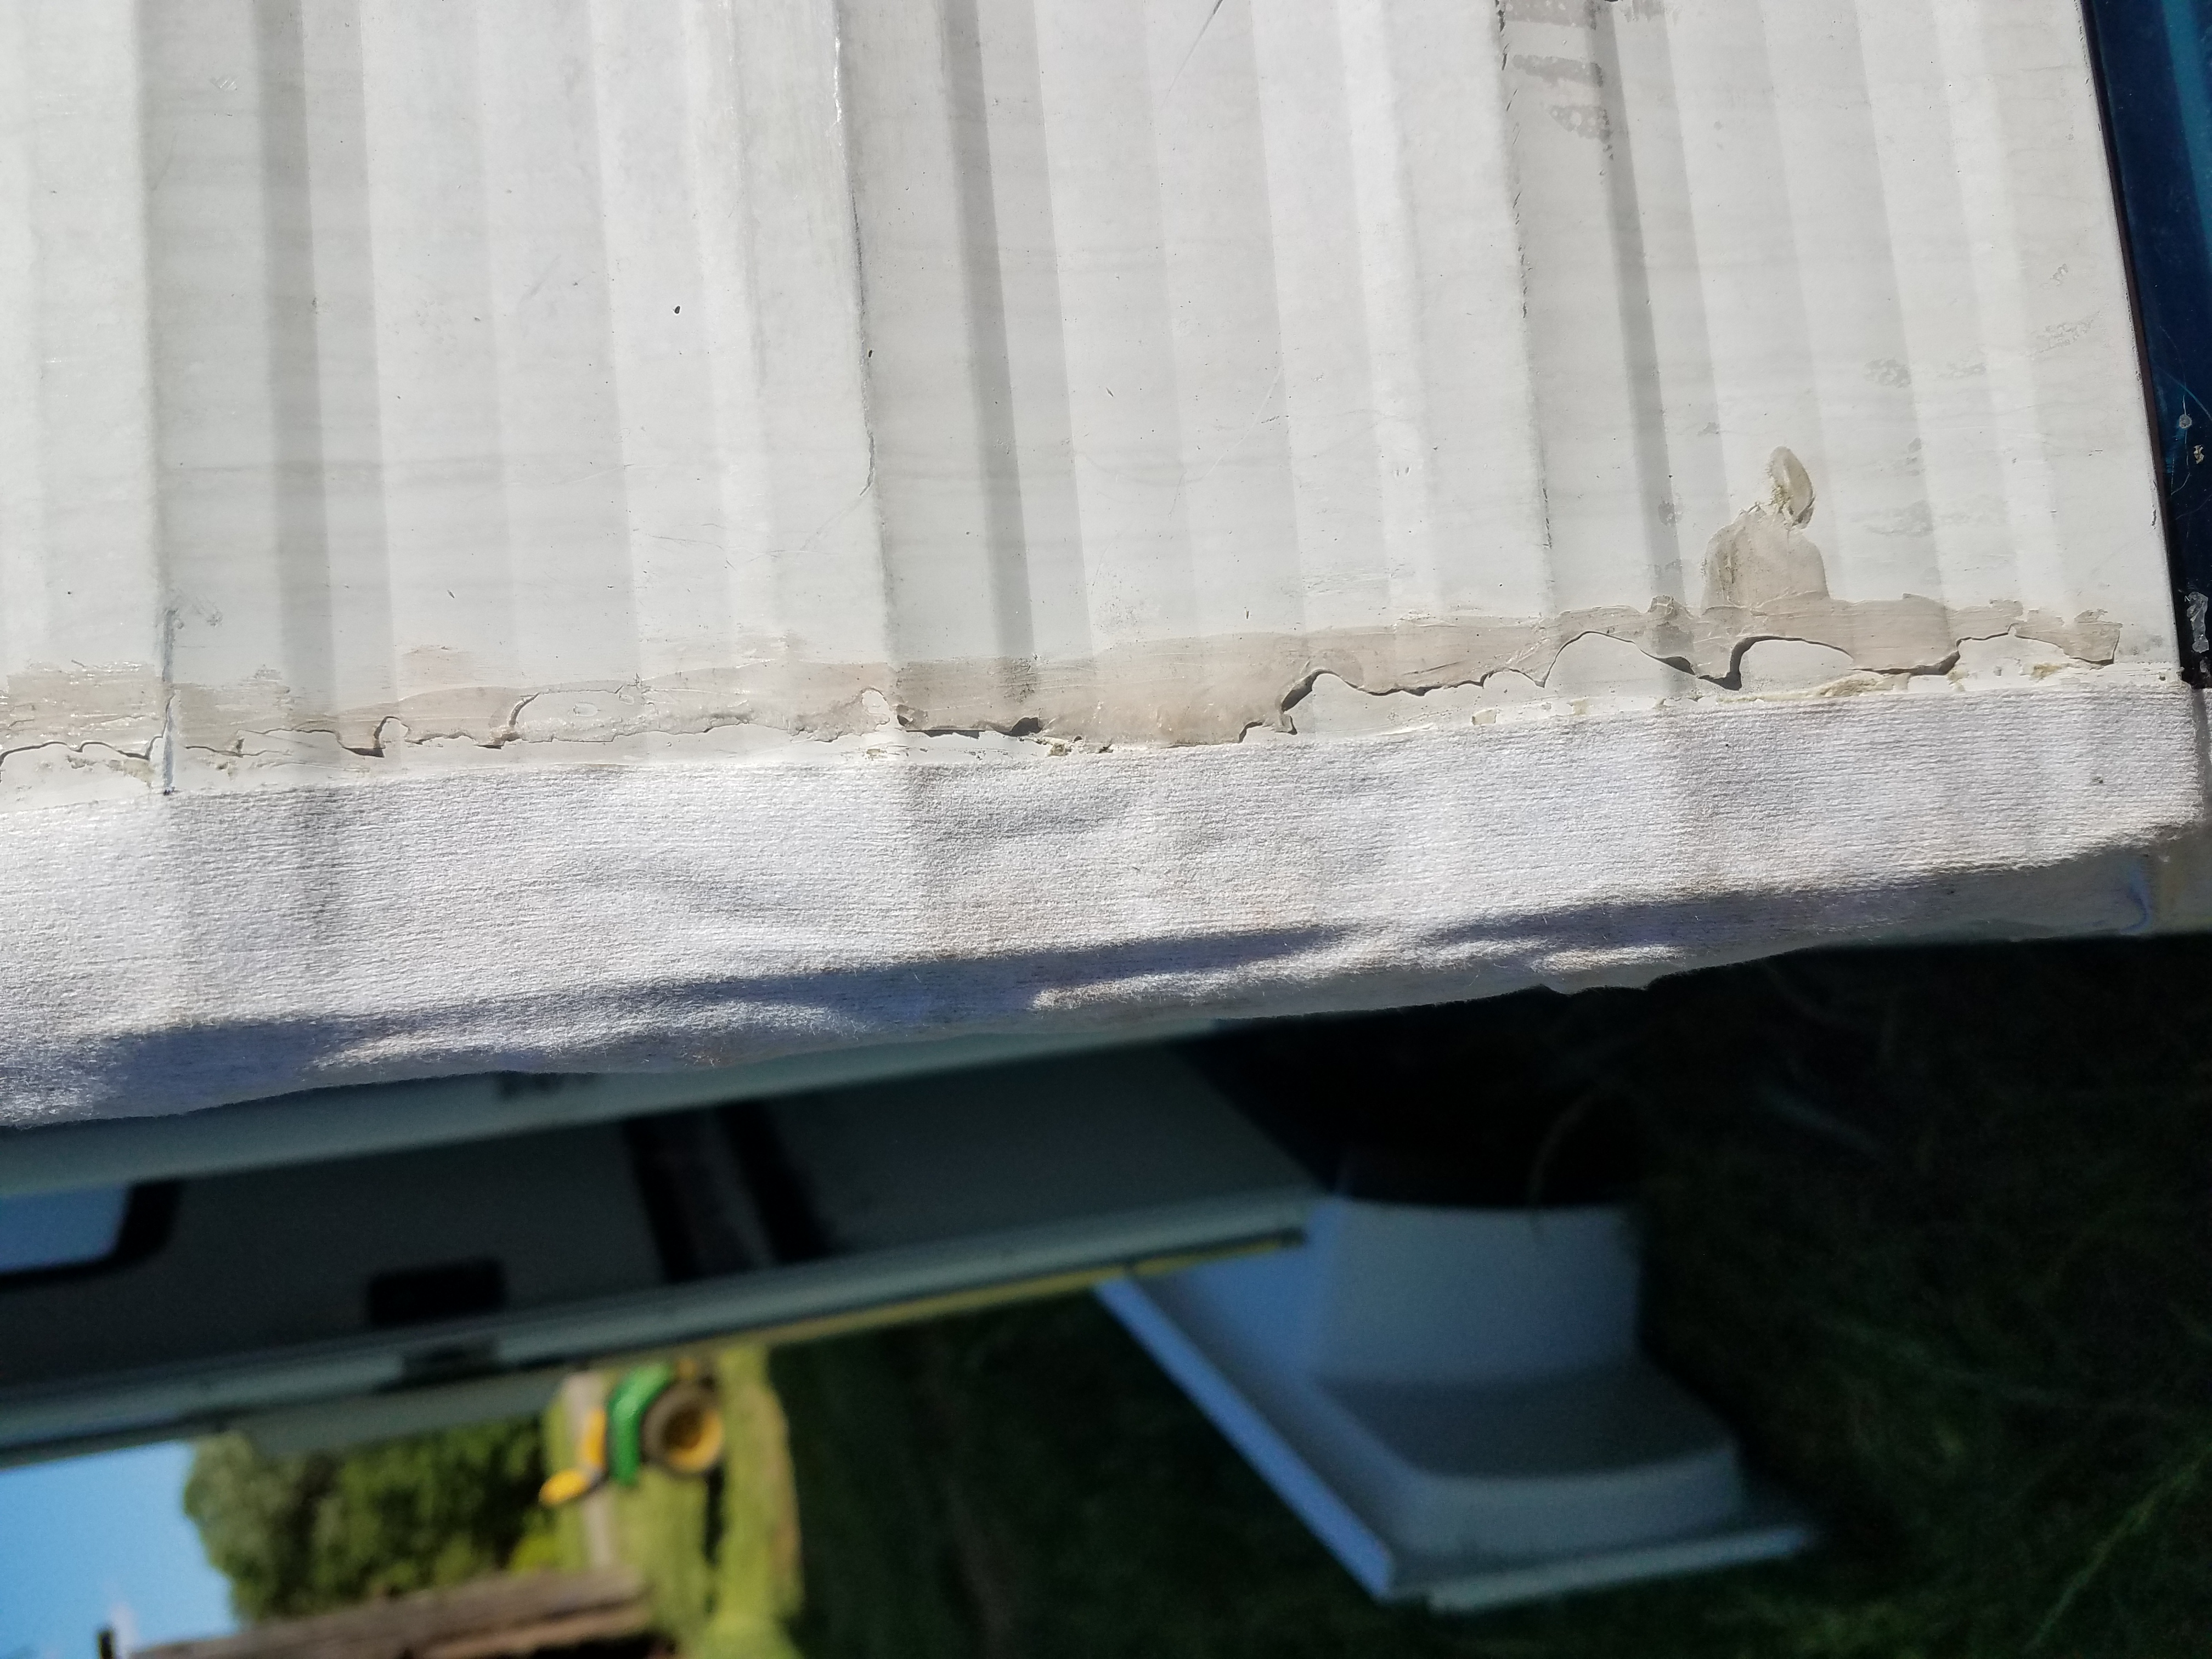
I have the sides stapled down and taped with the Corner Seal tape that was highly recommended for the job. I pressed the tape tightly to the aluminum as I went down the corner, trying to make sure there were no gaps where the aluminum was corrugated.
In hindsight, I should have taken more time to fully scrape off the old silicone caulk. That stuff is really obnoxious to remove because it’s slippery and mostly clear. But, it’s so slippery that the tape won’t stick to it, and putting new caulk over it is a bad idea. I recommend getting your entire surface clear instead of throwing in the towel at “good enough” as I did.
When you’re buying the tape, make sure to measure the width of your aluminum corner molding and get the right width tape. My tape was too wide so I had to apply extra caulk to compensate. But I didn’t feel like having to order new tape and wait for it to arrive. Impatience drives many of my remodeling decisions, unfortunately.
Next, I applied a few strips of butyl tape on the inside of the aluminum corner molding, making sure it press down firmly as I went. I applied enough to fill in the gaps made by the fact that the aluminum siding is wavy but the corner molding is not. There will be gaps that need to be filled between the aluminum siding and molding. The butyl tape and caulk have to cover the difference, and butyl tape is a lot easier to work with.
Then I basically just stuck the aluminum corner molding back on over the butyl tape, trying to bend it to fit the trailer as close as possible, and started screwing it in. Tightening the screws down should make the butyl tape squeeze out the edges, which is a good thing. I cut that extra off and stuffed it into any gaps where the corner molding didn’t quite meet the siding. Make sure to trim the edges flat so your caulk will fit nicely into a 90-degree angle between the molding and the siding.

For the most part, the screws ended up in the same holes that were already there and went in easily. I used painted screws for building decks that would resist rust. I’m so tired of rusted screws.
The final step was applying the caulk. I used Dicor self-leveling lap sealant because that’s what I bought to use on the roof. You should use non-self-leveling lap sealant because what I used is only for horizontal surfaces, not vertical surfaces. It was messy.
Self-leveling is good when you are working with gravity on your side. When applying caulk vertically, gravity is Not on your side. Self-leveling is good for the roof, but not for the walls. I also recommend watching some videos on applying caulk because my first attempt was ugly and frustrating. You can learn from someone else’s mistakes instead of your own.
Wearing disposable gloves and dipping your finger in water allows you to smooth out the caulk without it sticking to your finger and getting everywhere. I wish I’d known that beforehand. It may not be pretty, but it’s functional. I’m planning to paint the trailer as my last step, so I’ll probably work on making it look nice later.
After the caulk, I just had to snap in place the new vinyl insert molding that covers the screws and keeps them from rusting (supposedly). Make sure to get the right width. It should be easy to snap it in place and if it’s not easy, you might be putting it in upside down. I spent 2 hours trying to force it to go in the wrong way and nearly screamed with frustration when I realized I’d wasted all that time on something that was supposed to be easy.
You screw the vinyl in place at the top of the molding on the roof, and then again underneath the trailer where it folds over to prevent it from working free during travel. Once I had both sides done, I was finally finished with the front of the trailer!
To be perfectly honest, though, I had to do one of the corners twice. I didn’t use butyl tape inside the aluminum molding and applied the caulk wrong the first time and it leaked all over after the first rain. I went back, scraped the old silicone caulk off properly, and re-did the whole thing. Having to do something over because you didn’t do it right the first time is a Really, really annoying part of learning.
So, finally, after finishing the corners and the vents, I was ready to paint the roof with Kool-Seal!
Painting the Roof
Kool-Seal is a waterproof elastomeric (rubber-like, plastic-ish) paint that helps protect your roof from UV damage, insulates it against heat (it’s white), seals up little cracks or holes, and in general extends the life of your camper roof. You won’t find an aluminum trailer roof without a coat of this type of paint on it. There are many other brands like it, and I chose Kool-Seal for its great reputation in the RVing community.
I calculated the square footage of the roof (length x width) and bought a 5-gallon bucket so I could do 2 coats. I would rather have to put on an extra coat than not put on enough and have to do the job all over again in a year. I also bought the type that’s formulated to last 5 years.
I’m not sure how they decide which one will last 5 years and which will last 7 years and which will last only 1 year, but I figured going for the middle ground was best. My father taught me that when you don’t know for sure, don’t buy the cheapest one or the most expensive one, pick a nice middle ground.
Before I started painting I needed to wash the roof of the Wind Rose. All of the advice says to start with a clean, dry surface. The cleaner the better. I bought some TSP (tri-sodium phosphate) because it’s known as a harsh and effective cleaner that can strip your paint if you’re not careful. Since I have a full aluminum roof, I thought a nice harsh wash would make sure it was free of any gunk or old paint and give the new paint a good surface to cling to.
TSP is a harsh chemical so be careful with it. I must have gotten some on my hands or inside my gloves when I used it and it made my hands sting badly and turn red, even after several rinses. No lasting damage, but it was unpleasant.
Water Trouble on the Farm
Unfortunately for me, the water pump nearest the travel trailer died a few days before I needed to use it. This was almost comically bad luck for me. We have a lot of wells on the farm, including one situated nicely right next to the Wind Rose. However, these wells have long runs of underground wire to power them. The wire must have frayed somewhere in there because the pump wasn’t working and there was no water in the hose when I needed it.
What to do, what to do… The nearest water was 1/4 of a mile away at the pump for the house, down a big hill and then back up another big hill. There was no way I could run a hose that far. I ended up filling up an ATV trailer with 5-gallon buckets, driving them down to the house, filling them up from the garden spigot, and then driving them back up the hill to the trailer. I left huge splashy puddles behind me as I sloshed my trailer full of water buckets up the road.
Then I had to haul the 5-gallon buckets of water up the ladder and onto the trailer roof with me as I needed them, one for the soap solution and one to rinse. I do Not recommend this. I think standing on a ladder trying to hold a 5-gallon bucket of water over your head is very unsafe. It’s amazing what you’ll do just to save some time.
In any case, I am Certain that your experience washing the roof of your trailer or RV will be Much quicker and easier than mine was.
Tape Everything
I brought a large piece of plywood up on the roof with me to hold the buckets of water. I didn’t want all that weight to break a support beam (especially since I already had one broken one to fix). I put in the recommended amount of TSP for a strong solution and used a long-handled, soft-bristled car cleaning brush to scrub the roof of the trailer. Most of what came off the trailer was bright green pollen. I scrubbed diligently and rinsed thoroughly, making several trips back to the house in the ATV for more water. The roof didn’t really look cleaner, but I trusted that it was.
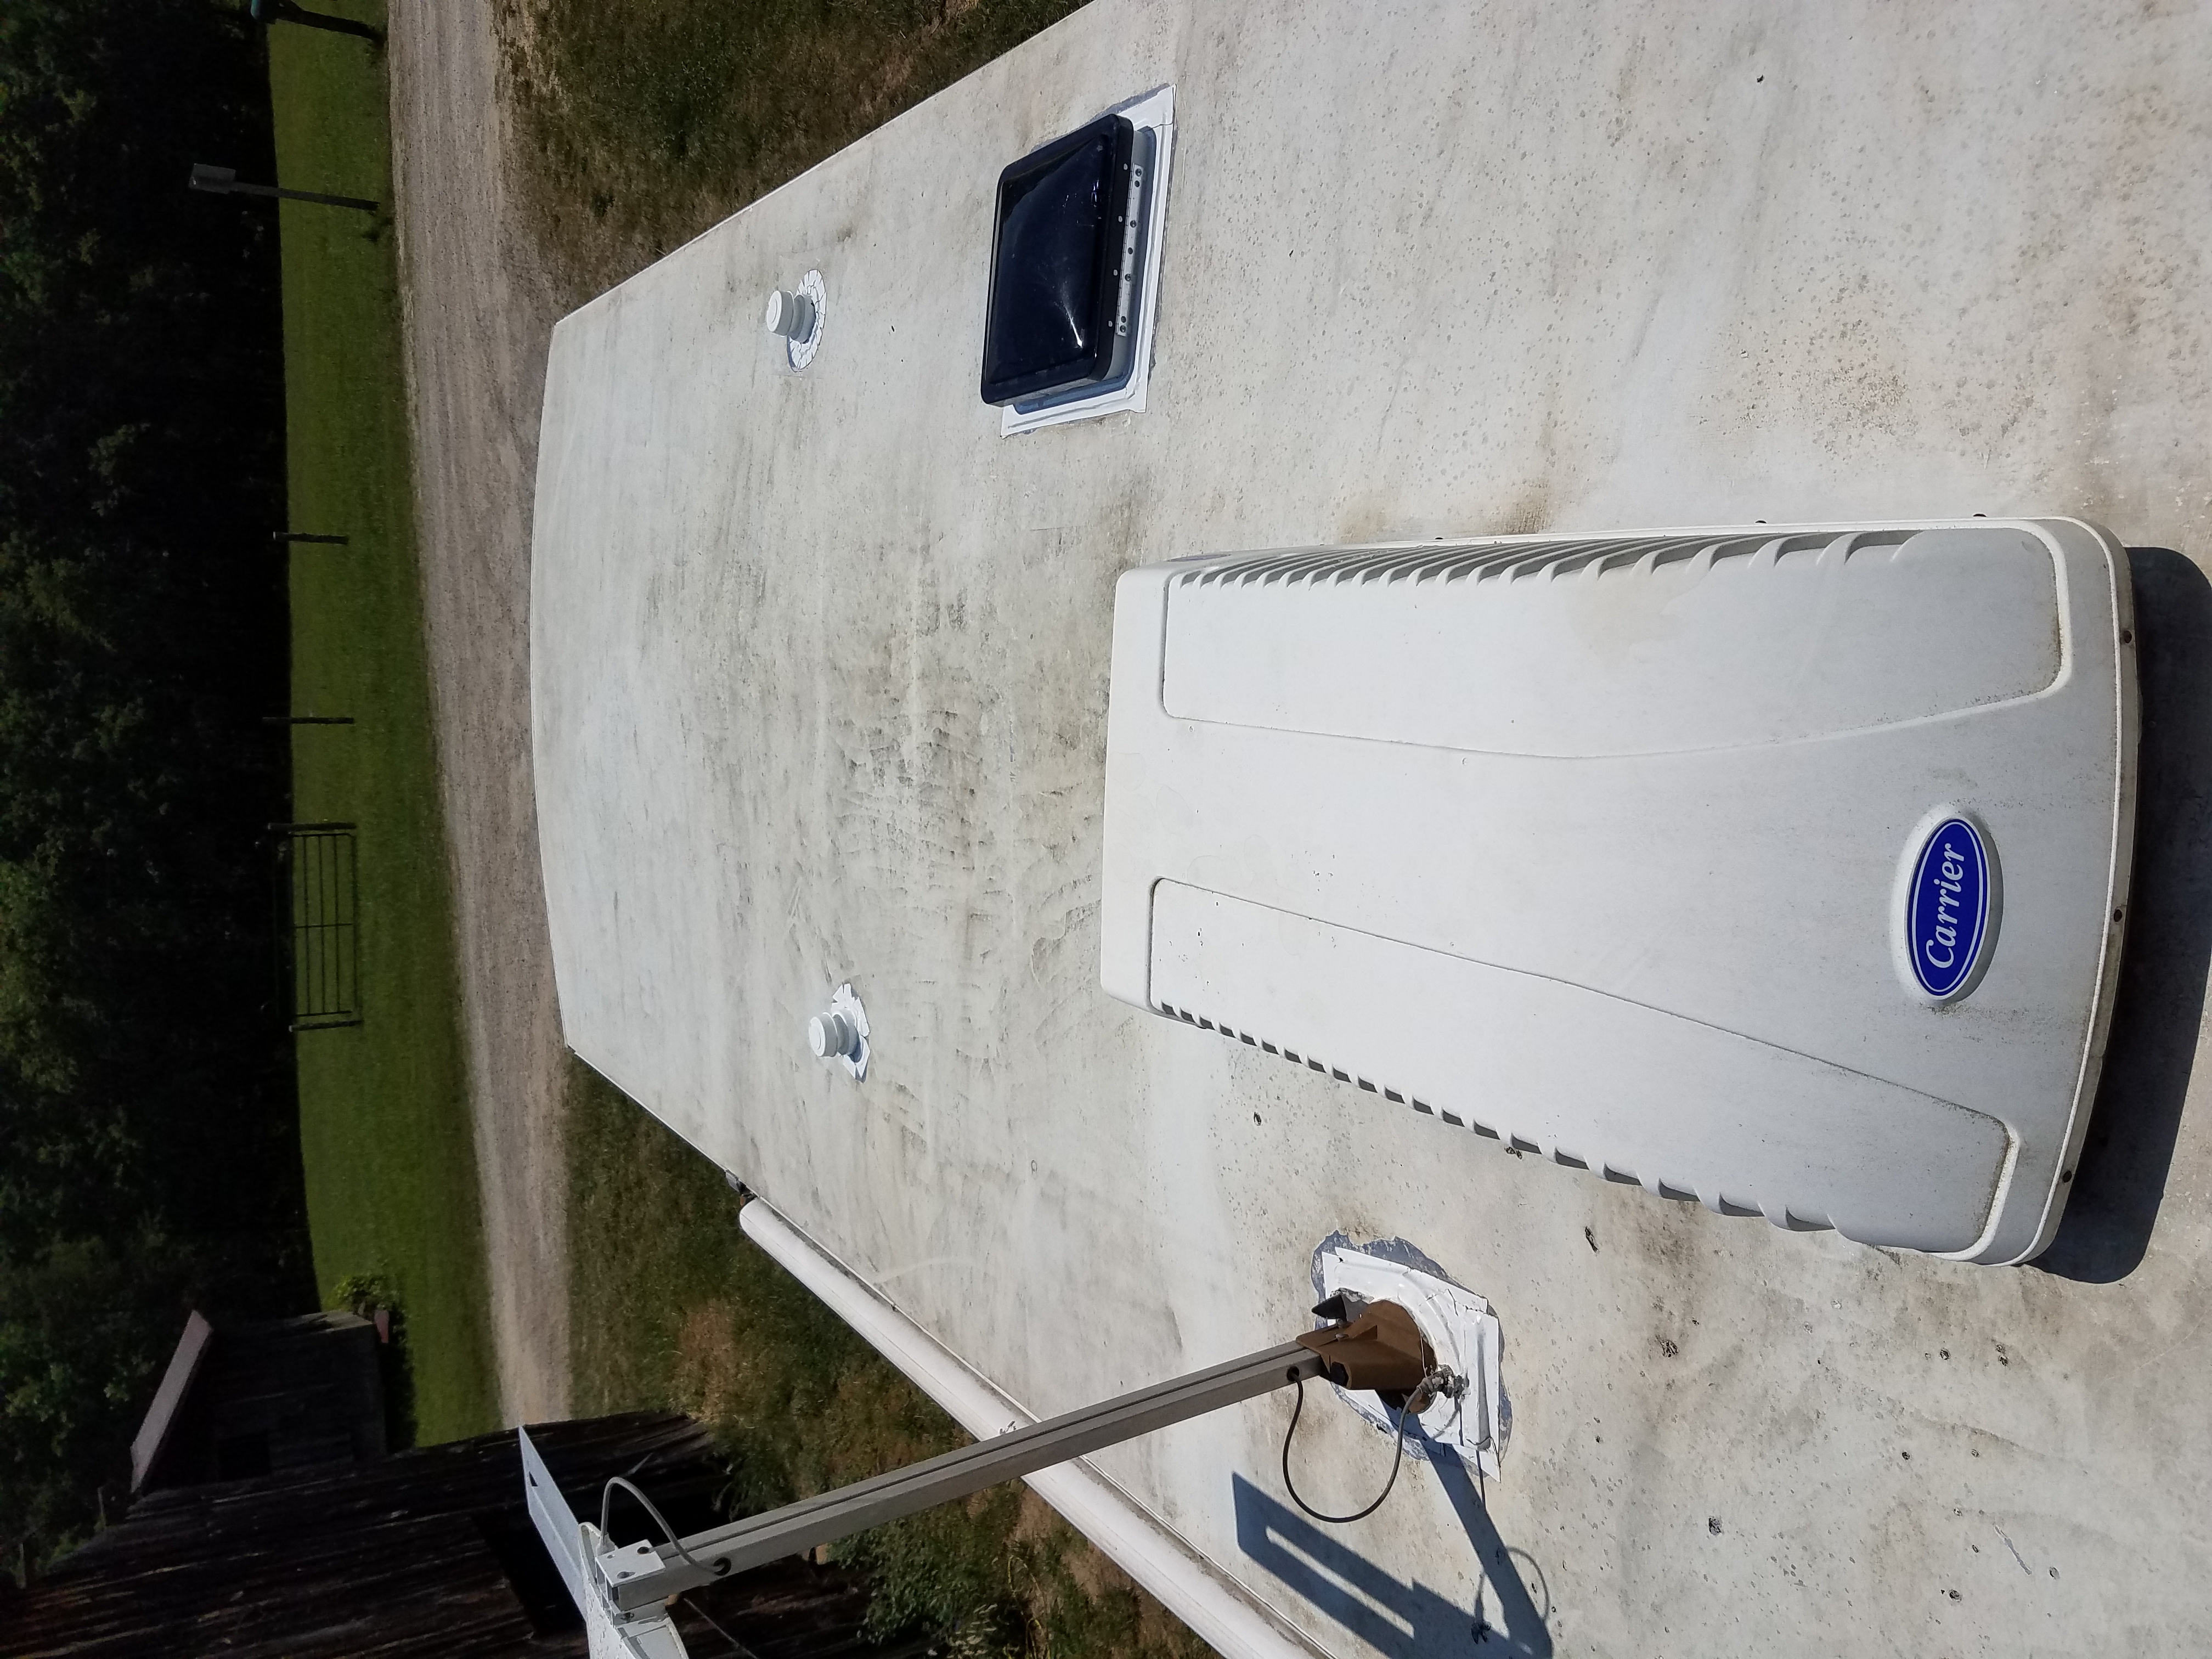
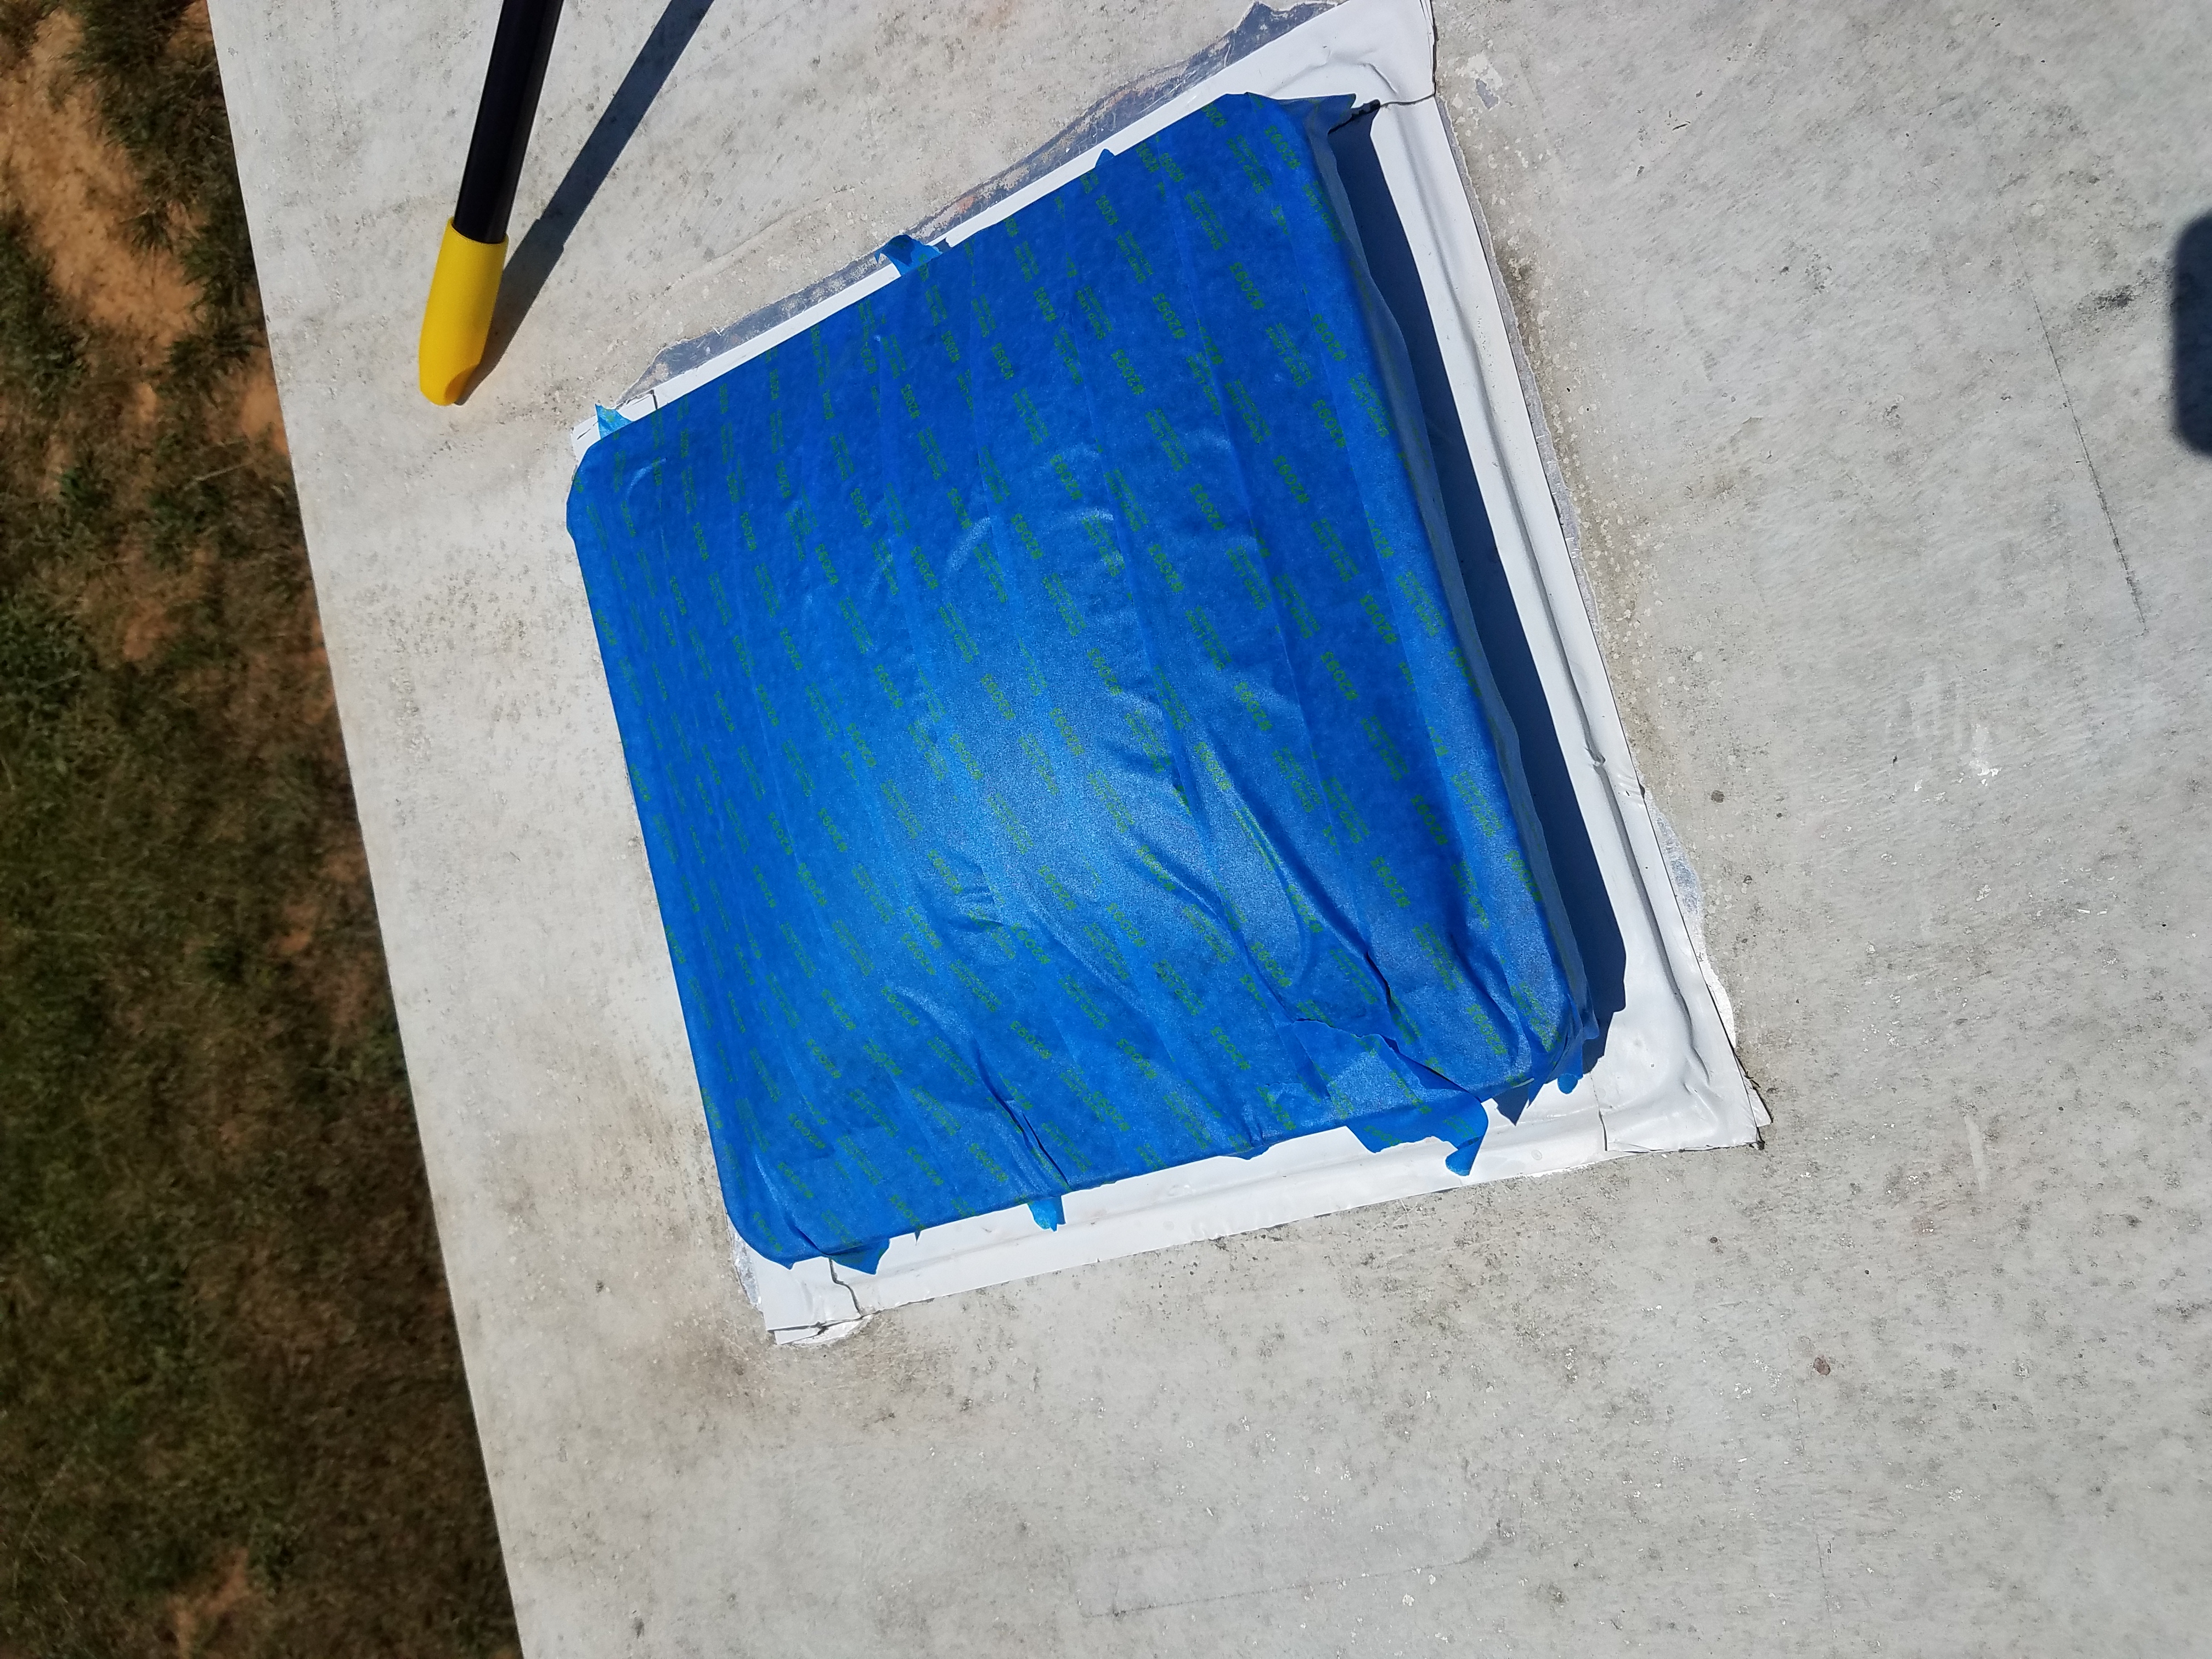
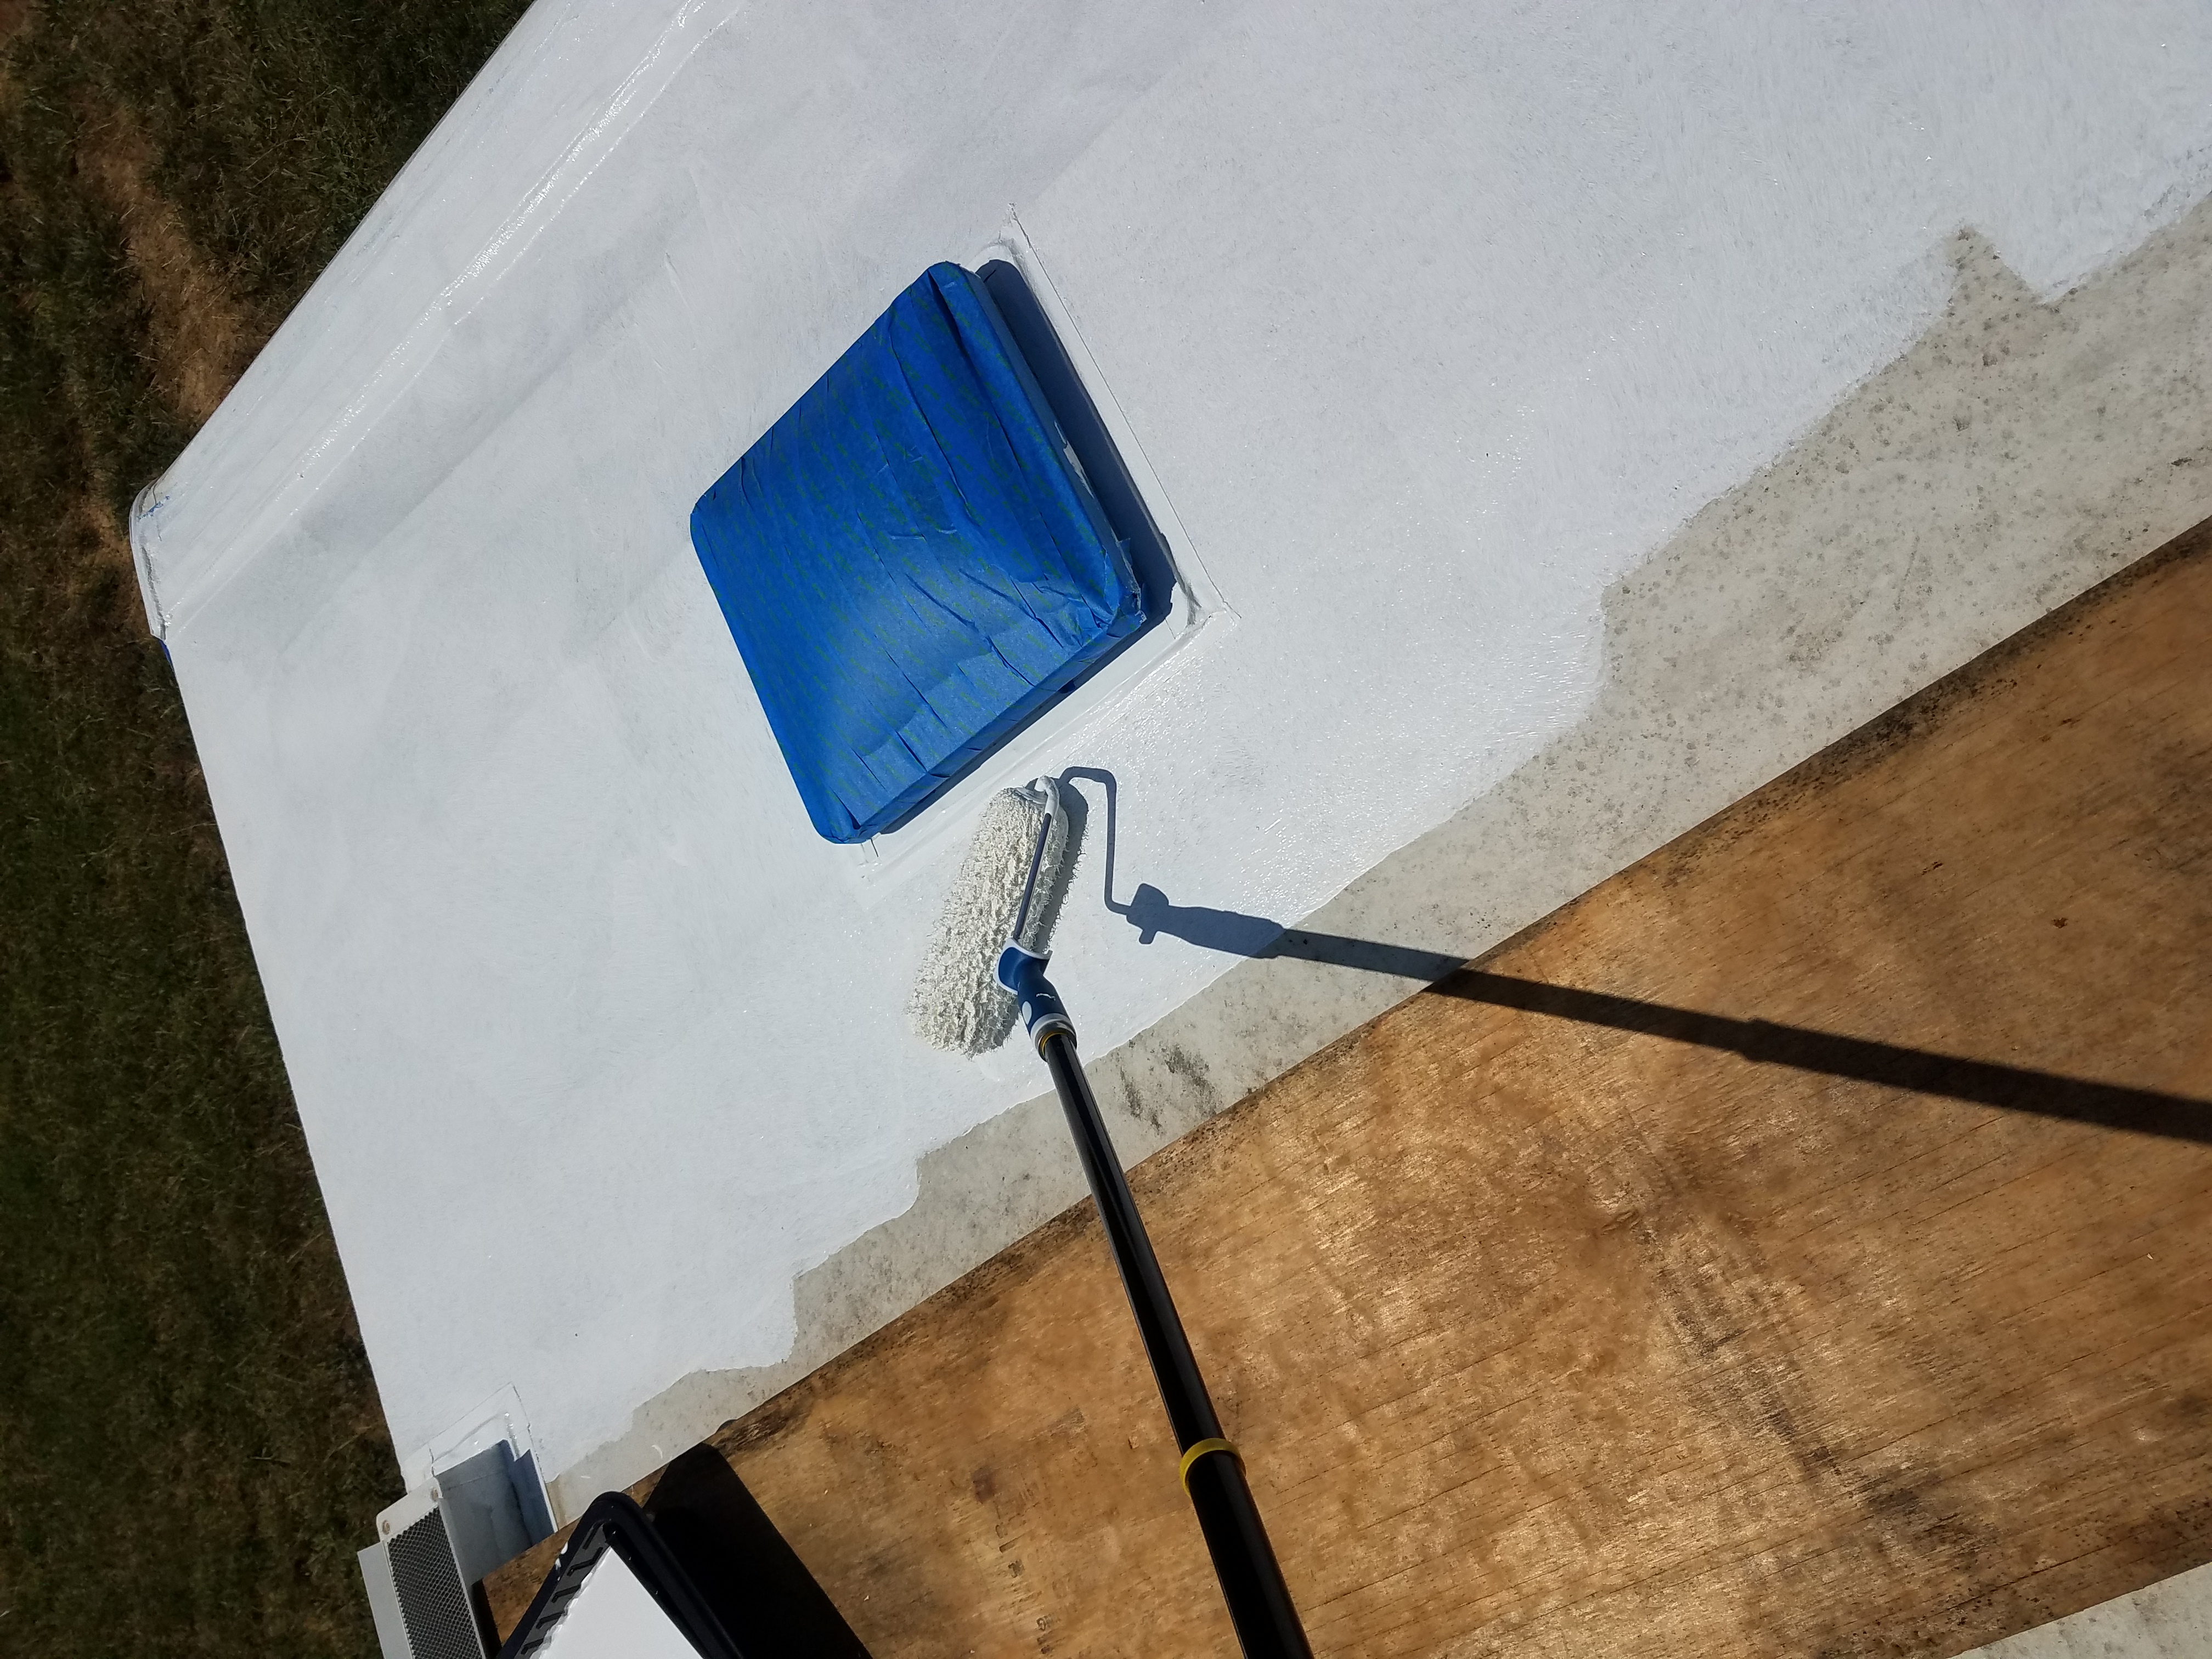
Next, I took out my painters tape and covered everything that I didn’t want to be painted. I ran a line of tape along the edge of the roof to prevent the paint from running into the gutters and clogging them up. I taped along the front where the siding curves up to make a nice, clean line where the paint would stop.
I also made sure to cover my vents with tape so the tinted plastic skylights wouldn’t get covered in paint. I made sure to get the hinges, too. I didn’t want to count on being careful while I painted so I double-checked the roof and taped everything I needed to protect. I’m not a careful painter. I’ve learned that about myself by now.
Painting
Finally, it was time to paint. There was no way I was getting that 5-gallon bucket of paint up the ladder (paint is much heavier than water). So I used a large, wide, and deep painter’s tray and filled it up. I had a roller brush with a long nap on it and an extendable handle. I remembered to start at the front and paint my way back. I made the first coat thin because the instructions said that multiple thin coats were better than fewer thick coats. I stood on the plywood along with the painter’s tray and worked my way to the back of the trailer.
I decided to be generous with my paint and paint over the edges of the roof sealing tape that I used around the vents and other roof fixtures. This way the seams will be doubly protected with overlapping layers of sealant.
When I got to the back of the trailer after doing the first coat on the whole roof, I realized that my ladder was still at the front of the trailer where I’d climbed up. I literally painted myself into a corner.
Fortunately for me, there was an 8ft drop behind me rather than an actual wall. Rather than walk on my newly painted surface, I painfully hung myself over the edge and slowly lowered myself down far enough to stand on the spare tire that’s attached to the bumper. From there it was an easy jump down to the ground. I pulled a few muscles doing that reverse pull-up, but I made it. Then I had to haul the ladder around and do the final few feet of the roof from the top of the ladder. I felt like an idiot, but there was no one to see. I learned my lesson and made sure not to do that again on the next coat.
When I finally finished painting, i.e. standing on the tin roof of a glaringly white trailer in the 90-degree blazing sun, I very happily jumped down and looked around for the first time. There were thunderheads moving in from the west. About 20 minutes after I finished, a thunderstorm dumped an inch of rain on my newly painted roof.
Yes, it rained on painting day… Despite the fact that there was only a 20% chance of rain that day. The Kool-Seal only needs 4 hours to become waterproof, but it didn’t get it. I may have screamed at the rain in frustration. Then I took a deep breath and let it go. Set-backs are inevitable, I reminded myself. I imagined the rain washing all of my hard work off the roof and into the grass (poor grass). Never mind, I didn’t let it go. I’m Still angry at that stupid rain.
The damage wasn’t too bad, though. I used rags to soak up the standing water on top of the roof and dry everything off the next morning. A little paint came off, but not too much. I did another coat, this time painting across the width of the trailer. Changing the direction of your brush with each coat apparently makes for better coverage.
The day after that, I did a 3rd coat. That’s when I realized that I’d bought too much paint. I made that 3rd coat as thick as I could and I still had enough for another coat. After the 4th coat I had more paint leftover, but not enough for a 5th coat. I threw that paint out and I didn’t feel bad about it. Four coats are definitely enough. It had better last 5 years, after all that.
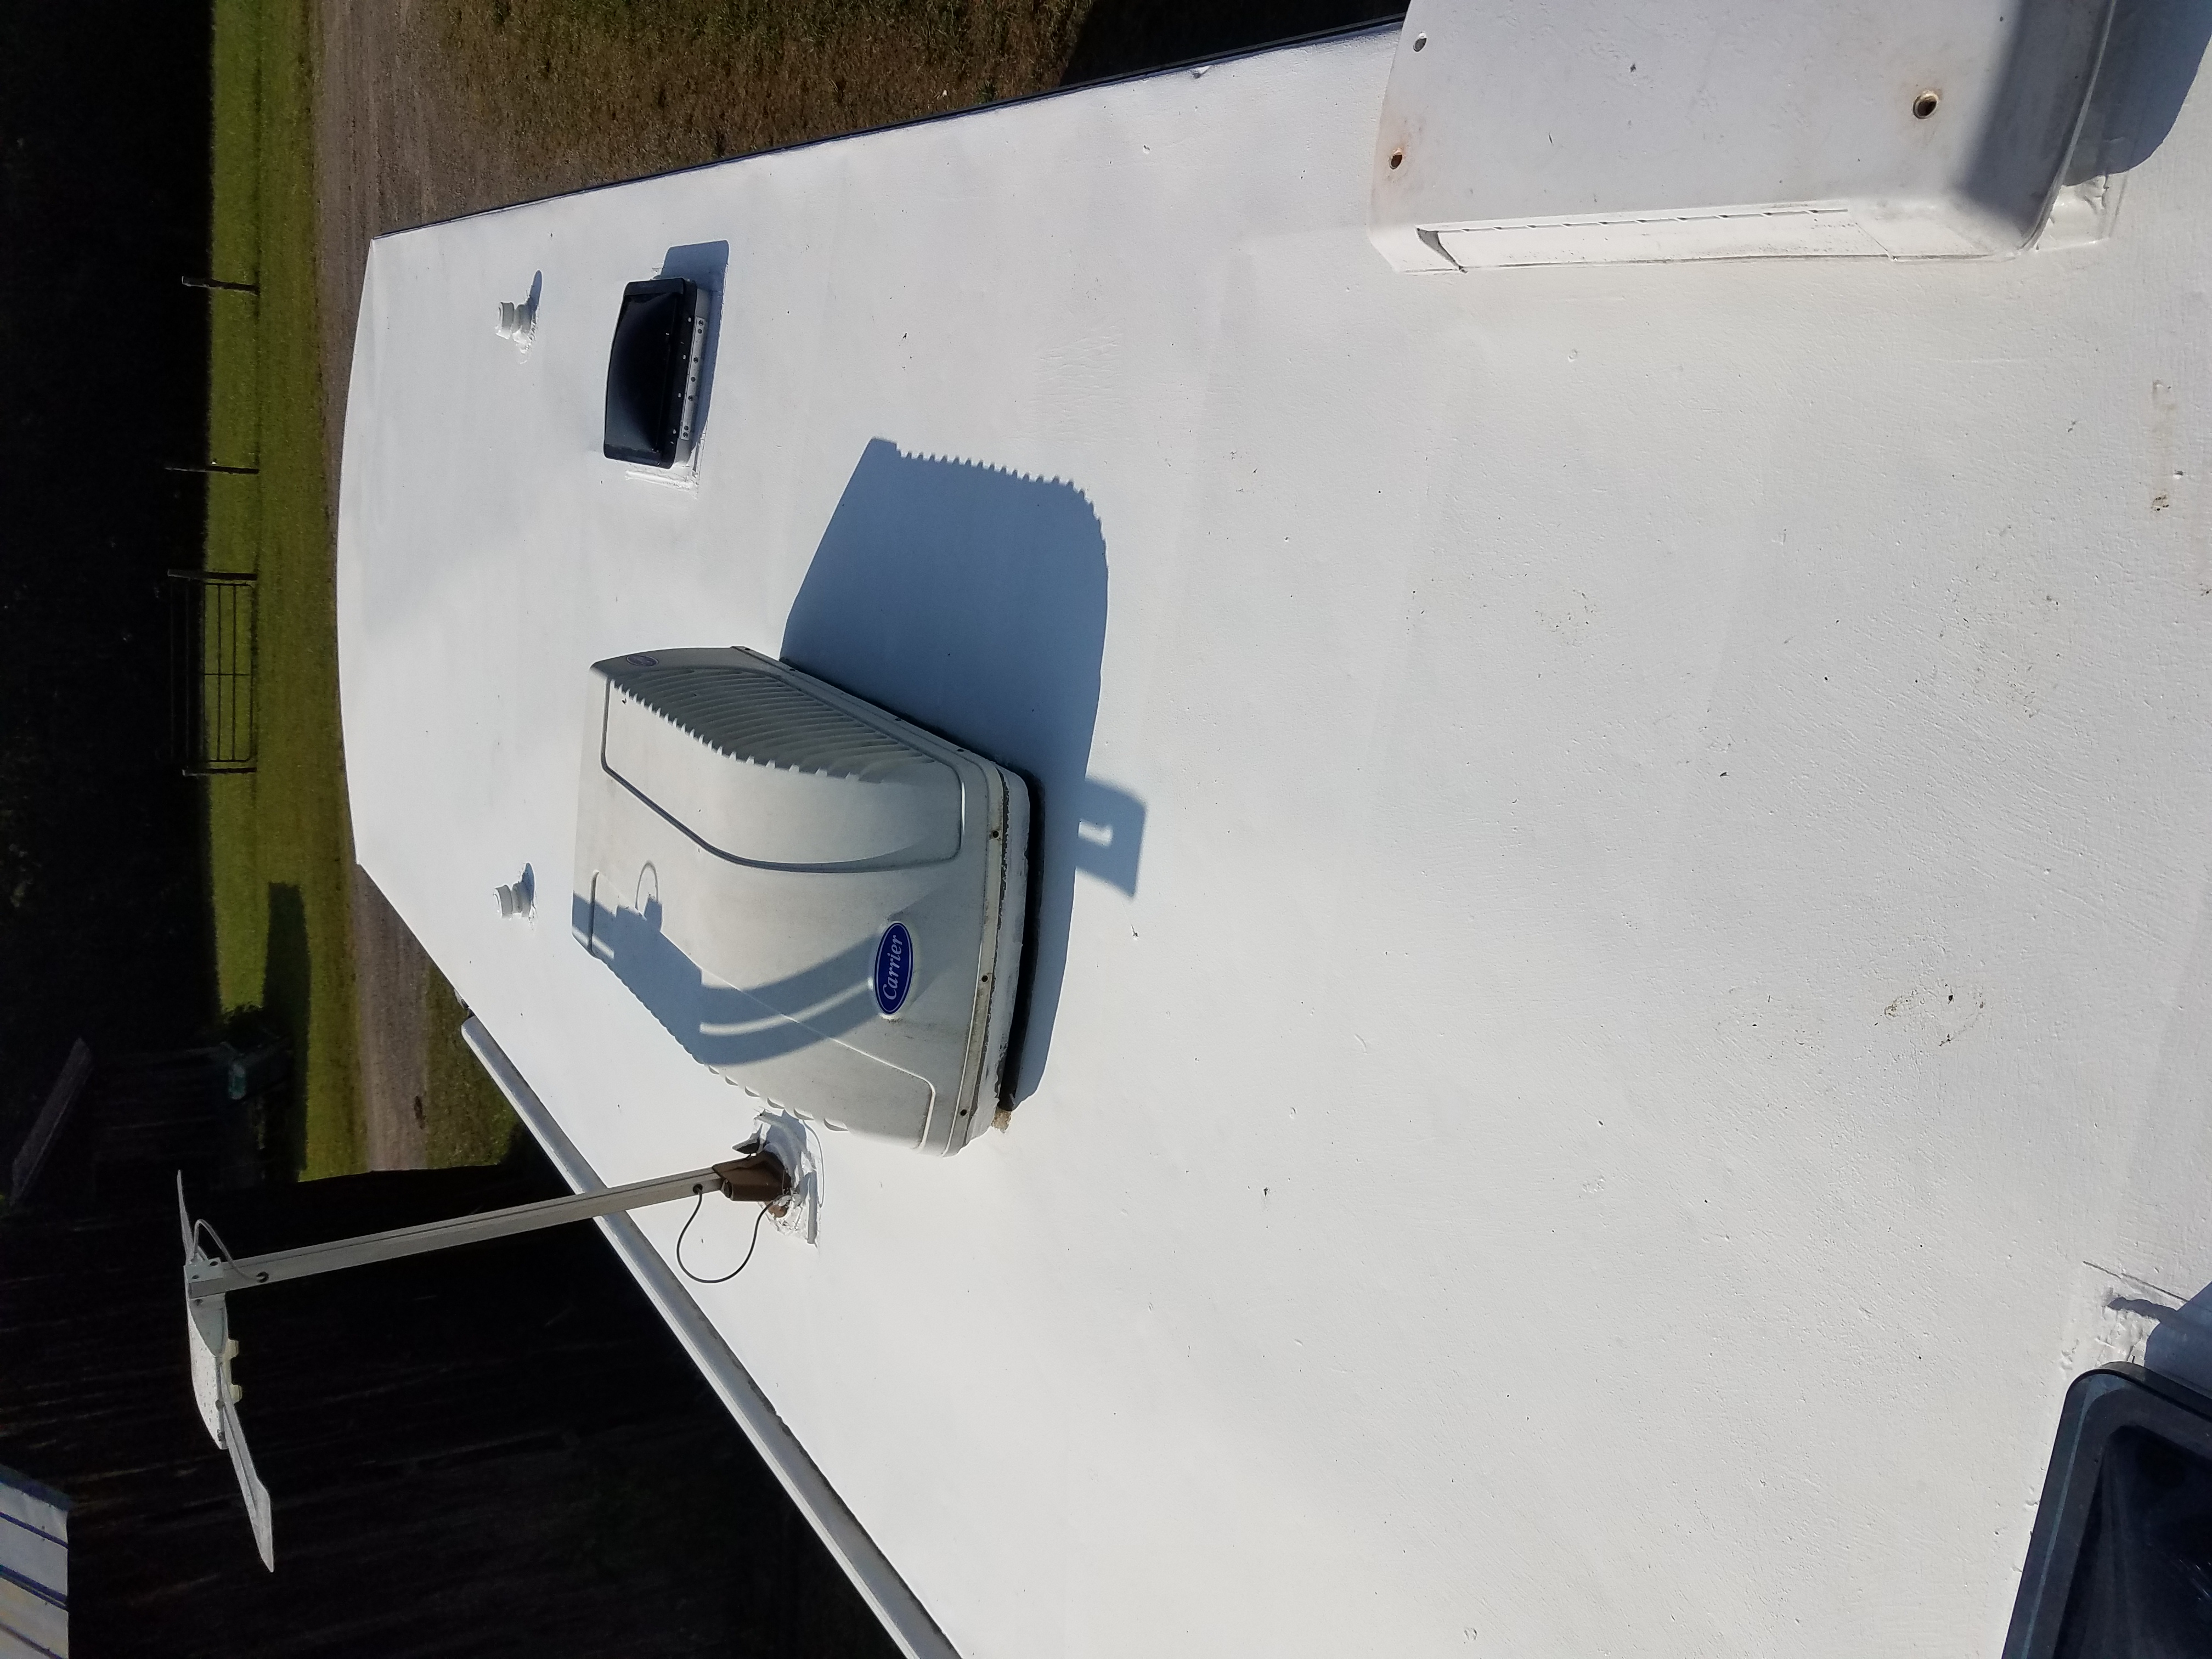
It definitely looks a lot nicer now! And, there’s no more leaking from the roof! Yay! Mission accomplished!
Roof Edge Molding
The final thing I did on the roof was to replace the vinyl corner molding along the roof edges and on the back corners of the trailer. The old stuff was grey, brittle, and cracked. I didn’t do the full reseal but I figured some new vinyl would look nice and help protect the screws until I decided to do a reseal on the rest of it (probably not until I’ve lived in it a year since I’m sure I’ll be very sick of working on it by the time I’m done).
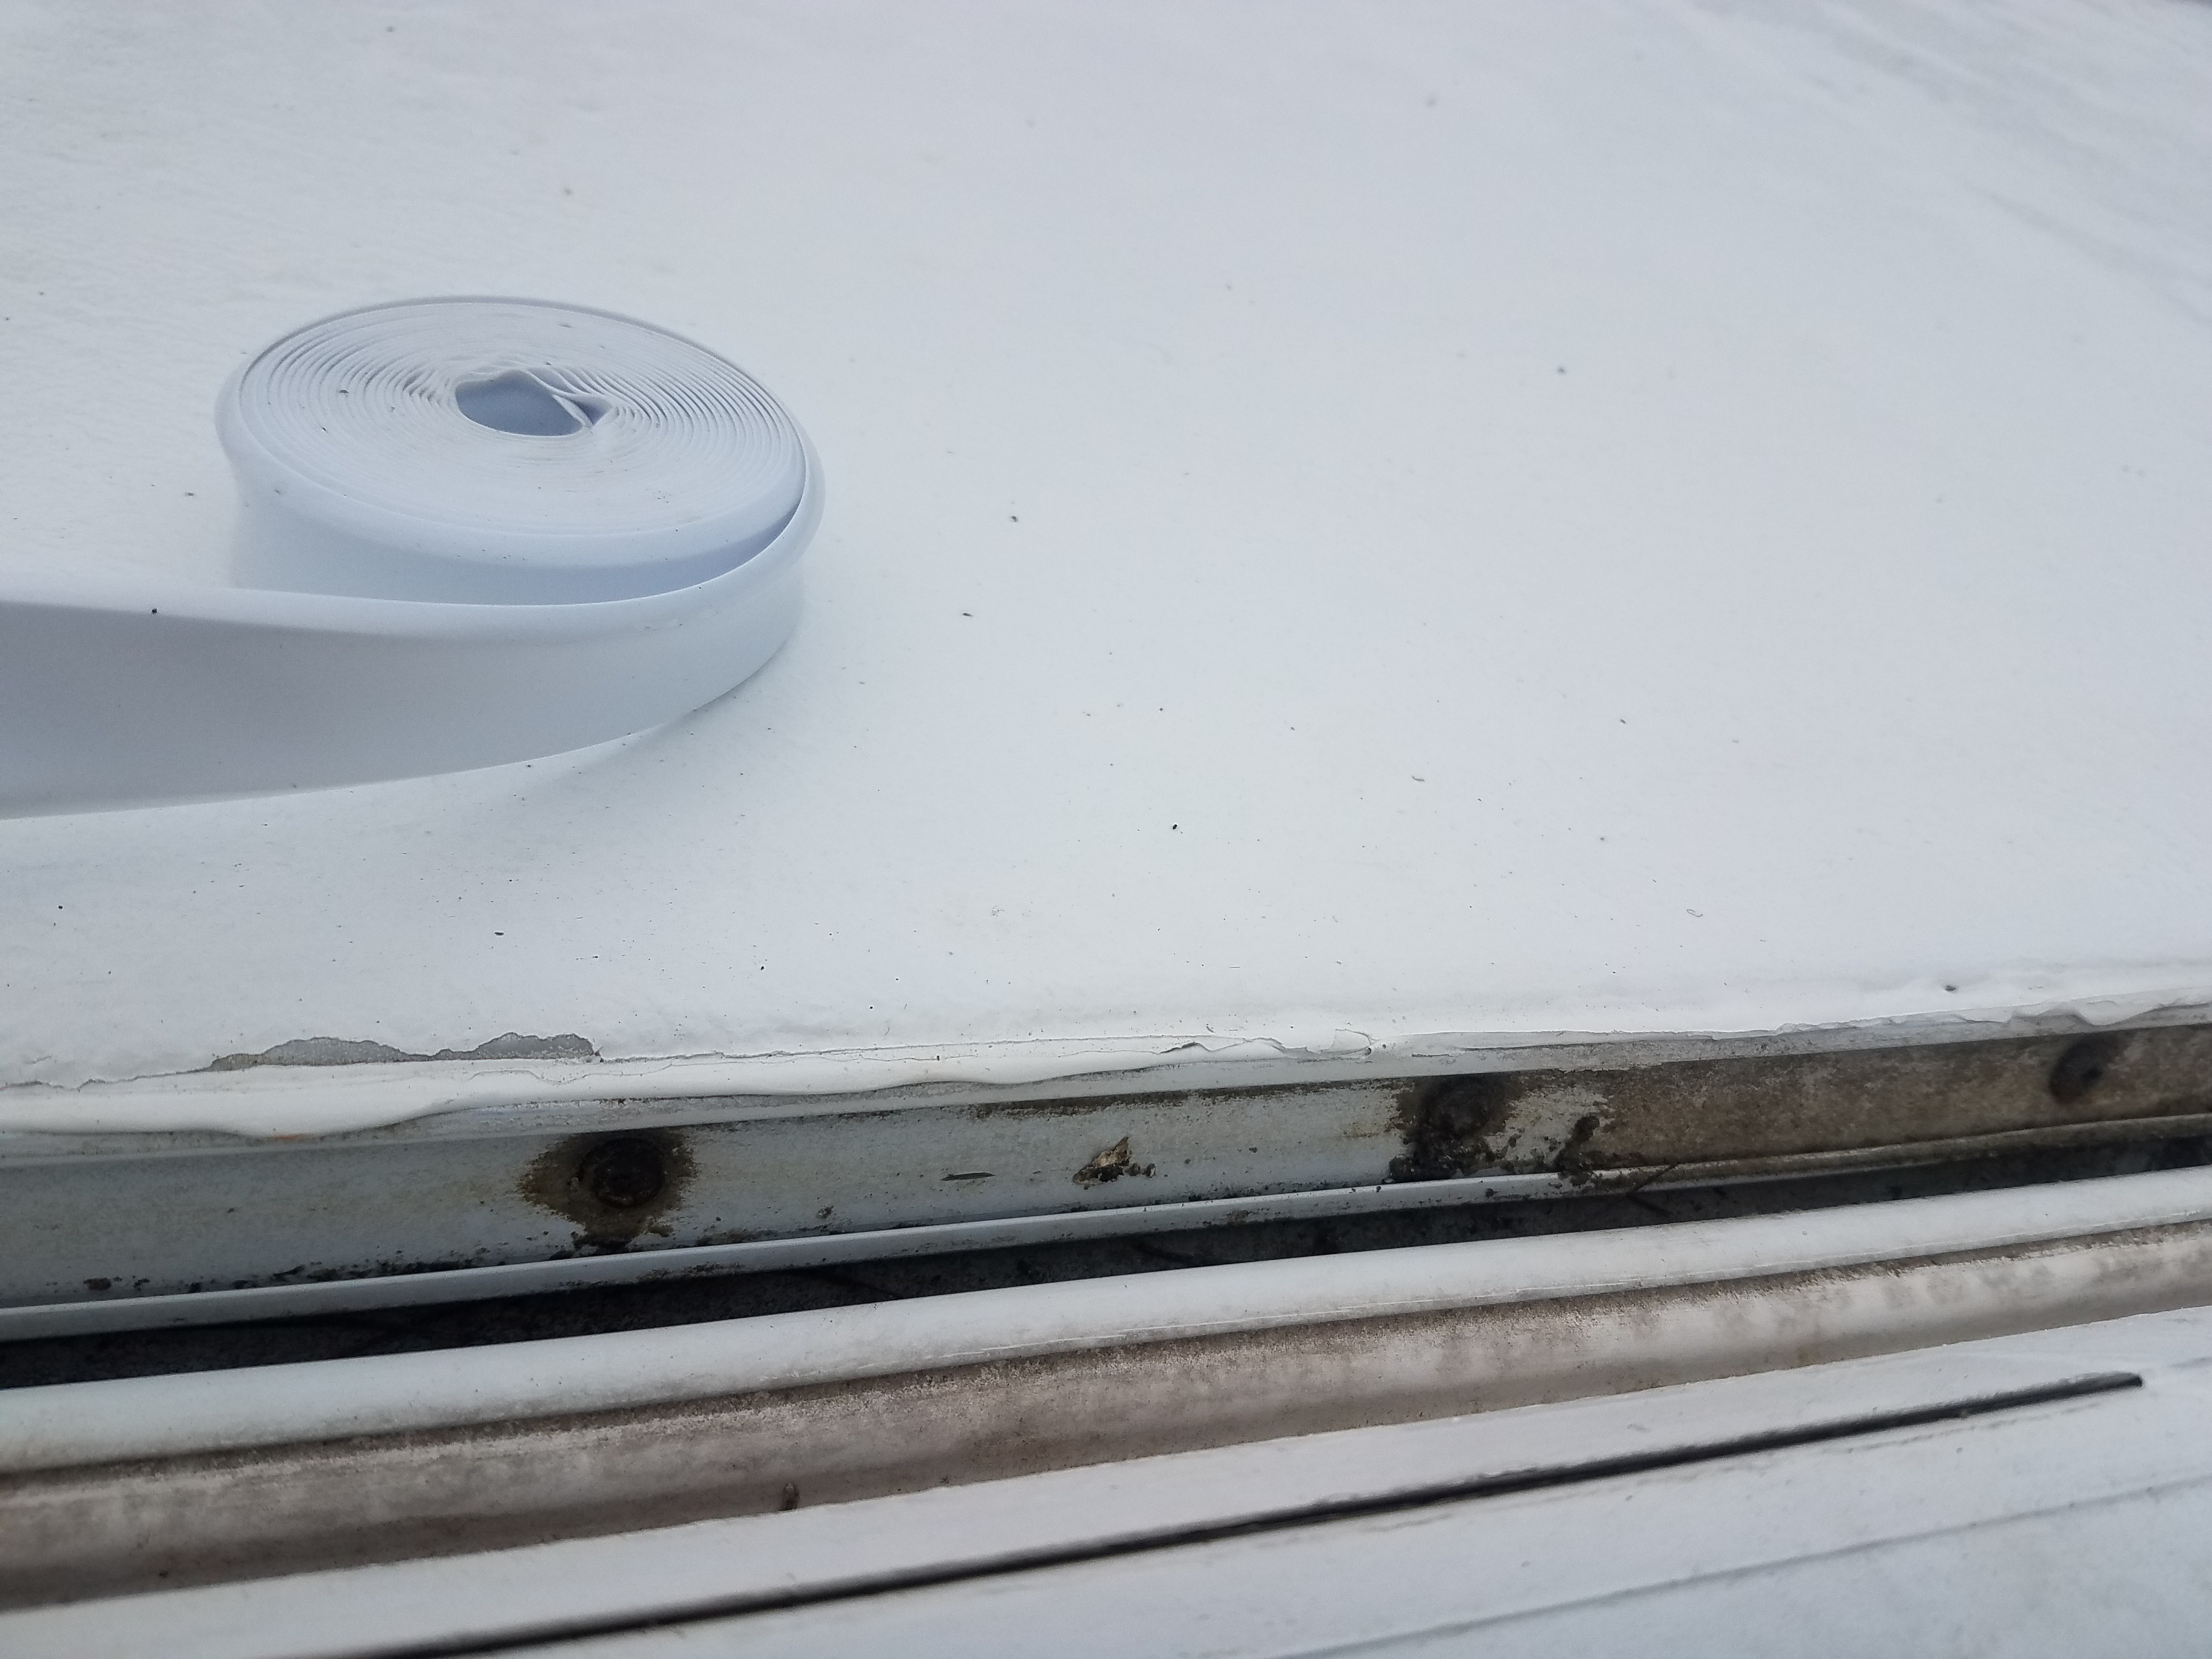
I pulled the old vinyl insert off, used a rag to clean out the interior, used a putty knife to scrape dirt out of the bottom track. Then laid in the new vinyl insert. It really does look a lot nicer. As long as those corner moldings aren’t leaking, I don’t see any need to pull them up and reseal them. I’ll leave that project for another day.
And thus, my roof was sealed and the biggest waterproofing task completed!
Click the link to follow along with the next part of the rebuild.