
Renovating our 1997 Fleetwood Mallard for Full-Time Living (Part 22)
The story of how my husband and I purchased a 20-year-old travel trailer and I DIYed the crap out of it to make it suitable for full-time living. In this series, I’m giving All of the details about the process step-by-step, as performed by me, a 26-year-old woman with No experience in construction. The first installment in this series details the purchasing process and the changes I planned to make. You can find that article in the link below and start at the beginning. Then, follow along in the series by clicking on the link for the next article at the bottom of each page.
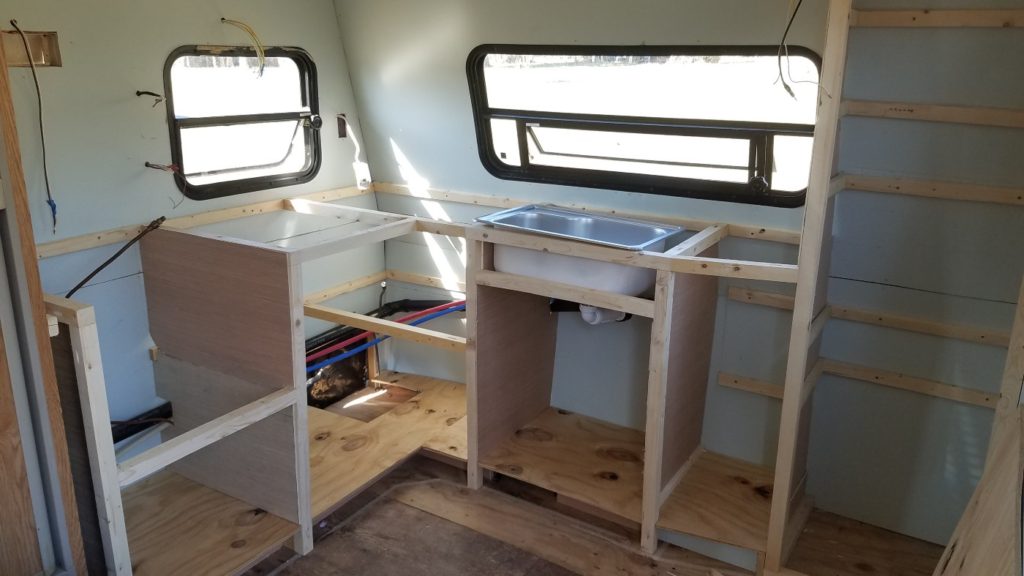
In this post, the kitchen will transform from a bunch of crisscrossing lumber to something resembling an actual kitchen. I described the rough work of building the kitchen a few posts before this one, and before that, I posted about how I designed the kitchen for maximum comfort and function. The kitchen build is separated into 3 posts because it has been a lengthy process and because I built it in stages between working on other projects in the trailer. Doing the rough work early on was necessary in order to get the plumbing dry-fitted.
Now that the plumbing is mostly ready to go, there are a few more things that need to be done before finalizing it. In order to fully install the plumbing, and have an actual working sink, I need a countertop to set the sink in. After mulling this over, I realized that I wanted to finish the shelving and cabinets before putting on the countertop because it will be a lot more difficult to work underneath with a countertop blocking access. First I have to finish the shelving supports and cabinets, then I can put the countertop on, then I can install the sink and stove, and finally, I can complete the plumbing and propane hookups. Isn’t renovation so fun!
In all honesty, I was very happy to be able to concentrate on just one project and get it to a state of near completion. The half-finished kitchen has been bothering me for weeks. Incomplete projects just niggle at my brain constantly, taking up space on the list of To-Do when it should be on the Done list. So, having come up with a logical justification to work on the kitchen, I set to with a will.
Installing Toe-Kicks
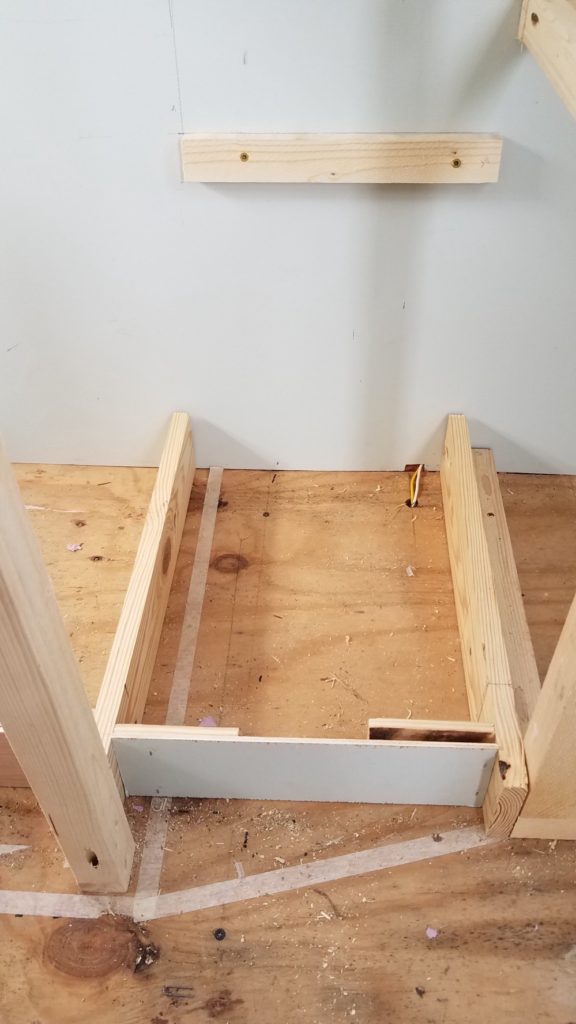
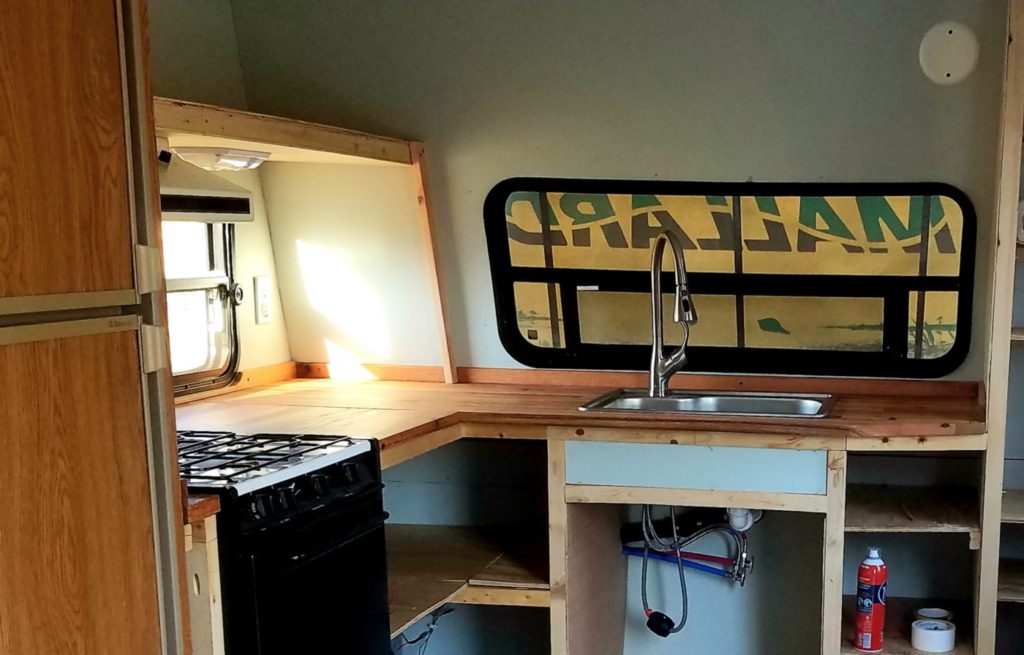
The first thing I wanted to do was install the toe-kick paneling that will go under the bottom shelf of the kitchen “cabinets”. I had already put in place the long 1x4s that would support the lowest shelf, as well as the T-supports that I would staple the toe-kick paneling to. It was simple to cut a long strip of 3.5″ wide 5mm plywood and then chop it into the right lengths for each piece of the cabinet toe-kick. I used the staple gun to attach the paneling to the 1×4 planks. I decided to use thin pieces of paneling rather than just use the 1×4 planking to save weight and money. The toe-kicks aren’t structural and shouldn’t Actually be kicked, so being sturdy isn’t a real necessity. If this paneling doesn’t work out I can try something different, no big deal.
Shelving
Once all of the toe-kick strips were stapled in, I was ready to install the bottom shelf of the cabinetry. This shelf rests directly on the 1×4 supports and extends beyond the toe-kick by 3.5″ as an overhang. This is pretty much how normal cabinets are designed. I decided to use 1/2″ plywood instead of 3/4″ plywood for the shelving to save weight and because my shelving is supported very frequently along its length. Stronger, thicker plywood is necessary for longer runs of unsupported shelving, but not necessary with my design. Also, I don’t plan to store anything particularly heavy on the shelves, since the trailer is all about having less stuff and keeping it lightweight.
I bought cheap, construction-grade plywood and I plan to sand it down, caulk any big knot holes, and paint it. It doesn’t have to look amazing since I’m only going to paint it and put it under the countertop, and then put pots and pans on top of it. It’s going to be mostly out of sight, and probably gt scuffed up pretty quickly. I’ll save my pretty work for more visible projects.
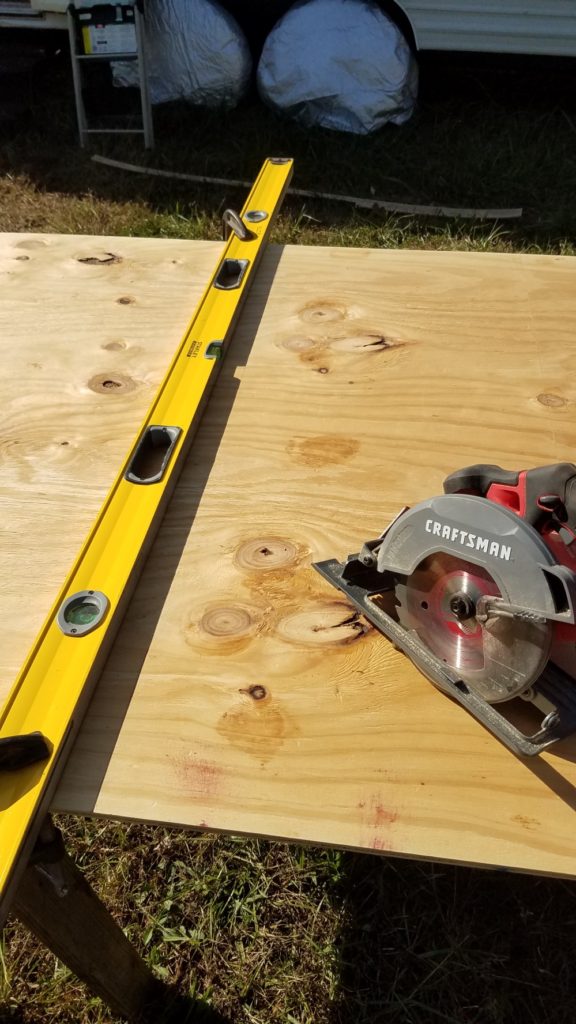
Rather than haul a giant sheet of plywood back and forth to the shop, I set up a few sawhorses just outside the trailer and used my large straightedge/level as a guide for my circular saw. A few clamps on either end and I was able to quickly and easily cut off a nice, straight piece of plywood. I ended up doing most of my cutting on the sawhorses and it was a lot easier to double-check measurements without having to walk up and down the driveway to the woodshop. Remember, when you’re cutting shelving, one large piece of wood can hold more weight than the same area of shelving in multiple smaller pieces.
Because of the way I built my kitchen, as one larger unit rather than separate sections, I had to cut notches in my shelving for the upright supports. I wanted the shelving to extend as far as possible over the toe-kick to maximize storage. A full 24″ of shelving would be ideal and in order to do that, I had to cut around the posts. I also cut notches for pipes, electrical wires, and a space for the water heater. For the smaller notches, I used my jigsaw and drill, but the circular saw is so much faster that I tried to use it as much as possible. Once I had all of the notches cut I stapled the shelves down with my pneumatic stapler/nail gun combo.

Paneling
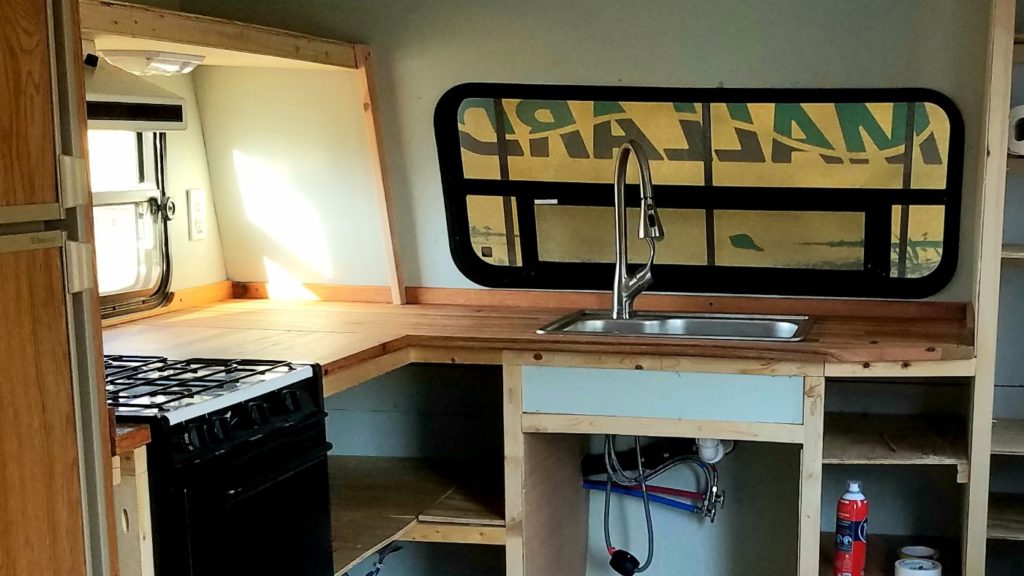
Once the entire bottom shelf was in place I was ready to start paneling the sink and stove enclosures, as well as the pantry wall. I started with the pantry wall because it was the simplest. I tried to use scrap wood from when I paneled the walls as much as possible. In order to make use of the available leftovers, I did the pantry in two pieces instead of one large piece. Any paneling along the front wall is a huge pain because of how the wall is sloped. I have to cut at an angle and the angle isn’t perfect, no matter how much I measured. I ended up doing a lot of guess-and-check with these panels, but luckily caulk, paint and trim can hide the gaps.
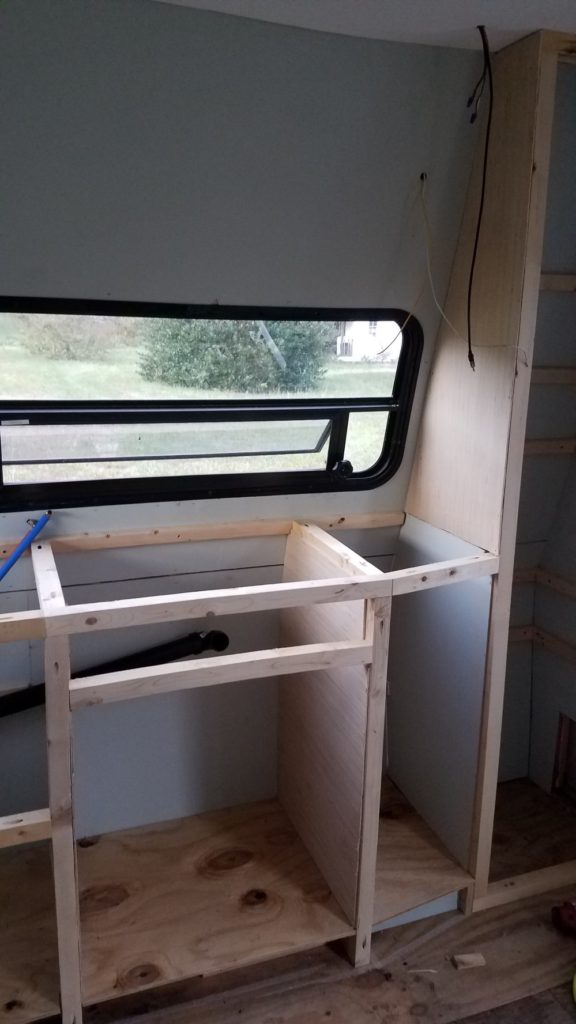
After finishing the pantry paneling I moved on to boxing in the sink area. I’m going to put a trashcan under the sink, along with cleaning chemicals and other under-the-sink items, so I wanted to close it up to contain the smells. I cut a 1×2 board in half to create a small backer board which I stapled onto the bottom shelf in line with the upright supports. That gave me something to attach the paneling to on all four sides. It’s important to support the paneling, especially when it’s only 5mm thick, to prevent it from cracking, bending, or breaking.
Cutting the panels was as much a pain for the sink as for the pantry, working with the complicated angle of the front wall. I also had to leave a space for the drain pipe from the sink to run along the wall. However, once that was done I moved directly on to enclosing the range area.
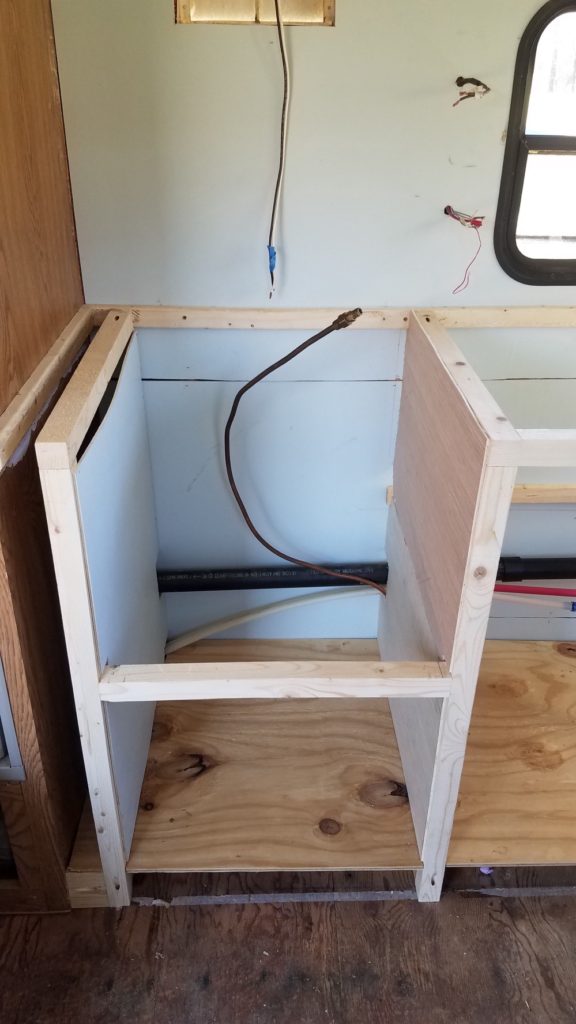
The range needs to be enclosed to provide protection from the heat that escapes from the oven and stovetop. I wouldn’t want anything on the shelves under the counter to be melted by accidental contact with the hot outside of the oven. The installation directions for the range require it to be installed in a cabinet, so I know that boxing it in is an acceptable method. Once again, I used small bracing boards on the bottom shelf and stapled the paneling to the 2x2s. You can see that the drain pipe for the sink, the hot and cold water lines for the entire trailer, and the copper propane line for the range all pass through a notch in the paneling.
The area to the left of the stove, up against the fridge, is going to be a skinny, tall shelf for things like cutting boards. I took a shortcut with the panel on that side when I didn’t have a scrap piece that was exactly the right size. That little gap will be hidden permanently behind the range and shouldn’t be visible inside the skinny little shelf. It’s not perfect. I don’t care. I just couldn’t force myself to cut an entirely new panel, although it may bug me enough to make me re-do it in a few days. Se la vie.
Countertop
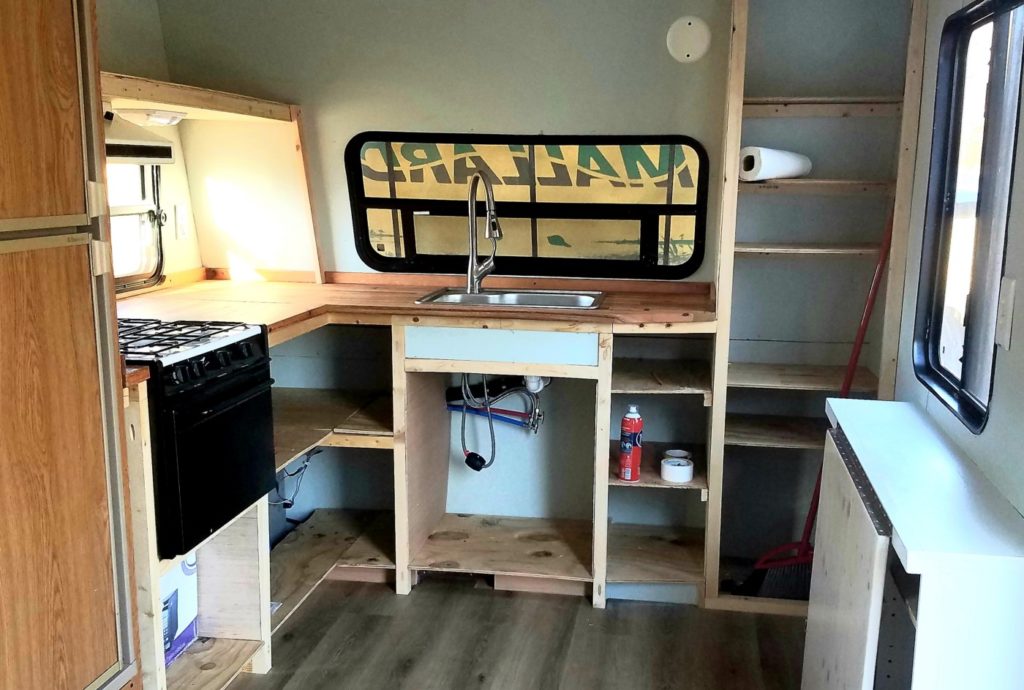
With the bottom shelf and all of the paneling for the cabinets and pantry complete, it’s really starting to look like a kitchen! The next step is going to be the countertop. Why the countertop? We can’t install the sink or the range without a countertop. They both are designed to rest on top of the counter, and the final height of the counter will also affect the plumbing. I Could simply cut a piece of plywood and make do, and if time is too short, that’s certainly a valid option. However, I have something special in mind for the counter and I want to make sure it gets done.
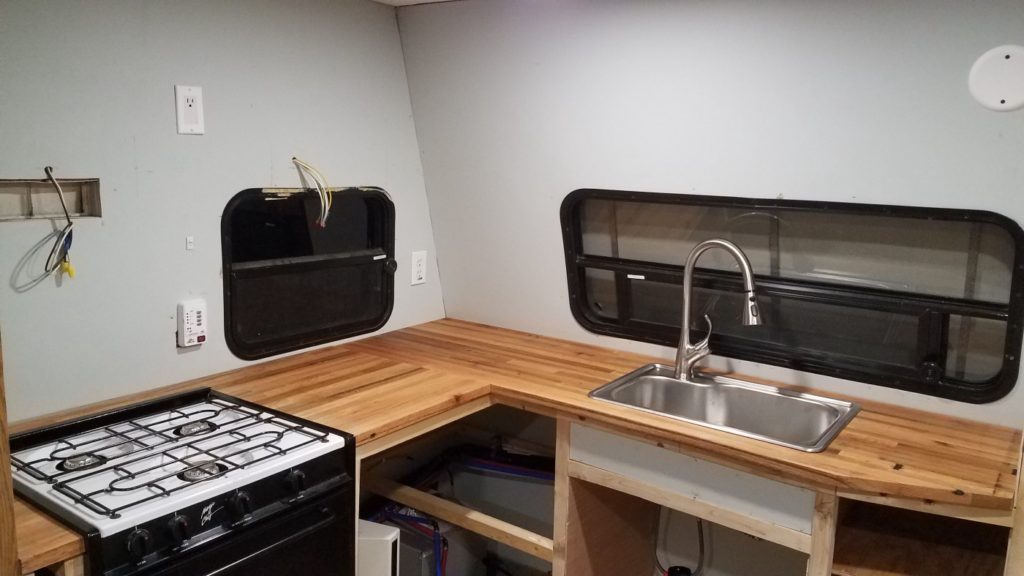
I decided to build a butcher block countertop out of reclaimed wood from the farm. I’ve already found a few 10ft long, 2″ thick beams of oak that will be perfect for the butcher block once they’re cleaned up. I’m so excited to have a beautiful, wooden, practical counter that will also hold the memory of my family’s home. We’ll take that little piece of the farm with us wherever we go. The butcher block countertop has its own post and you can check it out here. The post also covers installing the range and sink.
Once I finished the countertop I had to do a dry install in the kitchen and measure the size and placement of the cutouts I need for the sink and stove. I hauled the huge slabs of butcher block into the kitchen and laid them out as I wanted them. They looked so nice when I finally put them in that I had to go get all of my family to come up and look. The countertops made the random-looking construction of supports and beams at the front of my trailer magically turn into a kitchen. With the lovely, red oak gleam of my butcher block counters spanning the kitchen area, I could finally picture myself cooking and chopping, and washing dishes in this space. It was finally beginning to match up with the picture I had in my head.
Shelving Again
Once I had the sink and stove installed, I could finally do the finishing touches on the kitchen plumbing. I’ll write another post on finalizing the kitchen plumbing which will cover hooking up the propane to the stove and making the grey water and freshwater connections to the kitchen sink through the on-demand water heater. Installing the water heater will also have its own post.
The main frustration I had with this whole rebuild was figuring out which things needed to be done before other things could be done, and the right order to work on everything so you didn’t have to go back and undo a completed project. I’ve elaborated on this extensively in the other plumbing and electrical posts, so I won’t do it again. Just make sure to think at least 5 steps ahead and save yourself the trouble of trying to install plumbing around shelving instead of being able to do it first and have plenty of room to work.
Once I had the plumbing all finished, I moved on to installing the shelving I had designed for the kitchen. This was simple, as I’d already built in the shelf supports. I measured carefully and cut up a bunch of scrap 1/2″ plywood.
You might see a lot of people using 3/4″ plywood for their shelving, and that’s certainly valid. It really depends on what you’re planning to store and how long your shelves will run in between supports. I recommend doing some research on how wood carried weight and how to best support your shelves. It’s very interesting in a “physics class” way. Long story short, well-supported shelving doesn’t need to be as thick. Also, most of my shelves were short or narrow or both. Keep it light and use 1/2″ plywood if you can. Plywood is very heavy because of all the glue used to make it. I preferred to use more pine supports, which are significantly lighter even though they’re 2″x2″, and top them with thinner plywood.
Once all of the shelves were installed, I stapled them into place for extra security. Can’t be too careful when your home is going to be taking turns at 40 mph. The counter was screwed in from underneath, with long screws going up through the cross supports into the butcher block. The stove has multiple screw holes in the flange to secure it to the countertop from the inside out. The sink rested securely in its hole, held in place by the plumbing and its own weight. A little clear caulk around the edge can hold it in place even better and keep water from seeping under the rim.
My finishing plan involves painting the bare pine and plywood and putting a few layers of poly over the bottoms of the shelves to keep cans and boxes from scratching the paint. I also plan to install a double cabinet door on the under-sink cabinet and use some curtains to cover the other shelves and the pantry.
After a few months of use, I’ve decided to use wire shelving to organize my pots and pans in the larger corner shelves. Wire shelving is lightweight and easy to customize and adjust, so it’s perfect for tiny living. I’m just glad to find that I have plenty of space for everything I was to store. The pantry is working out amazingly. The different height shelving is great, although my largest shelf is really taller than it needs to be. Luckily, there are plenty of wire shelving storage solutions to make pantries personalized. I don’t think I could have gotten by without the pantry.
Overhead Shelf
The final addition to the kitchen was the overhead shelf above the stove. This upper shelf was an original part of the trailer design and is necessary to support the hood for the range. I couldn’t move it since the range hood has to vent out of a hole in the side of the trailer, and I was way past the point of cutting more holes in my trailer. We kept the shelf at the original height and made it slightly wider to accommodate the average width of modern microwaves. It was built like a floating shelf, basically a rectangle with interior cross-beams, and designed to screw into the wall.
Unfortunately, the studs didn’t quite line up to attach the shelf to the ceiling, and the wall framing wasn’t sturdy enough to make it a floating shelf. The refrigerator wall doesn’t have any studs, only 5mm plywood paneling, so it couldn’t be attached on that side. The only way we could make it sturdy enough was to make two supporting feet on either end of the shelf that rest on the counter.
I was a little irked when they were first put in place. I really wanted a floating shelf or, barring that, a cabinet supported by the ceiling. I didn’t want anything to be built onto my beautiful countertop. My dad and I puzzled over how to make it work but we ran out of time to come up with a creative solution, and after a few months I haven’t found the supporting feet to be a bother.
The shelf holds an apartment/college-sized microwave, my cookbooks, and all of our dishes, glasses, and mugs. I’ll want to use wire shelving to add another layer to this shelf as well since the overhead space is going unused. It’ll be too high for daily use, but I’m sure we can find something kitchen-related to store up there. Or possibly something to hang the mugs, since our mugs are all souvenirs and I like being able to see them.
I wired a dome light to go under this shelf and provide task lighting for the counter. The wires came in through a hole drilled in the middle of the frame, and the dome light was screwed into the 5mm plywood paneling on the underside of the shelf. The top of the shelf was covered in 1/2″ plywood to act as a sturdy surface for storage. This light is perfect for illuminating our chopping surface and as a low, soft light in the kitchen for early mornings in the dark of winter. It’s especially helpful because the light in our stove hood is very, very dim. We’ll get around to replacing that eventually, I guess.
Updated Review and Finshing Touches
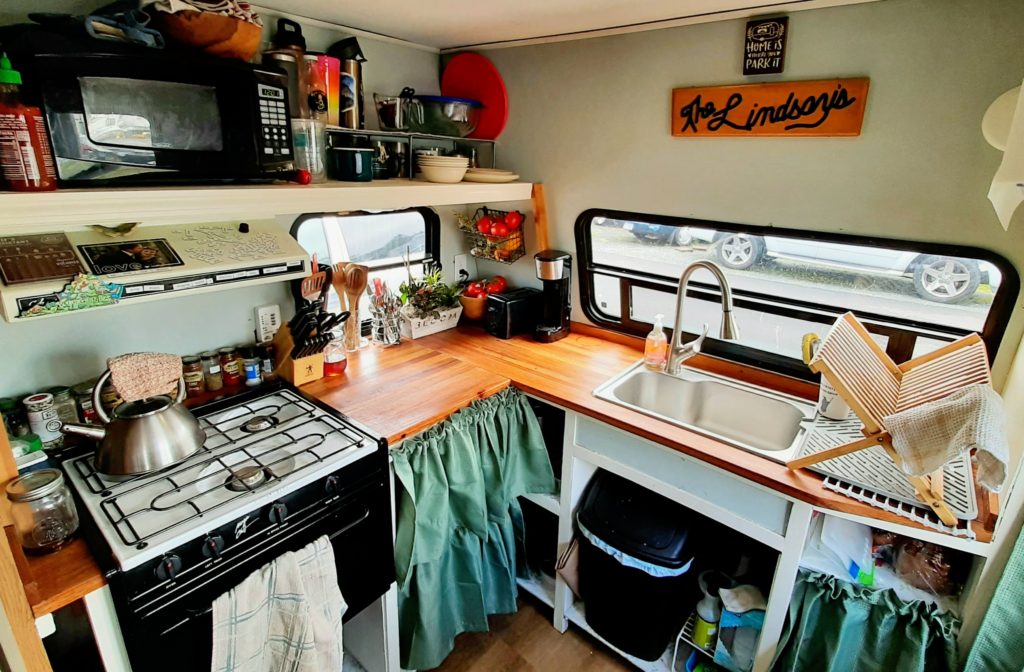
The kitchen isn’t exactly Finished, but the rest of it is merely painting and decorating. We ran out of time and have been living in it and using it unpainted and unfinished for the past 4 months. I have to say, I am very, very happy with it. When I think of the tiny little strip of counter between the stove and sink that was the entire kitchen in the original design, I am So glad we ripped the kitchen out and made it our own.
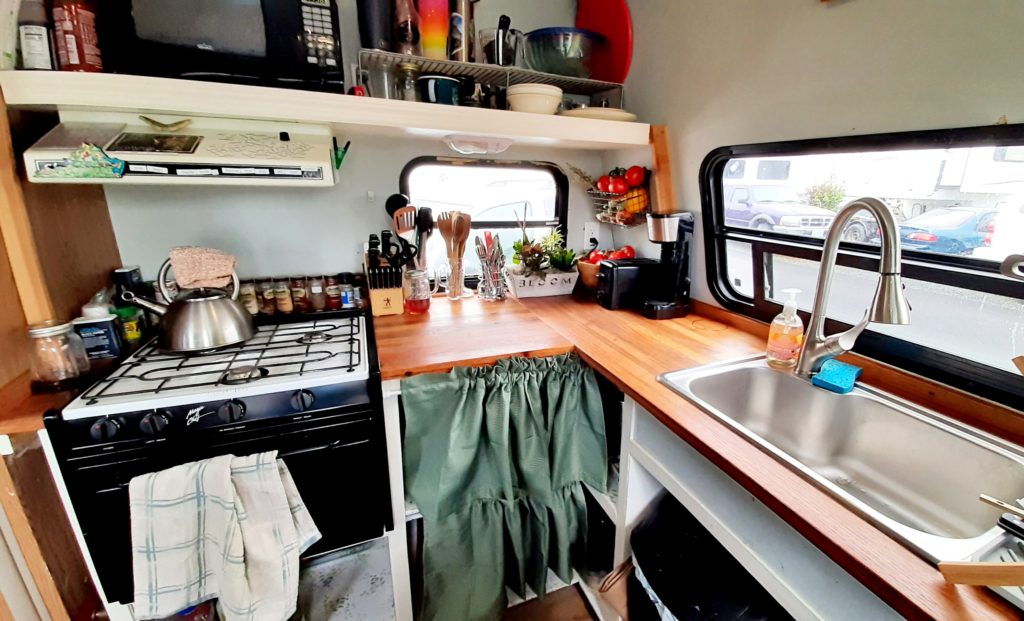
My husband and I love to cook, try new recipes, and bake interesting things. It’s one of our main couples activities and although it’s tight, we can share the fun of topping a homemade pizza or chopping a million ingredients for a crazy salad together in this kitchen. One of us stands at the counter, chopping directly on our lovely and practical butcher block counter, while the other sits at the table with a cutting board, mixing bowl, or baking sheet. There’s room in the corner of the counter for the little single-serve coffee maker and our crappy, thrift-store toaster. The utensils and silverware are in jars in front of the small window and all of the spices are lined up around the range (a spice rack is on the list, though).
I’ve been washing dishes in this sink for months now, and with the dish rack on the right side of the sink, I find simple pleasure in standing at the window, watching the various RV park cats play while I clean up in the morning. Having the trash can under the sink makes it close to everything you’re cooking and accessible for the whole house. Everything is handy, just a short reach away. We eat our leftovers and use our veggies and ingredients and the fridge isn’t too small for two people who shop once a week. The kitchen has turned out to be exactly what I imagined, and I’m so glad I put in all of the hard work to make it fit our lifestyle. We have both said to each other again and again, probably at least once a week, how much we love this little trailer.
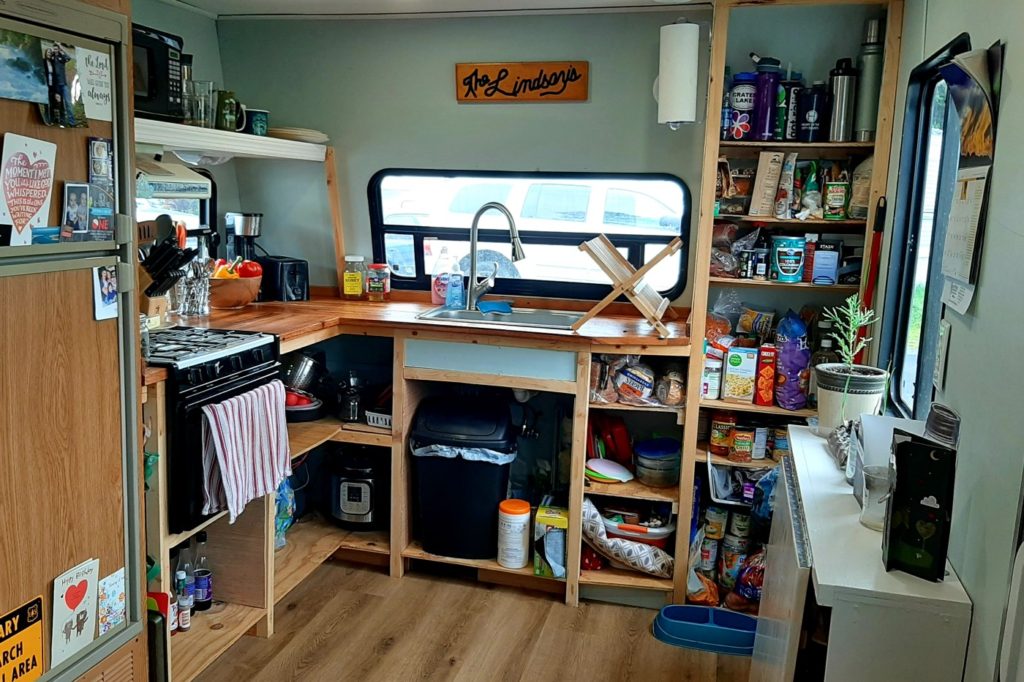
Since taking these pictures, I’ve painted the everything white, added some lovely tack paper to the surface of the shelves, and added curtains to cover the cabinet’s shelves.
I hope this post has given you some ideas about rebuilding your own tiny kitchen and help with how to make it happen. Stay tuned for more updates on the finishing (-ish) of our tiny home!
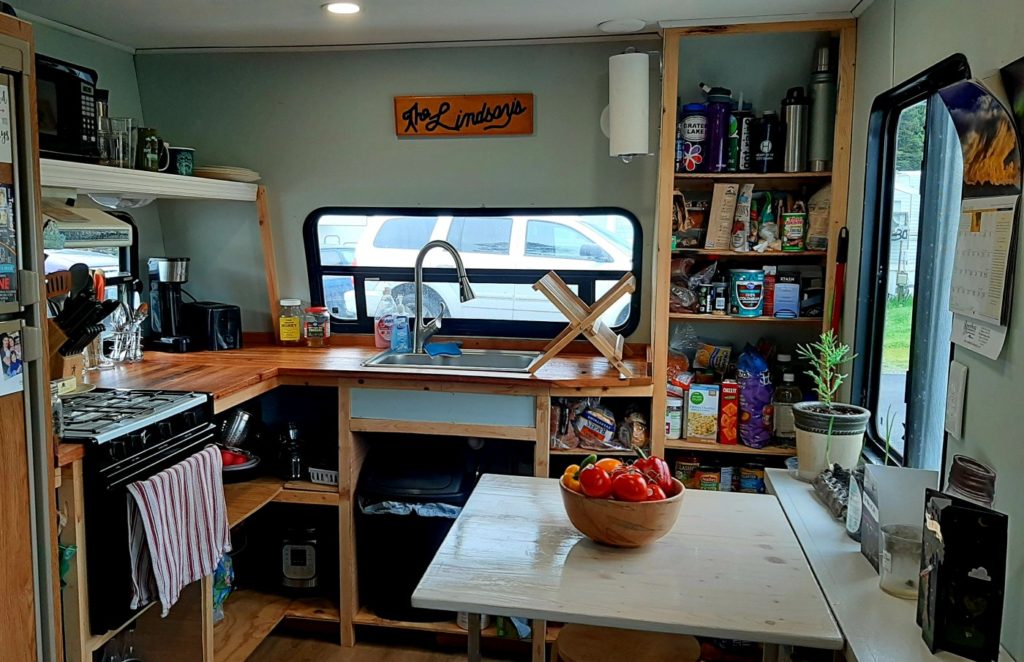
Next up, the flip-up table you can see in the picture here! Click on the link below to see how we built it.
