10 Steps for Turning Old Beams Into the Centerpiece of Your Kitchen
In this post, I’m going to show you how I built a butcher block countertop for our trailer kitchen out of wood I reclaimed from the old barns on the farm. Butcher block is a beautiful, durable, functional countertop material that gives a strong sense of farmhouses, old-fashioned cooking, and home. It requires slightly more maintenance than other kinds of countertop, but I look at it as a way of making sure you clean your countertops off regularly. When it came time to choose what material I wanted for my countertop, it was no choice. Butcherblock has always been my favorite and I couldn’t wait to finally cook in a kitchen with these beautiful counters.
1. Reclaim the Wood

As for what kind of wood to use in the butcher block, that was easy. Reclaimed wood is very popular these days, and for good reason. Older wood has character, like saw cuts, nail holes, and interesting knots in it that wood from Home Depot doesn’t have. People also like the idea of recycling something that might otherwise just rot or be burned. For me, the farm is my family home and we love the history of the place. It’s been a family-owned farm for over 100 years, growing mostly tobacco and supporting the family that owned it. Now, my parents are raising specialty dairy cows and trying to get the land working again. I’ve put a lot of my sweat and blood into repairing and improving the old buildings and the land. By using wood from the farm, I’ll be bringing a little bit of home with me everywhere.
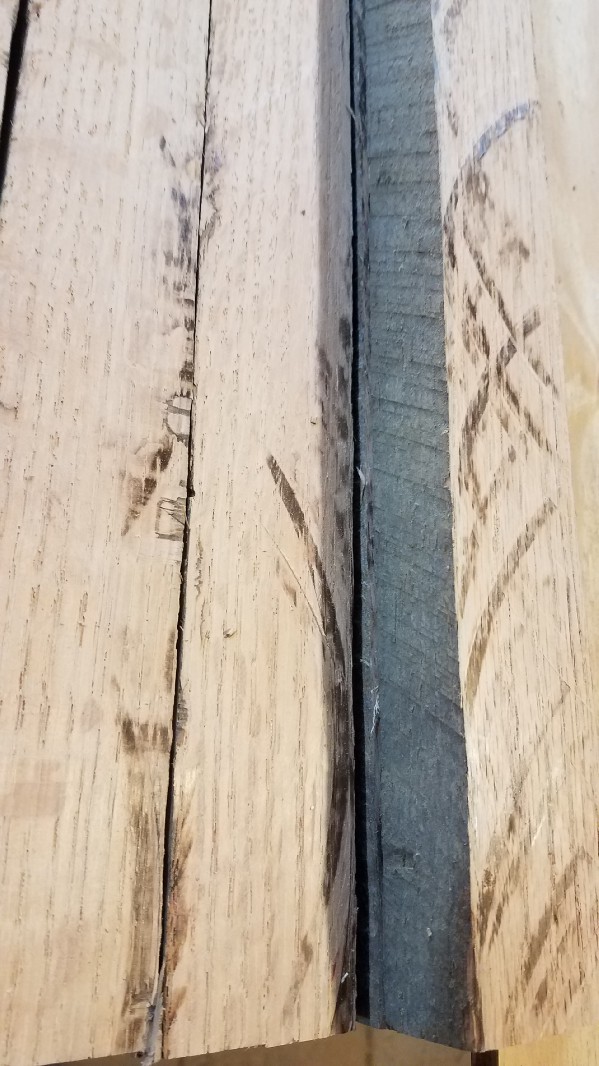
As for where to find the wood, I had a few options. We have a Lot of old barns on the farm. Tobacco barns, packing barns, grain barns, a horse barn, and a few old cabins and collapsed log houses. We also have a lot of old wood stacked around. I did some digging, but most of the old planks were pine, which isn’t good for butcher block. My dad finally pointed me to a dark corner in the collapsed log house where two huge, dark beams were stacked on the floor. Right away I knew they were hardwood because of their weight. They were heavy! Pine is light because it lacks grain density. Hardwoods are dense, hard, and heavy.
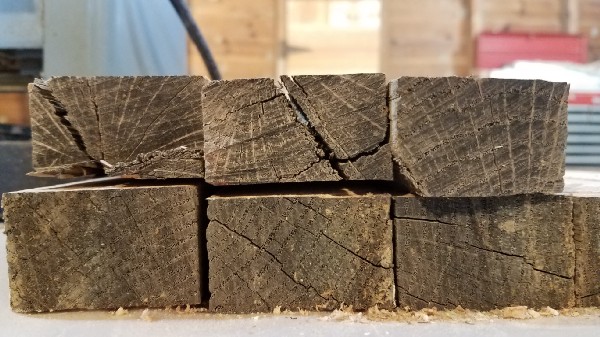
A friend of my husband’s who makes butcher block on the side told us to look for light-colored rays in the growth rings at the end of the planks. Those rays mean it’s oak! Oak is great for butcher blocks and I was happy to have two 2ft x 10ft beams to work with. There are other ways to tell if you’re looking at pine or hardwood, and usually, the size of the growth rings and the density/heaviness of the wood together can give you a good idea. Also, if you can make a dent with your thumbnail without too much effort, it’s probably pine.
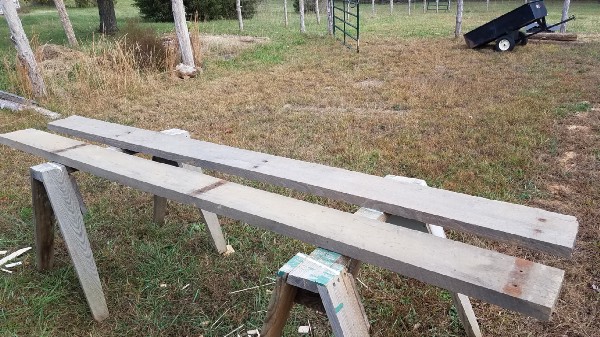
I hauled the beams out of the house and cut them into smaller lengths to make them easier to carry and work with. I knew my countertop was going to be 70″ across the front of the trailer and 46″ across the side to make the L-shaped kitchen. So I cut my board at 70″, leaving the other piece longer than I needed. In retrospect, I should have cut it at 72″ or even 75″ to leave myself room for error. As it is, with having to shave off the ends to make them neat, the planks are too short. Live and learn. I took the planks, now in 4 pieces, into the woodshop to run through the table saw.
2. Process the Wood
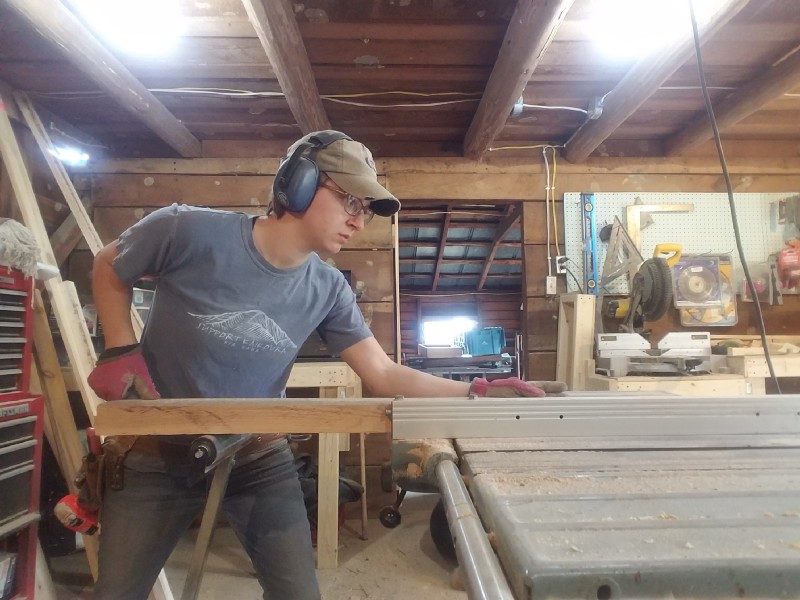
The planks were 2″ thick, which is a lot thicker than I want my countertop to be. A butcher block counter in a house might be 1.5″ thick, but I need to save weight so I’m planning to only have about 1″ thick counters. I used the table saw to rip each of the planks into 1.25″ strips which I will turn on their sides to make an edge-grain butcher block. It’s a good idea to cut the strips thicker and wider than you need them because the next step is planing then flat, which takes off about 0.25″ of wood on average.
The table saw had a little trouble cutting through these oak planks. The density was making the engine work hard and it was prone to getting bogged down if I pushed too hard or too fast. I had to push pretty hard to get it to cut and keep the saw at the minimum height to cause as little friction as possible. Always use your safety equipment and a pusher stick instead of your hand. I also used adjustable roller stands to hold up the long planks on either end of the table saw. If you don’t know how to safely use a table saw, let someone show you. You could probably do this with a circular saw as well, but again, it would need to be kind of hefty to be able to cut hardwood. My battery powered circular saw struggled to make the crosscuts. A corded saw might do better.
When I cut into the planks I was able to see the true color underneath all of the grime. From the distinctly pinkish tone, I guessed the planks were red oak. Red oak isn’t the best for countertops because the straws in the grain aren’t closed like in other hardwoods, so they absorb more water. It’s a unique quirk of red oak that doesn’t happen in other oaks. That was slightly unfortunate, but I decided to roll with it. The danger with the absorption is that if you get raw chicken on the countertop, it’s hard to make sure you got it all out. I’ll just cut my raw meat on a cutting board and be careful to wipe up any spills. Taking good care of your counters is part and parcel of having a butcher block.
Once I had all of the planks ripped down into 1.25″ widths, I was ready to start planing. A thickness planer is a type of rotating blade that cuts a board down to be all one thickness, making it almost perfectly flat. Flat on one plane, thus it’s called a planer. If works like a sander would by taking down high areas, only much faster. Luckily, my dad had an old portable 12″ planer, sometimes called a lunchbox planer, that I could use to plane my boards flat. Boards often cup, twist, or bend as they dry. If two boards are bent slightly in the opposite direction, there will be a gap when I try to glue them together. I need them all to be flat so the flat edges will fit together without any gaps.
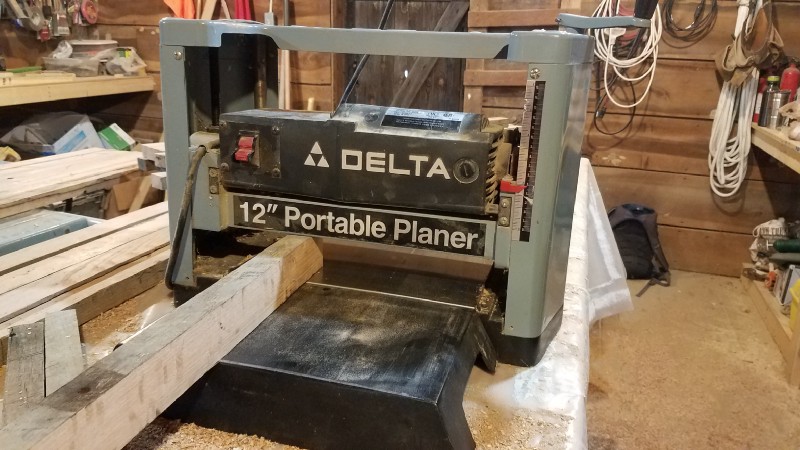
Planing is a pain, and it took forever. I ended up replacing the planer blades, not expensive or difficult, and that helped the process along nicely. The common advice is to make multiple runs through the planer and lower the blade by 1/4 turn of the handle each time. That seemed to work best for me. If the planer gets bogged down it starts to take chunks out of your boards and undo all of the hard work you’ve done to smooth it out. It can also bobble a little on the very first bit of board and the last bit of the board and take a chunk out, which is called sniping. Sniping is bad, but there’s not really a solution except to leave your boards long and cut off the sniped end. I’ll probably just sand it a little and work with it.
3. Assemble the Blocks
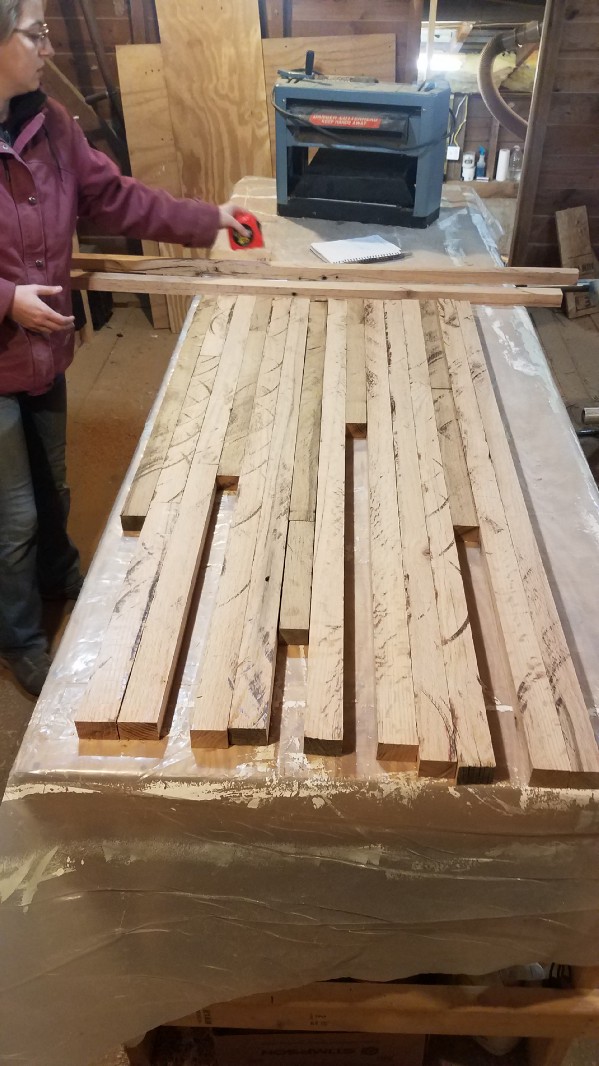
Once all of the boards were planed down to an even thickness, I cut them into random lengths and started to assemble my countertop. I mixed in a few pieces of oak from a different plank, and pieces from a more golden colored oak that a friend took off his property, to fill out the width I needed for the countertop. However, when I put all of the boards together, I could see that there was a lot of bowing in the planks and they weren’t fitting together very carefully. Gaps aren’t necessarily a huge problem, as long as they aren’t huge gaps. Closely fitting planks allow more glue to bond which makes the countertop stronger. You can fill in gaps with wood filler or a mixture of glue and sawdust. As far as I know, the wood filler or glue/sawdust mix in the cracks won’t change the function of an unsealed butcher block countertop. So, I could have just gone with the gaps and made it work. But, I decided to try and plane the bow out of the boards. The trick is to cut the long boards into smaller pieces so that the bow will be spread out over smaller pieces, and each piece will be flatter when they go through the planer.
But… then I broke the planer. When I was changing out the blades the little wrench was slipping on the nuts that tighten to hold the blade in place. As a consequence, I didn’t get the blades tight enough and when I started the machine, one of the blades fell out, got caught in the rotation, broke into multiple shards and forced the steel bar that held it in out of joint. The steel bar got caught in the rotation and bent the frame before sticking fast, making everything come to a screeching stop. That’s not the kind of broken you can come back from, unfortunately. What a stupid mistake to ruin a $400 piece of equipment! The only good thing is that the machine was old, 1998, and a hand-me-down from my grandfather. Still, what an embarrassment! I couldn’t afford to buy my dad a new one, but I replaced it with a power hand planer instead.
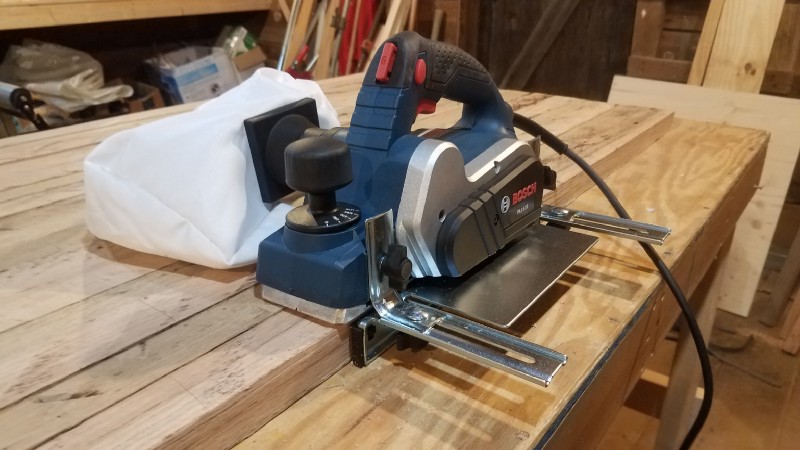
Power hand planers are very useful for a few specific things, and you can use them in other ways with some practice and skill. They’re also a lot less expensive than a portable “lunchbox” planer. Unfortunately, the power hand planer didn’t work to help me level out my boards. I spent a frustrating afternoon that didn’t improve the fit of my butcher block before giving up and asking my husband to borrow another planer from a friend of his. I promised not to change the blades in his planer. He told me I could buy it from him if I messed it up. Fair enough!
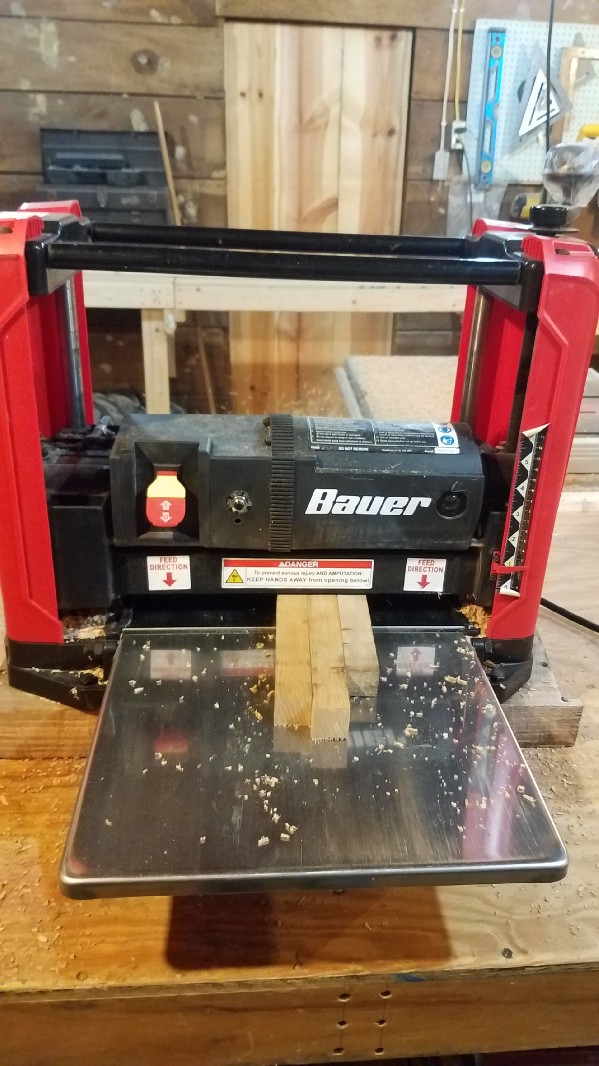
Enter, the new planer! This sweet machine was about 100x better than the 1998 planer my grandpa passed down (No offense, Grandpa, RIP). Faster, smoother, and with very little sniping. With my butcher block boards cut up into shorter lengths, I ran them all through the new planer and was able to achieve a much tighter seam when I put them back together.
Since I was using three different sources of wood to make this butcher block, I ended up with three different size boards spread throughout the block. The red oak was widest, while the golden oak was about half as wide as that. I ended up with different width “stripes” of each wood. This isn’t a problem as long as all of the pieces in each row (stripe) are the same width. By taking all of the pieces from each row and putting them through the planer together, I was able to ensure they were all the same width and would create a tight seam with the next row in the butcher block.
When I assembled all of the freshly planed pieces, I was very happy with how nicely they fit. Since I was working with three different color and width types of wood, I mixed the colors around until I liked the overall look. I wanted a certain randomness to the piece and tried to avoid repetitive patterns. When I was happy with the mix of red, brown, and gold, I numbered my rows and each piece within the row with a pencil to keep the order straight during the rest of the project.
4. Glue the Blocks
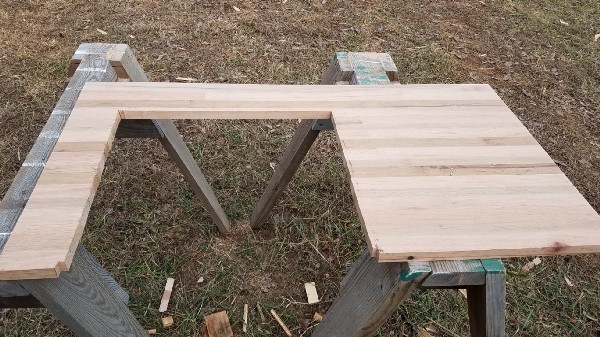
It was time to do a glue-up! Now, before gluing the entire 25″ depth of butcher block countertop together, consider whether you’re going to plane the block again after gluing. Although each row in the block was the same width, they were not all the same height. The top of the block was uneven and the block was much thicker than my ideal end product. Although most butcher blocks are 1.5″, I wanted mine to be 1″ or even slightly less, to keep the weight of the solid hardwood manageable. Most of my boards were approximately 1.25″ thick, so I was expecting to plane down at least 1/4″ after I glued them all together. My planer is only 13″ wide, so I can only plane pieces of butcher block that are 13″ wide or less. I split my larger, 25″ board into 3 smaller pieces to glue up and plane separately, before gluing them all together at the end.
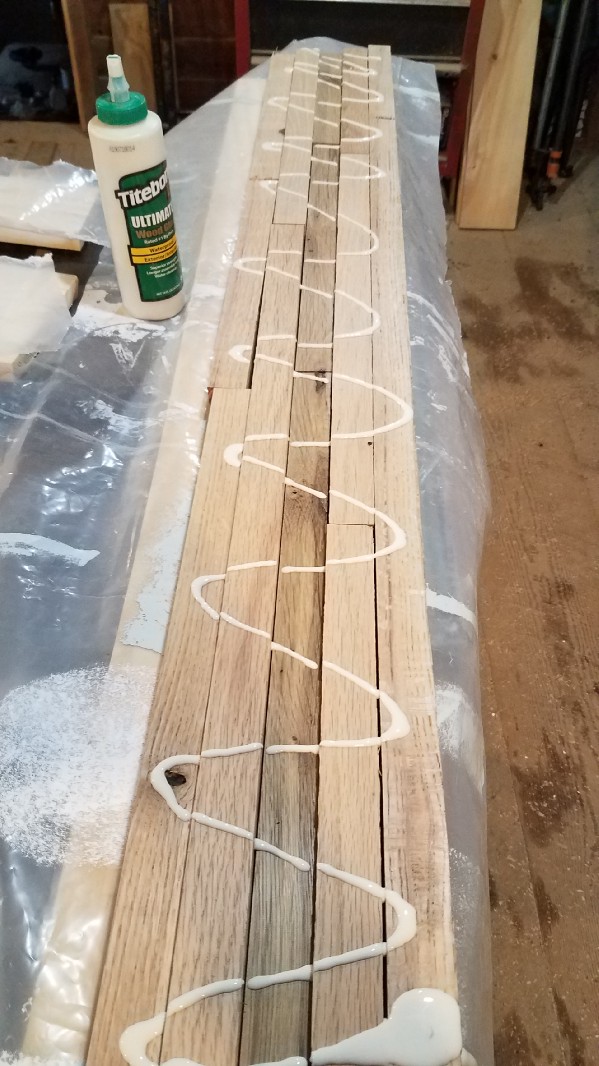
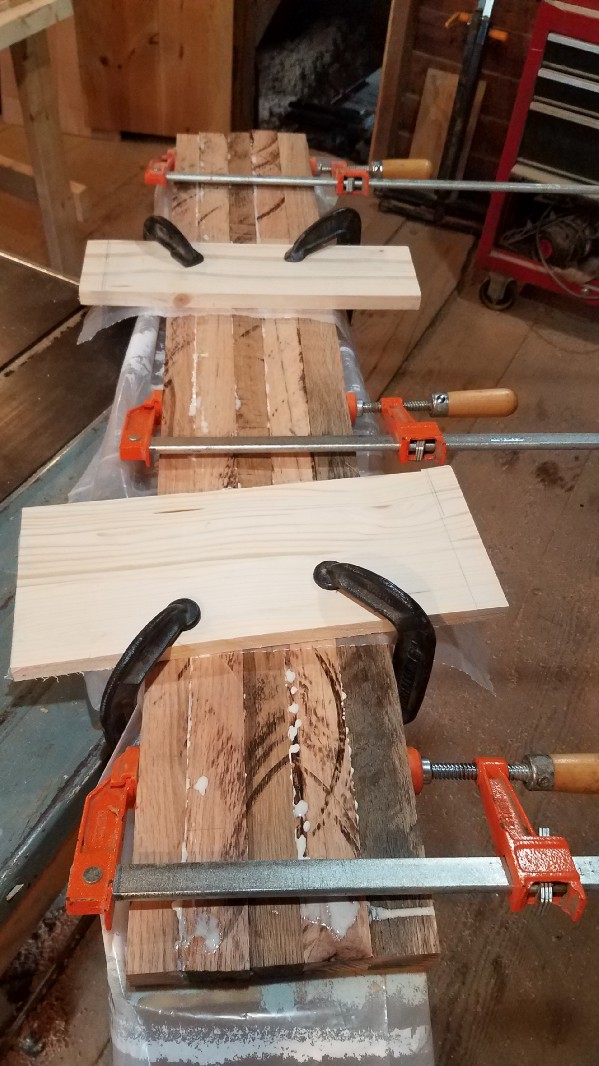
Gluing and clamping requires some preparation. You need to use a flat surface that is slightly narrower than the width of boards you are gluing and clamping. That will allow the clamps to press them together fully. The board needs to be sturdy enough to not flex and to hold clamps without breaking. I used a nice flat piece of 11″ wide plywood and a 2×6 pine board that I found in the shop. Over the board went a thick plastic sheet that I previously used to paint on, and then the boards I wanted to glue together. When I had the boards in the right order, I flipped them so their sides were facing up. Then I laid down a few thick lines of Titebond III on the sides (facing up). This is a lot faster than picking up and gluing each piece separately. Thank you, You Tube professionals!
Next, using a plastic glove, I spread the glue all along each side until I felt like it was evenly distributed. Too much glue really isn’t a thing. If it squeezes out when you clamp it, then you know it’s getting the maximum surface area to hold. You can always wipe or sand away the extra later. I did not glue the butt joints of each piece, mostly because the guy in the YouTube video didn’t. With all of the surface area of the glued sides holding each other together, I figure it’s not going to make much of a difference. Then I flipped each piece back over so it’s top was facing up and lined them up again, glued sides touching.
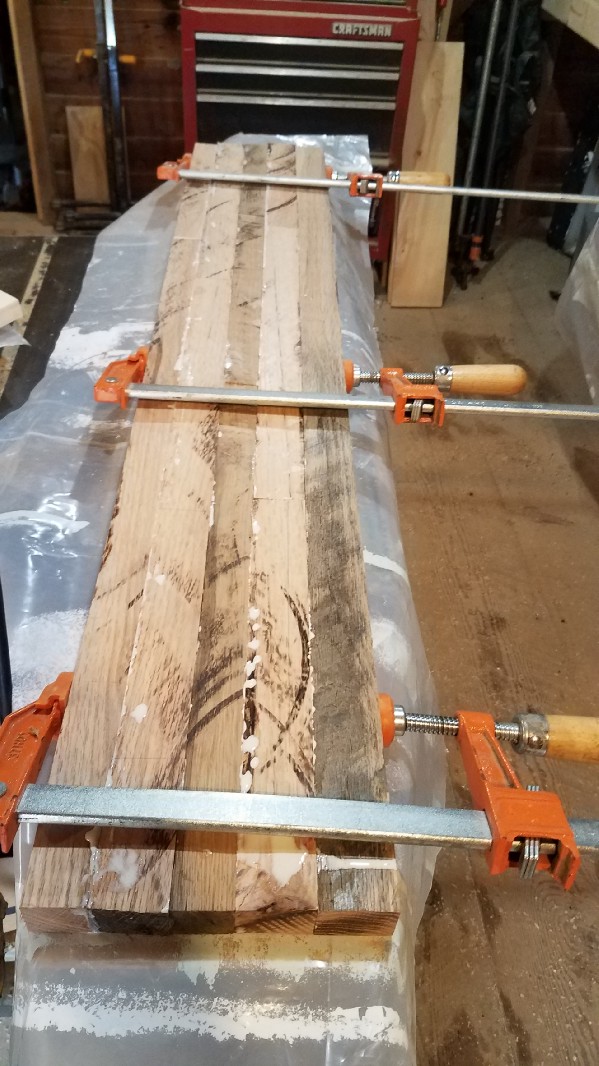
I put my first clamp on one end, then used that as a solid backing to knock the other pieces into place. I tried to get my butt joints as tight as possible by pounding lightly on the ends of the boards as I put them in place. I added another clamp in the middle and continued knocking the boards into place on the far end. I screwed the last clamp up as tight as I could, then went back down the line and tightened the other two as well. I like to see the glue squeezing up from the cracks.
Although I didn’t do it with this piece, I recommend using a long, uncut board on each side of the block for the clamps to press on. It will distribute the pressure more evenly and make the edged line up straight. I used a few random pieces of 2×2 that were in the shop in my later pieces. They aren’t glued on, and you just remove them when you remove the clamps.
When you put that much pressure on the boards, they tend to bow up in the middle to release some of the pressure. I wanted to prevent that, so I clamped a few pieces of board lengthwise across the block. By clamping these securely to the board underneath, I was able to press the board down along the whole length preventing it from bowing. Remember to put some plastic or wax paper under these boards as well, or you’ll have a hard time getting them off after.
With the pieces of butcher block glued and clamped, it was ready to dry. The glue needs to be at least 45-degrees to set properly, and room temperature is better. That’s probably not a problem for most people, but I was working in a drafty woodshop in December, so I had a problem to solve. I decided to move my board into my trailer and use a small electrical heater to keep the temperature up while it set. The Titebond III says to keep it under pressure for at least 30 minutes, but longer is better. A friend who is a butcher-block professional recommended keeping it clamped for at least 4 hours. So, I set my timer for 4 hours and moved on to prepping the other half of the counter while I waited.
After 4 hours I removed the clamps and plastic and took a look at my narrow piece of butcher block. The globs of squeezed-out glue that had been trapped between the plastic and the wood weren’t dry, so I laid it out to let the globs harden. I noticed that a few of my butt joints weren’t as tight as I could wish, but the cracks were very narrow. The piece seemed solid, flat, and unlikely to fall apart anytime soon. I call that a success! I glued and clamped the other two pieces of this half of the countertop and left them overnight. I figured that 12 hours is a good time for the glue to cure and that it would be strong enough to plane after that. The Titebond III says not to strain the joints for 24 hours, but I don’t think planing is the same as straining the joints, since the applied pressure will be downward, not pushing the pieces away from each other. Although the side of the board that was against the plywood is fairly flat, I will plane both sides of the board to get a smooth, even surface on each end. Being flat on the bottom only matters so that it rests nicely on the countertop supports and doesn’t wobble or tilt.
5. Smooth the Surface
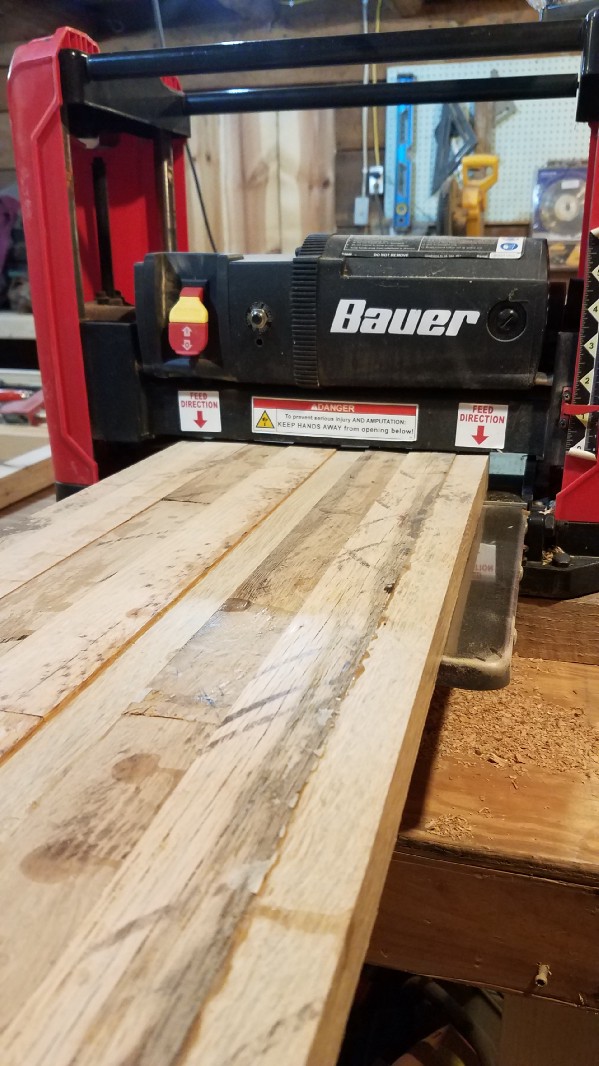
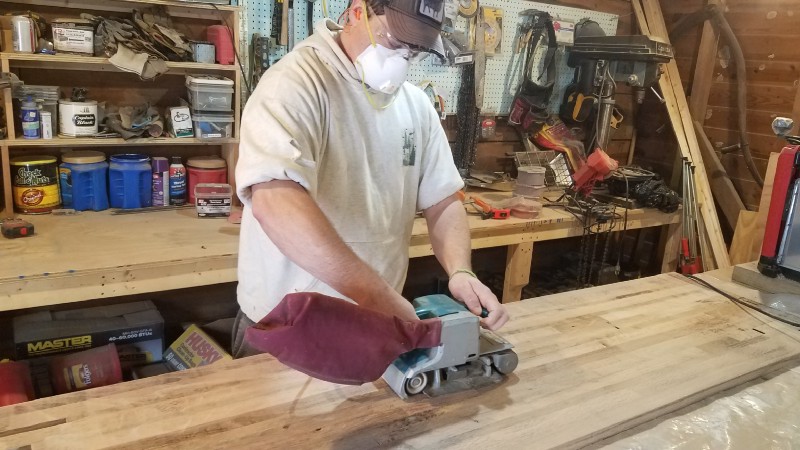
When all three sections of the butcher block were glued up and cured, I put them through the planer for the final round of planing. I will not miss planing. Despite the fine job it does making things flat and smooth, it is extremely loud and unnervingly dangerous. The noise is so overwhelming that I had to wear foam earplugs under my large ear protection headwear. It’s so loud that no one else can use the woodshop or even be in the building. It also makes a huge mess of woodchips and fine sawdust. I would love to have some kind of dust collection system to eliminate the constant mess, but I make do with the dust.
Putting the glued sections of the board through the planer was like magic. They went in looking like a child’s art project, rough and covered in glue blobs. They came out the other side looking like a butcher block countertop. I put each piece through many times, taking off about 1/32 of an inch at a time to keep the machine from straining so much with the hardwood. When I tried to do 1/16″ the rollers would slip on the wood and get stuck, making burned rub marks and sniping the top. If you have a larger machine with more power, or you’re using soft pine, you may be able to take off deeper layers. My original block thickness was about 1–1/4″ and I wanted the finished block to be 1″ thick or even slightly thinner. I ran the block through the planer, again and again, taking off thin layers each time, and flipping back and forth to get it from both directions and on both sides.
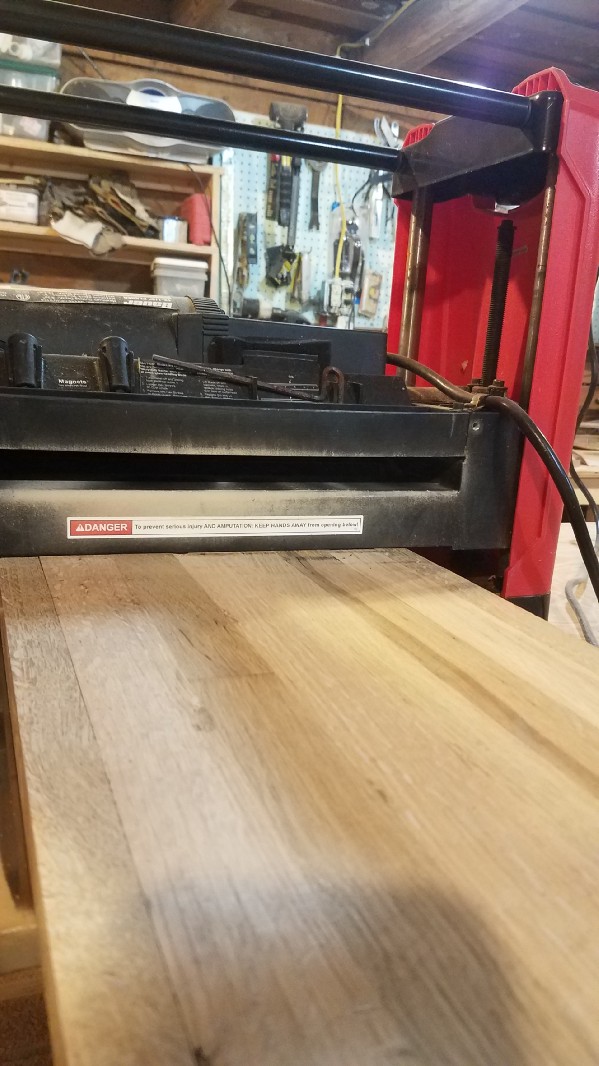
Once all three sections of the countertop were roughly 1″ thick, I lowered the planer another 1/32″ and ran all three sections through on the same setting to make them a uniform thickness. They looked beautiful and I was very pleased with how smooth and uniform they were.
6. Final Assembly
The next step was to glue all three pieces together. However, the glue needs to be at least 45-degrees to set properly and it was a very cold morning the next day. It took a few hours for the little wood stove to heat the shop to 50-degrees. I took that time to pull out the wood filler and pack some into any gaps, knotholes, or cracks in the countertop. You scoop up a generous amount on your putty knife and slather it into the crack. Make sure to scrape it in multiple directions to fill in every side, and you don’t have to scrape it completely flat since you can sand it down later. In fact, leaving a little mound on top of the defect can be good because it can tend to shrink as it dries.

I found that more than a few of my butt joints had gaps where I didn’t push the pieces together firmly enough during the glue-up. For the next round of gluing the larger countertop, I used a rubber mallet to pound the ends and make sure the butts were pushed firmly together.
The wood filler takes at least 2 hours to dry, so I went ahead and slathered it on and by the time I was done, the shop was up to temperature and I was able to do the final glue-up with my large bar clamps.
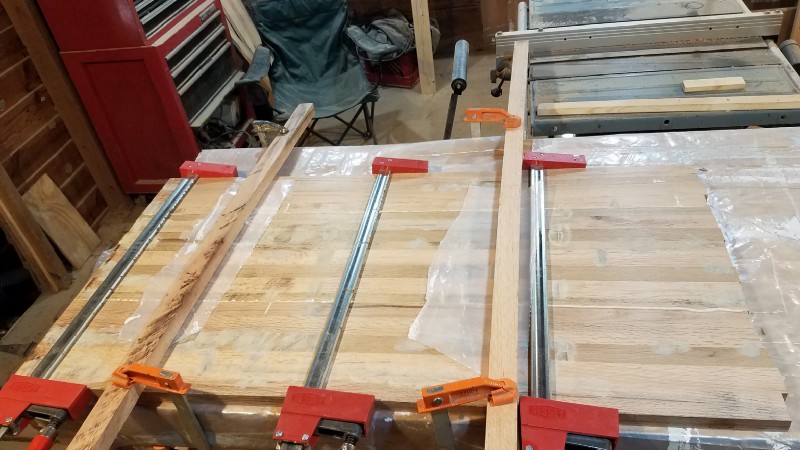
I left the whole countertop to dry overnight and moved on to gluing up the larger 70″ countertop. I followed the same process, but this time did a better job lining up the joints and keeping the planks flat. This countertop is only 21″ wide, so I only split it into 2 sections for the planer. I had to use the shop table to support the pieces because they were so large. It is possible to use the floor as long as your floor is flat. These pieces were also left overnight to cure, although the temperature in the shop got down to 40-degrees by the morning as the wood stove burned low. I gave them a few more hours in the morning as the shop warmed up just to be sure. When I took the clamps off it was clear that the glue had cured well and the long pieces were ready to go in the planer.
7. Final Plane and Sand

The weight of these larger sections and their length required using roller stands to keep the boards from tipping the planer over as they rolled out the end. If you don’t support your boards as they go into and roll out of the planer, they will push up on the part of the board that’s still in the planer and make it snipe. You need to make the board roll evenly through the planer for an even cut. I also had to guide these boards through, since their weight strained the rollers and they sometimes wandered from side to side, which left marks on the surface. Remember to read your user manual before getting started. Do Not Push your boards through! Let the rollers determine the speed to keep the machine from overheating. Do Not Cut Too Deeply, to keep your machine from overheating. Following these two instructions was frustrating since the size of my butcher block sections and the hardwood made them roll through very, very slowly. I had to back off from doing 1/32″ cuts and start doing 1/64″ cuts, only lowering the planer by 1/4 turn of the handle each time. It took me almost two hours to do each section, for four total hours of finish planing. It was tedious, but the result was worth it.
After planing, I glued the two sections of the long butcher block together and let them set up overnight. The next day my husband and I spent a few hours sanding and filling the surface. One of the sections was slightly bowed and I wasn’t able to completely fix it by clamping it flat during the glue-up. That meant that both ends of the seam were even and smooth, but the middle didn’t match up nicely, with one board sticking up higher than the other. We broke out the large belt sander to work on the seam until it was level and you couldn’t tell where the sections were glued together. The belt sander is aggressive and takes off a lot of material, so be careful not to gouge your wood or take off too much. Also, make sure to sand with the grain, or else it will leave large scuffs and scratches that you will need to sand out later in the process.
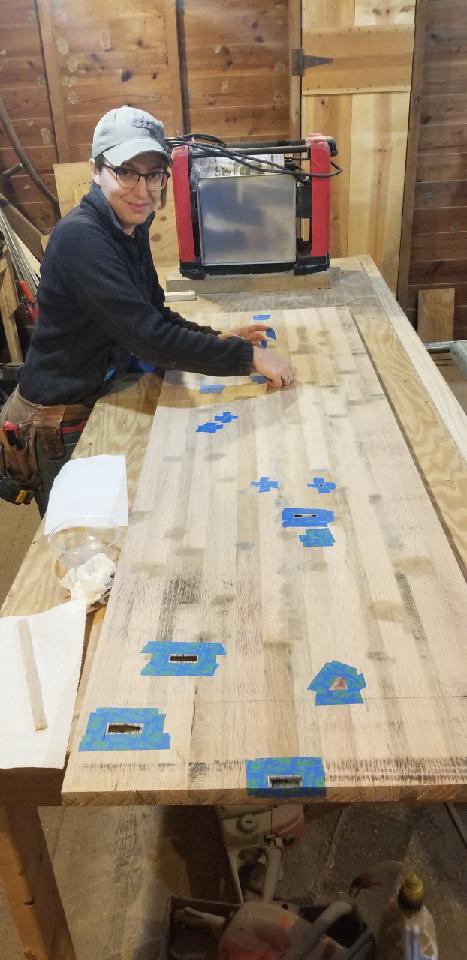
After getting all the excess glue off and leveling the seams, we got out the wood filler and filled all of the seams, butt joints, and crevices in the surface. We also had a few deep knots and some holes where there were iron bolts in the old beam. When I filled these in with wood filler, the pale color of the filler drew attention to the imperfections while also taking away from their unique aesthetic appeal. I didn’t like how it looked, so I decided to use clear epoxy to fill in the knots and bolt holes in the larger piece of butcher block.
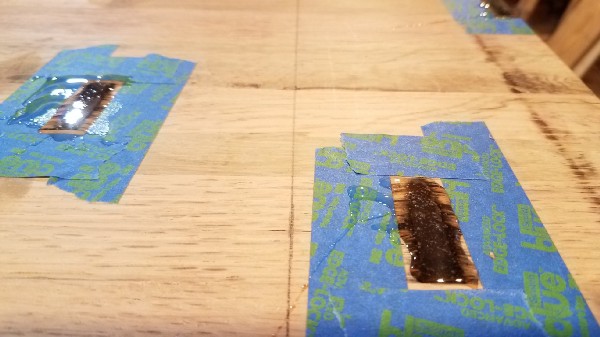
We used Gorilla Glue 2-part, clear-drying, 5-minute epoxy and it worked beautifully. Simply use painters tape to define your area and protect the surrounding wood. We mixed the two parts of the epoxy in a plastic cup, then dripped and spread the epoxy into the bolt holes and knot holes. We mounded it up a bit to make sure it would be level after we sanded it. We let it dry overnight along with the rest of the wood filler.
The next day I spent another couple of hours with the random orbital sander (palm sander) and 60 grit sandpaper. The 60 grit takes off material pretty efficiently and I was able to easily sand down the hardened epoxy until it was perfectly level with the surrounding wood. It worked beautifully and I was really pleased with the decision. I sanded off all of the extra wood filler around the seams and joints and kept on sanding until everything was as flat and smooth as I wanted it to be.
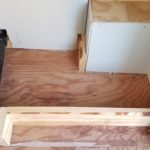
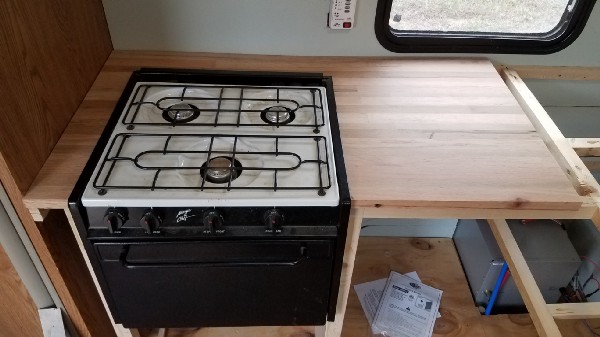
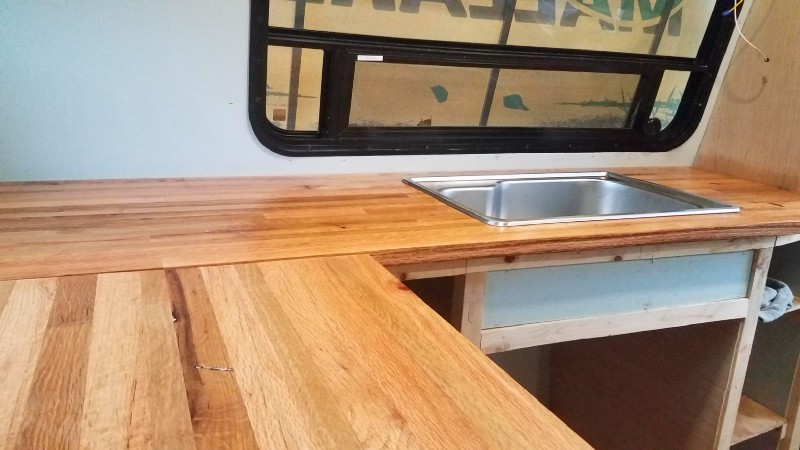
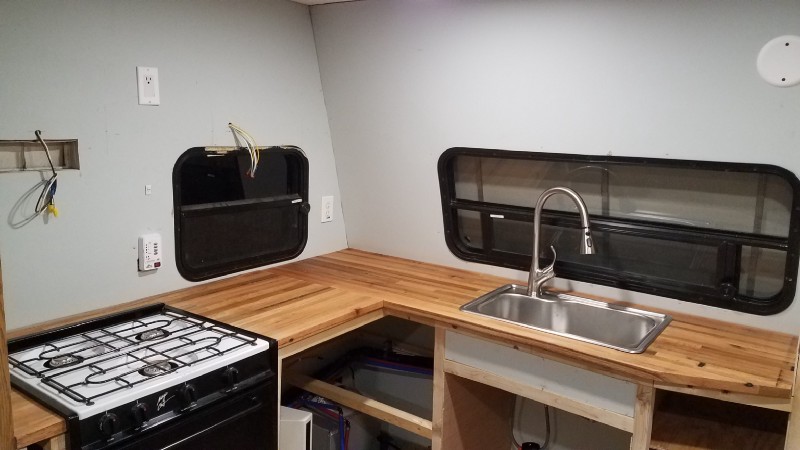
8. Fit Countertop to Kitchen Space
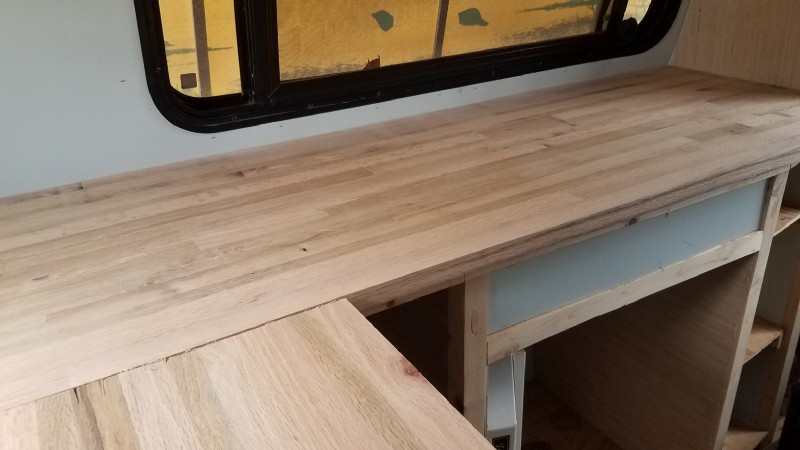
The next step was to measure the space in the kitchen for the countertop, mark it out, and cut the butcher block down to size. Countertops usually overhang the edge to prevent you from banging your knees on the cabinet doors, so we left ours wider than needed to create that ergonomic overhang. I wanted the length to be a tight fit just in case we needed to make adjustments. I put the large butcher block in first, then measured between it and the wall before cutting the other side to size. The circular saw wasn’t doing the most perfect job of cutting a nice, straight seam, but it was better than the jigsaw. The butt joint between the two parts of the L-shape isn’t as neat and tight as I wish. It needs more work in the next step.

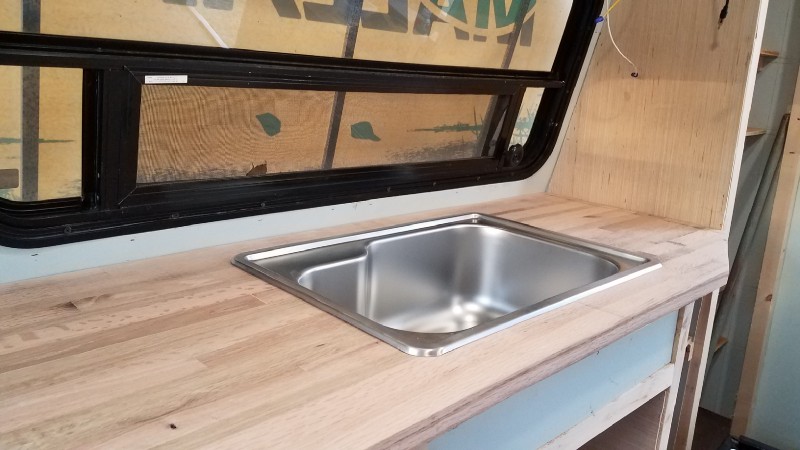
Finally, it was time to cut out the holes for the range and sink. This part was very nerve-wracking. If I cut these holes wrong, I could ruin all the effort I had put in so far. Luckily, the sink came with a template. I centered the template in the cabinet that I built for the sink, traced the outline, and cut it with the jigsaw. Measure thrice, cut once! Make sure to back and look at your markings from another angle before you cut. If it doesn’t look right, measure again. I changed my template around a few times before making the final marks. Unfortunately, the template turned out to be larger than it should have been. I recommend checking the template against the measurements in the manual just in case. Also, you can put the sink on the countertop upside down and trace it. Then trace another line about 1/4″ inside the other line and cut there. When in doubt, cut it smaller than you think. You can always cut more off later, but it’s a lot harder to put things back after you’ve cut them.
Finally, I cut the far edge of the butcher block at an angle to match the angled shelving I built next to the pantry. The idea was to leave room for a chair, and I didn’t want the countertop sticking out too far and making it hard to sit at the dining table. I tapered the angle so that it went from overhanging by more than an inch at the beginning of the angled shelf, to flush with the shelving by the time it met the pantry wall. That way we had the maximum amount of counter space while still leaving space to pull out a chair.
The stove cut-out was slightly more difficult, but I used the Installation Manual that came with the range to measure and mark the cut-out. If you don’t have the manual, you can probably find it online. The exact measurements needed for the stove were provided, as well as a handy, detailed diagram, and I was glad not to have to guess and check. Again, measure three times!
This cut didn’t go as smoothly as the sink cutout and I had to make several corrections after the initial cut. It turns out that neither the front of the counter nor the back wall is square. Just typical. In the end, though, the stove fit and the mistakes I made were hidden underneath the flange. Unfortunately, the stove won’t be exactly centered under the hood because I built the support about 1.5″ too far to the right. I decided not to rebuild the shelving or cut a new hole in the outside of my trailer to make it match up. I’m going to have to live with the range hood being slightly off-center from the stove. I don’t think it will be very noticeable. This kind of mistake is the consequence of do-it-yourself work and it won’t be the only small mistake I’ll have to learn to live with.
With the countertop cut to size and the sink and range holes cut, I broke out the sander, again, and went to town on the final surface. I graduated one at a time from 60 grit, to 80 grit, to 120 grit, to 220 grit. You should also use 180 grit, but I didn’t have any so I just sanded extra with the 220 to make up for it. The tabletop got smoother and smoother with each new sandpaper grit until the 220 made it feel almost as smooth as glass. The difference is amazing and I was really glad I took the time to go through each grit as recommended. By the time I was done sanding, the butcher block was soft, smooth, and not at all splintery or ridged.
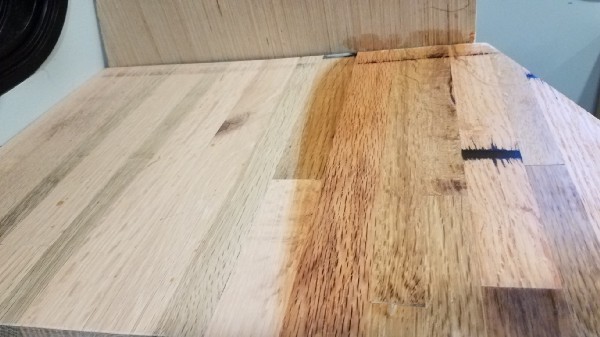
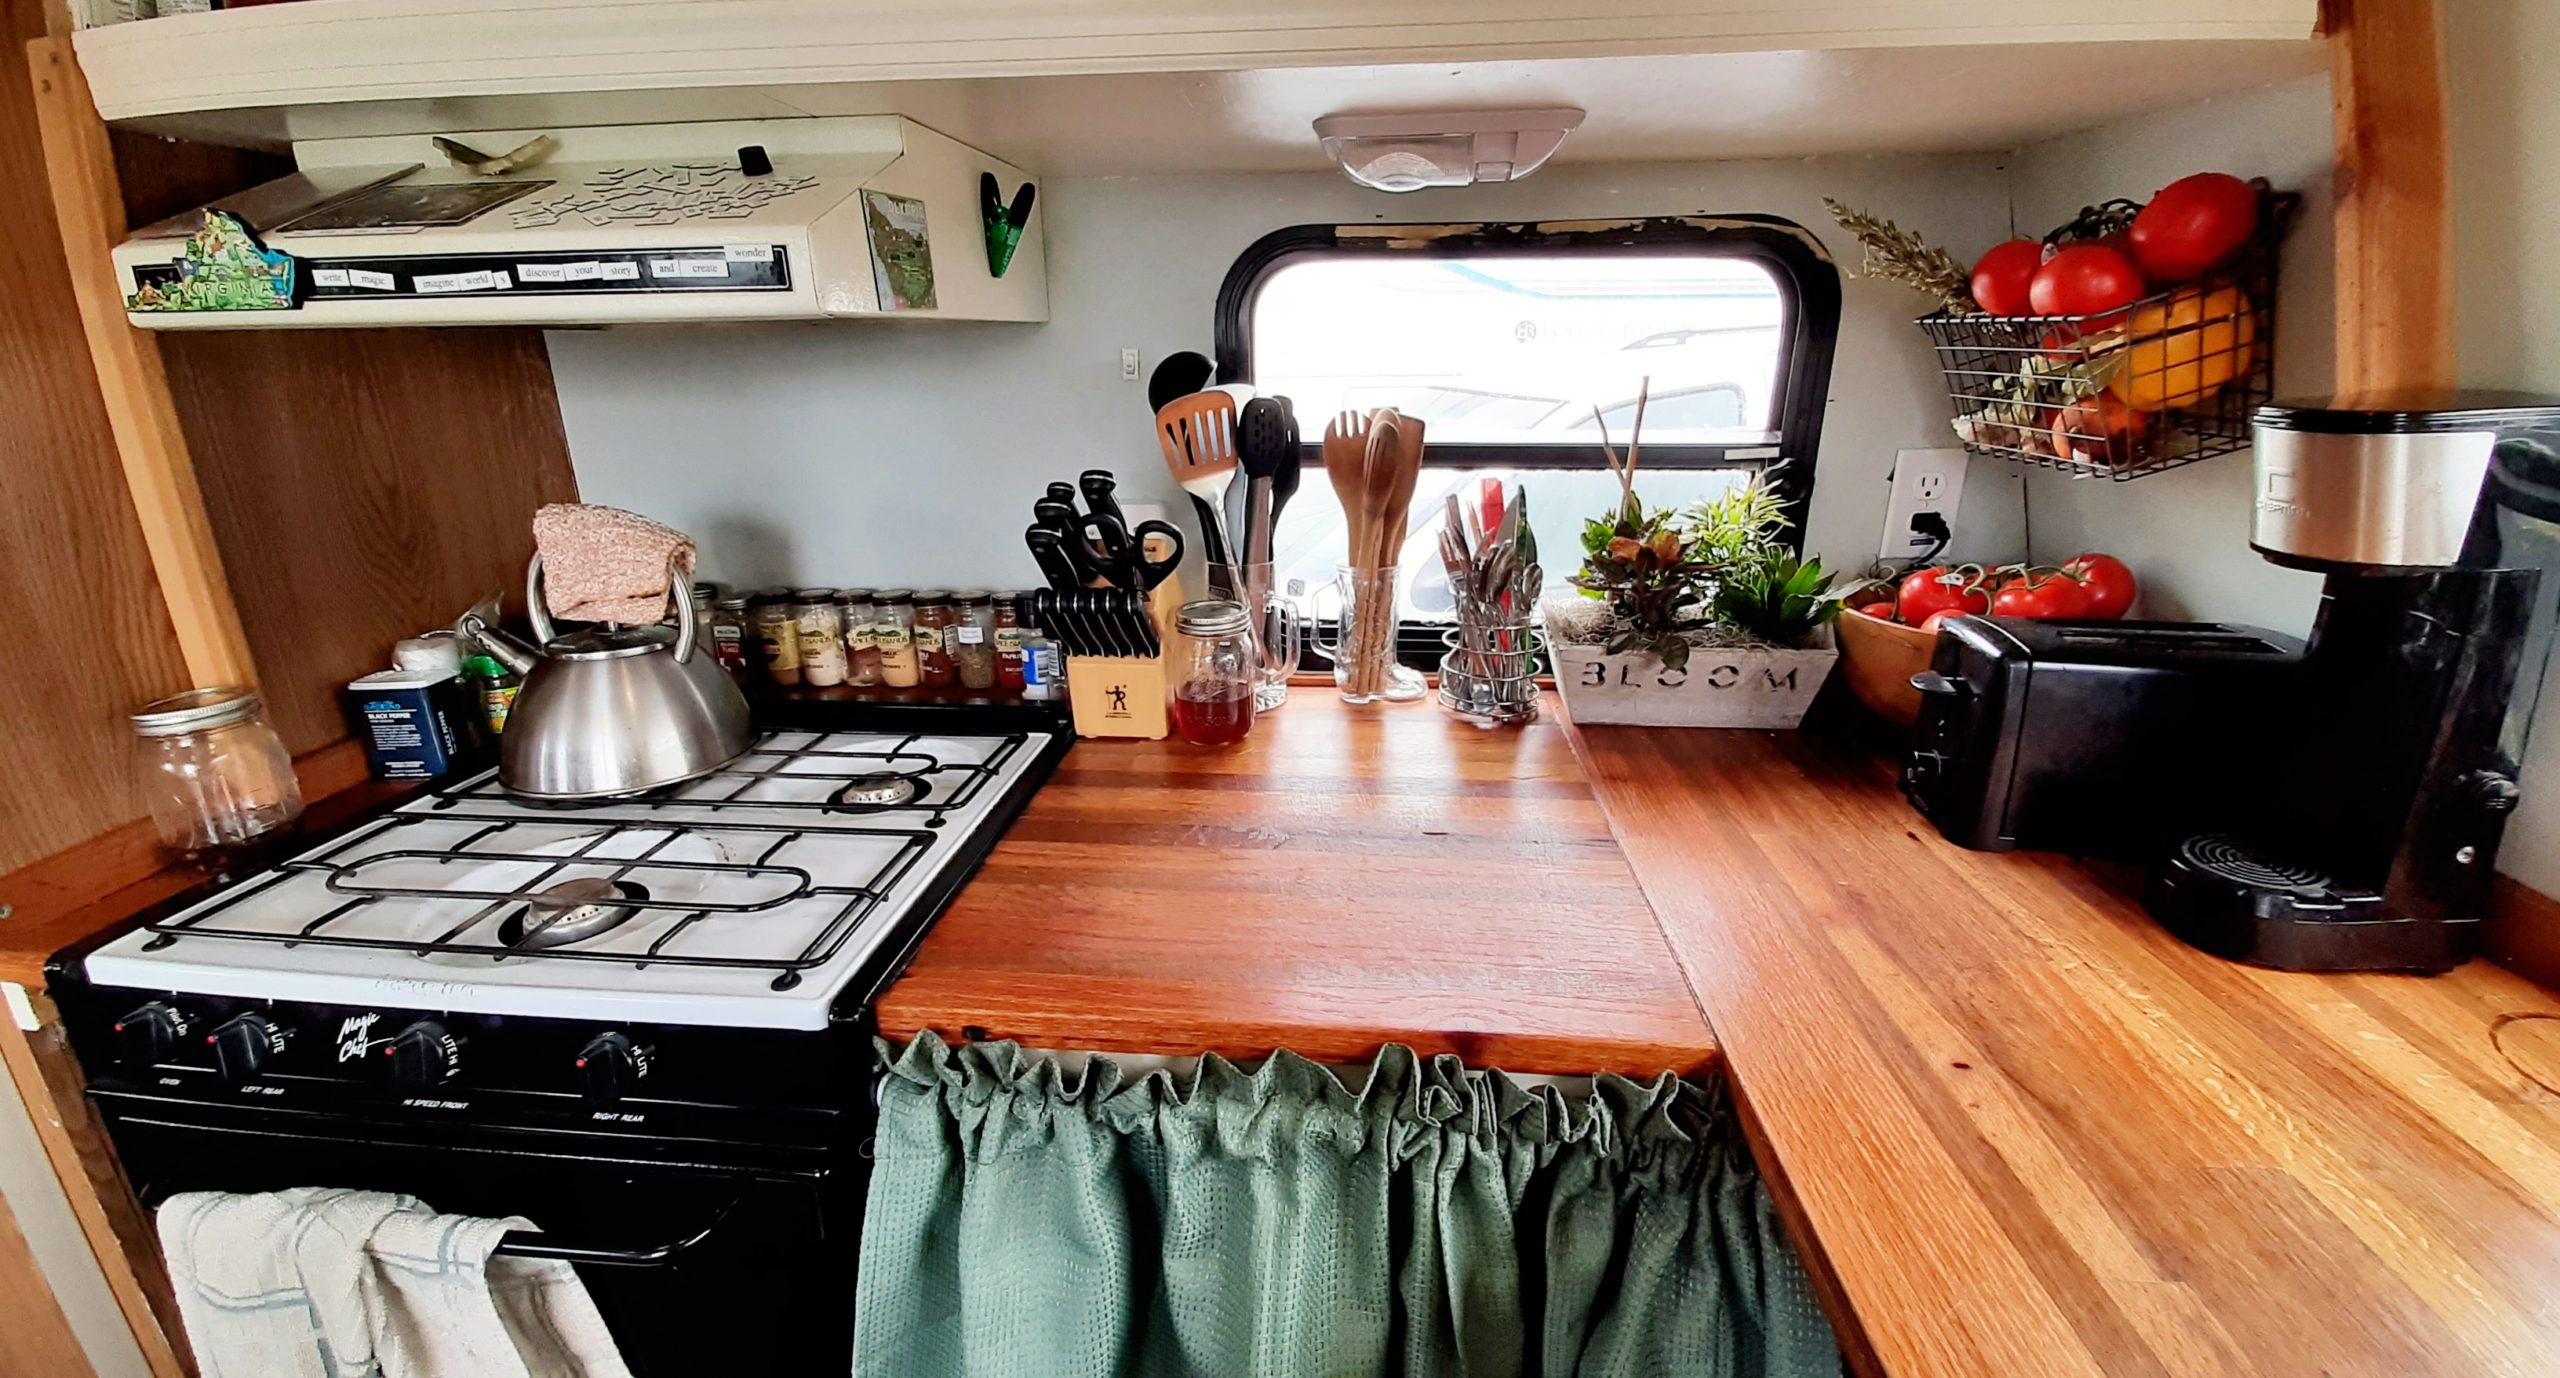
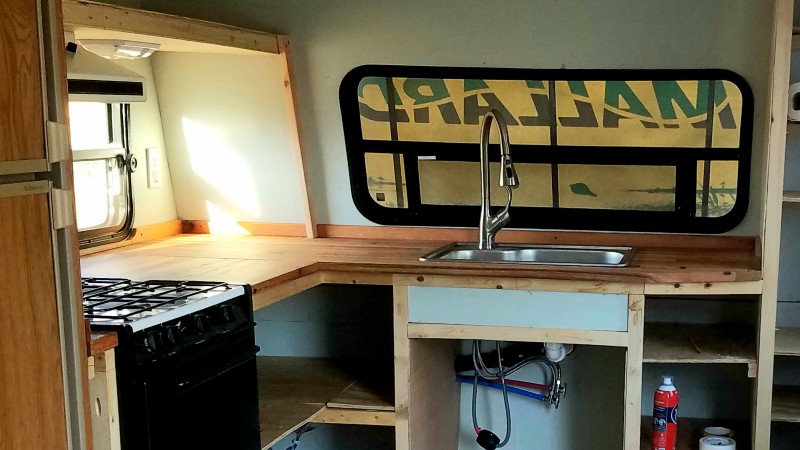
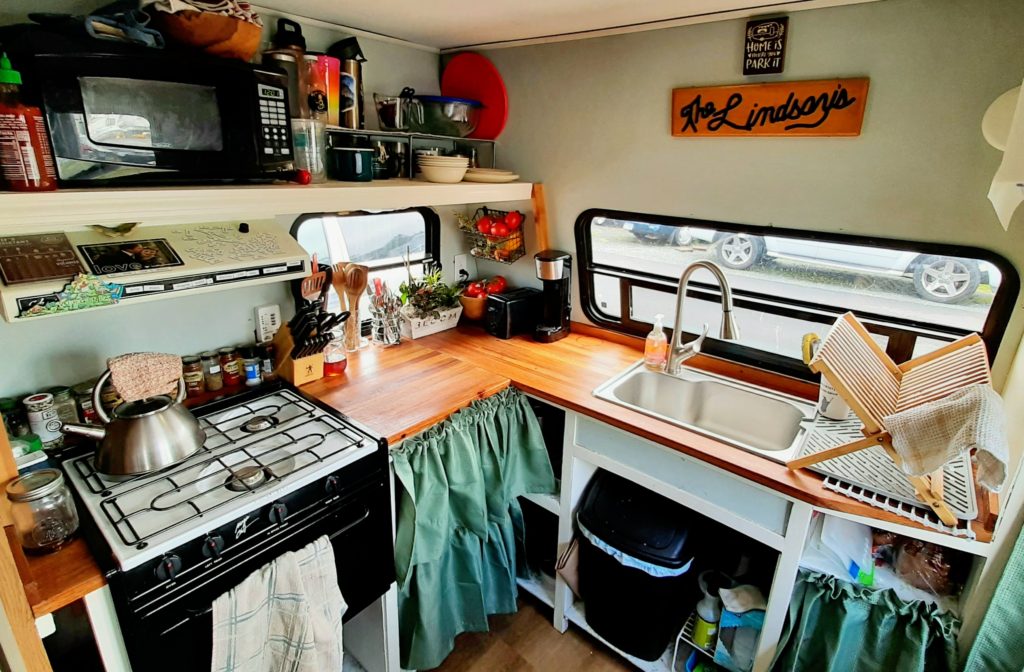
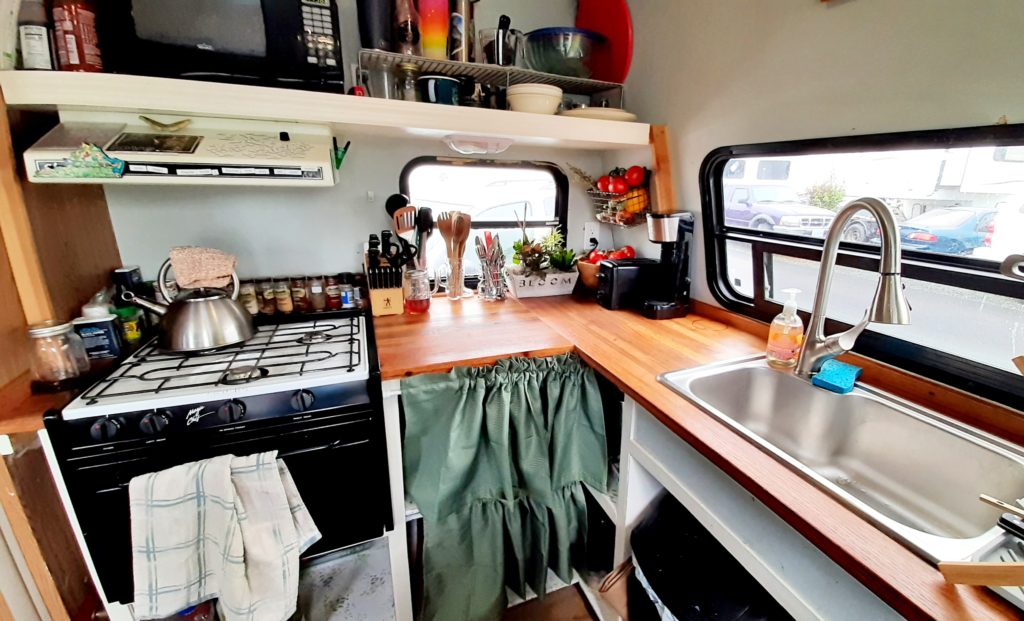
To finish up the day, I broke out my mineral oil, Howard brand, and wiped the butcher block down for the first time. I followed the directions on the back of the bottle and used a cloth to wipe the oil in the direction of the grain. Seasoning the butcher block properly takes multiple applications of mineral oil and then Howard oil and wax butcher block conditioner. The old advice is to condition once a day for a week, once a week for a month, and once a month for the rest of the life of the countertop. The butcher block wasn’t all permanently installed and ready to go, but I couldn’t wait to see how the oil would bring out the colors of the wood. I went ahead and wiped on the oil and I was so pleased. My countertop is beautiful! The butcher block glows warmly with red and golden tones that add so much natural beauty to the kitchen.
9. Installation
Now, if that were the end of the butcher block saga, I would be very happy indeed. However, as always, everything doesn’t go perfectly on the first try. I had to do a little work on the butt joint seam between the two pieces to make them fit more closely. Unfortunately, I cut the stove half of the block a tiny bit too short and it left a larger seam than I wanted. The circular saw and jigsaw didn’t leave a very smooth edge and the two pieces didn’t come together tightly. This is where the power hand plane comes in handy! It’s perfectly designed for shaving the edges of things flat. I used the attached guide to shave the edge of the block smooth. When I put it back in place, the seam matched much more smoothly, although there was still a gap. I decided to shift the block over and leave a gap near the wall instead of in the middle of the countertop. Easier said than done since I’d already cut the hole for the stove.
I measured very carefully and determined that I had about 1/8″ leeway in the stove cutout so that it would still rest on the countertop and not fall into the too-big hole. I shaved away that edge, sanded away some more, and finally got the stove moved over just a tad so that the seam between the two blocks was much tighter. It’s still not perfect, but I’m going to fill the seam with caulk after I screw the tabletop down.
Another issue with joining the blocks is making them level with each other. You may find, as I did, that your cabinets are not completely level. I had one corner that dipped down a bit too low, and a slight warp in my block that made one corner stick up a bit too much. The warp I can fix when I screw the block down (screwing from the bottom into the counter). The dip can be fixed with a shim. Don’t fret, most countertops need to be shimmed in one spot or another. Luckily, the dip was perfectly fixed by a scrap of 5mm plywood. When I was finished adjusting, my countertops fit together reasonably tightly and were reasonably level. I’ll need to do a bit of sanding after I caulk the seam to make everything smooth and even, but that’s to be expected.
You probably realize by now that DIY work creates a lot of compromises with quality. The Handy-Man special often requires you to choose between perfection and the hours of labor required to get there. If I wanted to fix my countertops perfectly, I could have glued some more wood onto the end of my block to fix the too-short cut I made. However, that would have required another few days of gluing and sanding. I compromised and decided that good enough was good enough. My husband reminded me that it’s meant to be a working countertop, and it will get scratched, knicked, dented, burned, and stained over time. Perfectly smooth, perfectly clean, perfectly nice isn’t really what I was going for. A nice tight joint would be good no matter what, but I took my husband’s advice and chose to save the time and effort.
10. Backsplash
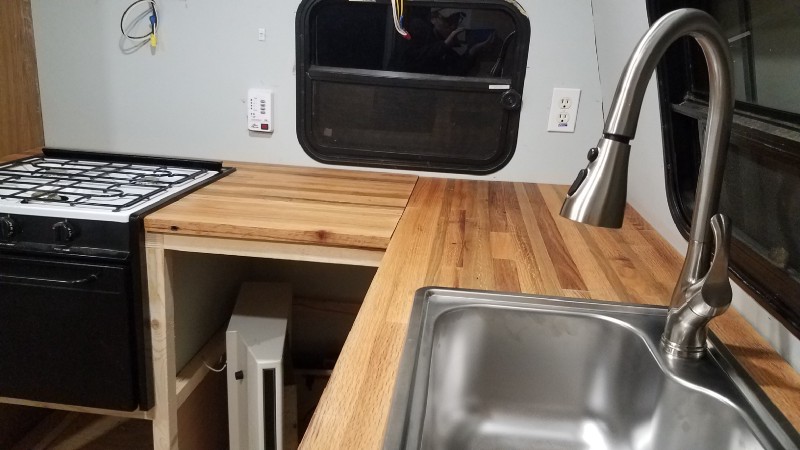
The final fix for the slightly out-of-square blocks and walls and seams is to use a backsplash to cover the gaps. Luckily, I had just enough leftover red oak to make a 1/2″ thick backsplash all the way around the butcher block. It was pretty simple to rip my thicker board down into two pieces and then cut those pieces to size. I remembered to account for the angled front wall of the trailer when I made my cuts. That angled front wall has given me endless headaches in the building process. I planed the boards nice and flat with the hand planer and then sanded them smooth. I attached the backsplash pieces to the wall by screwing them into the studs and then caulk the seam. That will prevent any water or food particles from getting between the counter and the wall. The backsplash also helps extend the warm red tones of the counter up the wall and make for a more seamless transition.
The countertop is really the focal point of the kitchen. Once I have the shelving nicely painted, it’s going to stand out as a lovely warm, working surface. After 4 months of using it, cutting on it, and oiling it, I am so glad I went with butcher block. The only problem we’ve had is that when we moved to coastal Oregon (a temperate rainforest), the ambient humidity was quite a bit higher than a dry winter in southern Virginia. As a result, the grain on the butcher block soaked up the humidity and expanded, creating raised ridges on my previously smooth surface. This is a simple fix, although I haven’t done it yet. The counter needs to be sanded smooth again and re-oiled. I’ll probably do this in the summer when I can work with the plenty of ventilation in the warm sunshine.
Hopefully, this post has inspired you to think about making your own butcher block out of reclaimed wood. Don’t worry, you probably won’t have to go through 3 different planers during your project.
In the end, after days of work, it was definitely worth it. I love the way the warm wood tones instantly added a homey feeling to our travel trailer. As someone who loves to cook and bake, having a functional and beautiful kitchen was important to me. As we travel around the country, far from family and home, I’ll be reminded of the farm every time I chop vegetables or roll out dough on my lovely countertop. If you’ve been following the blog then you know that I’ve basically built the entire travel trailer with my own two hands. Out of all of that, this butcher block is what I’m most proud of. It’s truly beautiful as well as functional, and it carries a lot of sentimental value, too. I know it’s not perfect, but I learned a lot while building it. These projects always have two products, the object you make, and the skills you learn. Both are valuable in different ways. My butcher block won’t last forever, but the skills and knowledge I gained will. On the other hand, I only decided to make my own butcher block because buying one was too expensive! The point is, if I can do it, you can do it!
UPDATE!
One year later, I’ve been using, abusing, and loving my butcher block countertops every day since we moved into our little trailer. The color of the red oak has deepened as it’s been oiled and waxed and used into a really warm, welcoming color. We cut primarily on one spot just next to the stove since it’s the most convenient place to stand while cooking. One nice thing about this tiny trailer is that when you’re cooking, everything is within reach!
I’ve used a few different cleaning/oiling/waxing products for my countertops over the past year and I have a new favorite. Clarks Cutting Board Care Kit has everything I need to wash, oil, and wax my countertops conveniently and effectively. I promise I’m not getting any money from them for saying that, I just Love this product! It works on my countertops like a charm and the special applicators are super helpful since I have such a huge area to cover. I got the Lavender Sage scented kit and it makes the whole house smell Amazing when I treat the counters.
I used Howards oil and wax combination for months and it just didn’t last as long or hold up as well. I also got sick of using an oily rag to apply it, having to heat it up in the microwave to get the wax to mix with the oil, and how it didn’t seem to penetrate as well. I think having the oil and wax separate is crucial under such high-use conditions. I’m not condemning Howards, only noting that it didn’t work as well for me.

I have learned my lesson about putting metal things directly onto my red oak butcher block. Red oak reacts to iron and creates a black stain, so I’ve had to sand off a few black rings from coffee cans. You can still see one ring I haven’t gotten to yet in the far right of the picture above. Also, be sure not to let anything like vegetable scraps sit on the counter for too long, say… a weekend. My husband made this mistake and created a large brown blotch where the vegetable juices soaked into the counter. It took a lot of sanding to get that stain out, but luckily, the countertop is good as new afterwards.
There is definitely a rougher spot on my countertop where we cut. This spot gets a lot more water from vegetables, washing, etc, and dries out more quickly. I do more frequent spot treatments of oil and wax on this spot to keep it nice. I also oil more frequently at the front edge of the sink where the water is always splashing. You can tell what needs oil because it looks pale compared to the rest of the counter.
We ended up using a clear silicone caulk in the small seam between the two blocks and it works perfectly. The blocks do swell slightly when it’s humid and shrink a bit when it’s dry, so that little big of room is actually a good thing for the blocks. The flexible silicone moves with the blocks and stops anything from falling between the counters onto the shelving below. We also put a line of clear silicone around the edge of the sink, as is normal. We had to re-caulk the front after a year of use, but it only took a few minutes to do.
Overall, the care is worth the beautiful functionality of the butcher block countertops. I’m really glad I took the time and effort to make this countertop for our home. It’s one of the most unique parts of our trailer and one of the things that make it feel special, comfortable, and welcoming.
As you may have seen from the pictures I posted, there is a lot more DIY work going on around this butcher block countertop!