Renovating our 1997 Fleetwood Mallard for Full-Time Living (Part 19)
The story of how my husband and I purchased a 20-year-old travel trailer and I DIYed the crap out of it to make it suitable for full-time living. In this series, I’m giving All of the details about the process step-by-step, as performed by me, a 26-year-old woman with No experience in construction. The first installment in this series details the purchasing process and the changes I planned to make. You can find that article in the link below and start at the beginning. Then, follow along in the series by clicking on the link for the next article at the bottom of each page.
After the long and involved electrical post of the early rebuild stage, this post is what I think of as “finishing” electrical work. The wiring is all positioned correctly under the wall paneling, with the rough work done to add additional lighting fixtures and receptacles (outlets). For a few months now, those wires have just been sticking out of the walls with nothing on them except caps and electrical tape.
As the cold, dark winter months set in, I’m beginning to see the wisdom in getting those receptacles and lights working to make my life more comfortable while I continue construction. Without the lights, I have to stop working when it gets dark at 5 pm. Without the electrical heater plugged in, my toes freeze and my fingers get cold and stiff. So, I put aside some of the previously assigned priority projects and got to work on the electrical.
Outlets (Receptacles)
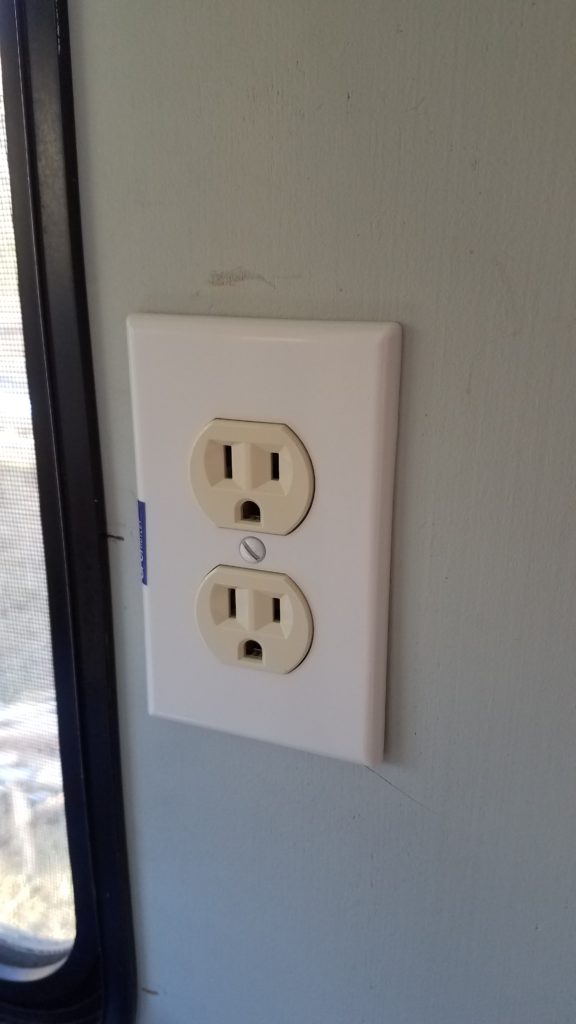
The biggest job out of all the little jobs involved in finishing the electrical work was installing the receptacles (outlets). I added a fair number of new receptacles to the walls around the trailer and I was planning to replace the old “speed box receptacles” or “self-contained receptacles” with the standard house receptacles. Speed box receptacles are installed in RVs because they don’t require an outlet box (they’re self-contained) and they’re very quick to install when you have the special tool that goes with them. However, if you Don’t have the $300 special tool, they’re a total pain in the… neck.
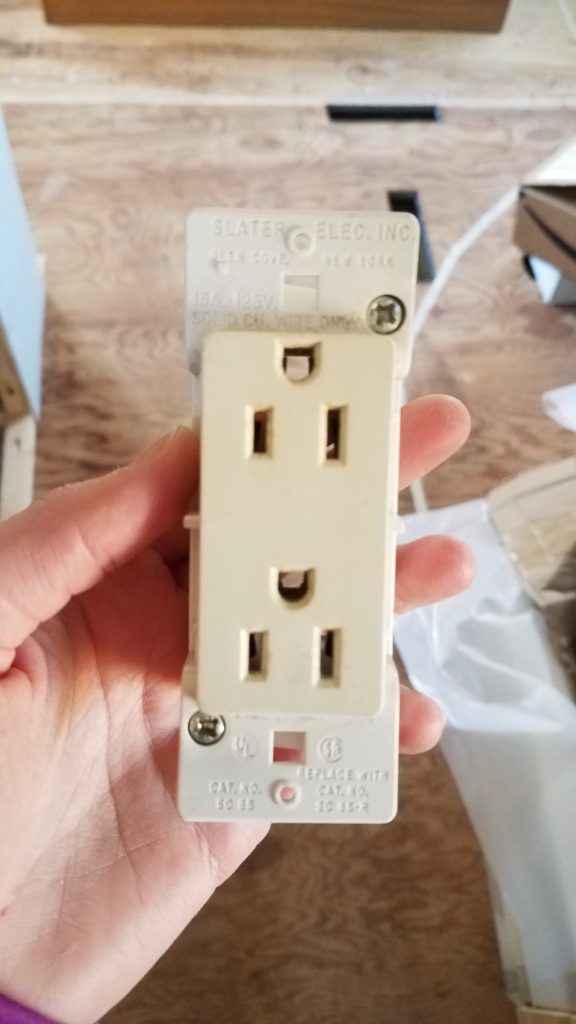
At first, I started trying to re-use the speed box receptacles that I took out of the wall, but I ended up fighting with those things for a long, frustrating time, cutting myself on their sharp edges, stabbing myself with the wires, and then breaking the delicate plastic tabs. After some more research, I decided that house-style electrical receptacles were better in the long run and gave up on those stupid speed boxes.
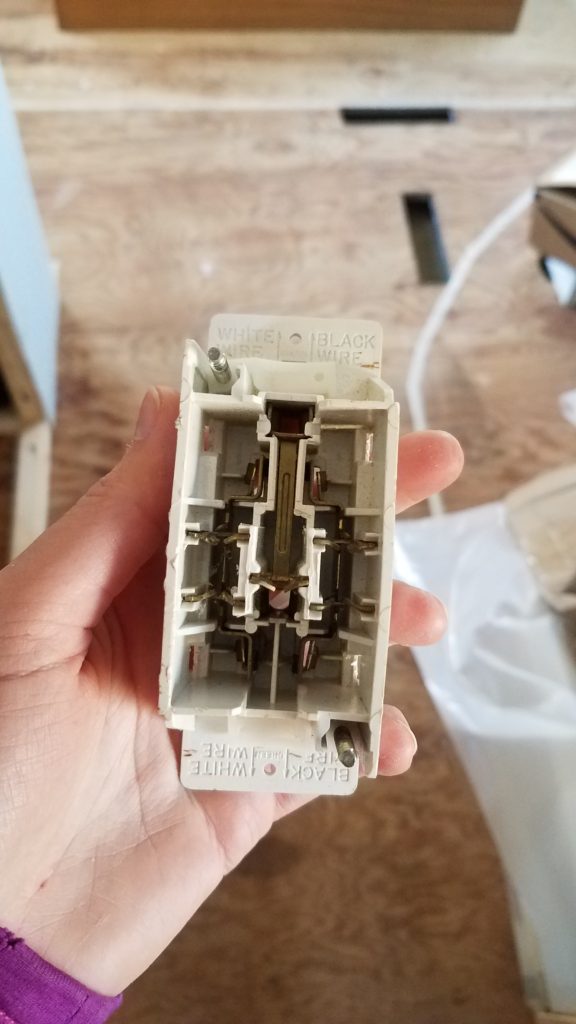
The trouble with using regular electrical receptacles is that the walls in the trailer are very thin. Most electrical boxes assume a wall cavity of 3.5″ because walls in houses are built with 2×4 studs. The wall cavity in the trailer is 1.5″ deep, which means I had to buy special “old work, narrow” electrical boxes. These boxes are up to code, but their 1″ depth doesn’t leave very much room for wires behind the receptacle. That made them very challenging to work with for several reasons.
For one, I had to cut the wires short to save space in the back of the box. Cutting the wires short leaves less room for error and less room to maneuver while attaching the receptacle. Trying to twist your hands and the screwdriver around enough to attach all the wires correctly takes a lot of practice.
Another problem was the little tabs on the edges of the receptacle that attach the box to the plywood paneling. The tabs are short and you end up screwing right at the edge of the hole you cut for the box, so you need to cut the hole as small as possible or your screws won’t catch anything. I also had to cut away the rigid foam board insulation behind the boxes to make room for the wires and the box. I guess that means my electrical boxes are going to be more vulnerable to heat and cold, but I had to make them fit.
My only advice for this part of the project is to watch a video or read a book on installing receptacles and to have patience while you learn to do it. The first few I did were endlessly frustrating, but by the time I was doing the 11th and 12th receptacle, I was going quickly and relatively painlessly through the process.
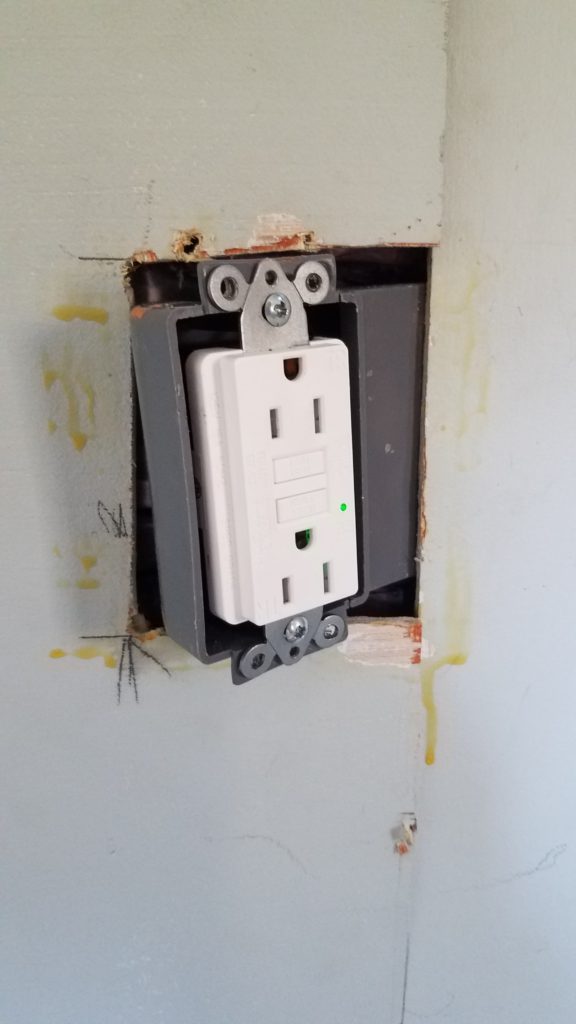
Don’t forget to add GFCI receptacles to your bathroom and kitchen area. In my travel trailer, all of the 120V receptacles are wired in sequence, so putting a GFCI at the beginning of the sequence will protect all of the receptacles that follow it.
However, as my wiring diagram shows, the sequence of the outlets runs back and forth all over the trailer in a very non-intuitive way so it can be hard to tell which outlets are protected by the GFCI. My trailer already had a GFCI receptacle in the bathroom area which also protected the kitchen receptacles and the outside receptacle. I added a GFCI in the outlet over the sink since that new outlet location was not in the sequence below the original GFCI. As a result, most of my outlets are GFCI protected, but that’s all for the good. I don’t mind a little extra safety.
Luckily, the outlet over the sink is in the wall of the closet. The closet wall is open on the other side (into the closet), so I was able to use a large receptacle box that sticks out into the closet on the other side of the wall. GFCI receptacles are larger and deeper than normal receptacles, so they need a larger box. That saved me a lot of trouble trying to cram all of the wires into a small box.
A lot of people are putting in receptacles that also have USB plugs. I really like this idea and I wanted to put some in our bedroom area to make the wires more streamlined and smaller. However, those USB receptacles are very large and deep and they do not fit in the walls of the trailer, so that idea was a no-go for us. If I’d known beforehand that the receptacles were so large, I might have designed the outlets to be inside the bedside table, giving me more space to work with. As it stands, we’ll just keep using the converters that come with the devices as usual. Que sera, sera.
Finishing all of the receptacles was a huge accomplishment for me, and it took many hours of work and multiple trips to the hardware store. It was so nice to not have wires dangling out all over. Finishing that part of the project put me a Lot closer to the point where I can turn on the electrical and have lights and heat again!
The A/C unit and microwave are also on the AC circuit (not the DC power), but I didn’t change those wires at all. The microwave receptacle was screwed into the new paneling and I put a nice new cover over the outlet and called it done. The A/C unit has functioned faithfully all summer, so there was no need to do anything with that.
However, receptacles aren’t the only things on the AC power supply. The AC electrical unit also powers two lights that go behind the couch. Originally there were a pair of sconces that were the only lights in the whole trailer that were not DC powered. There are also two DC lights over the couch, so there’s an abundance of light in that area. The trick to replacing those sconces was to find something that had an integrated on/off switch, was set up to be hardwired, and wouldn’t stick out of the wall too far and make it uncomfortable to sit on the couch.
Unfortunately, everything I found that fit the description was ugly. Maybe I just don’t like sconces, I don’t know. The industrial/steampunk look with the Edison bulbs wasn’t working for me, and the hotel-looking ones were so boring. There wasn’t anything I wanted to spend my precious budget on. When I asked my husband what he thought about the ugly sconces, his reaction was, “What is a sconce?”
In the end, he suggested just buying a ceiling cover plate and capping off the wires until later. It’s not like we need 4 lights over the couch, after all. So, I capped and taped the wires and shoved them back into the wall to be covered with the ceiling plate. I can look for a not-ugly sconce later.
Once I had everything connected I tested the circuits by plugging in the trailer and flipping the switches one at a time. I used my voltmeter to test each receptacle. It turns out I put both GFCIs in wrong. GFCIs need to be connected in a specific way and without having marked the line and load wires (I should have done that) I had a 50/50 chance of getting it right. Sometimes, 50/50 isn’t very good odds. It was an easy fix, however, to pop them out and to flip the line and the load wires. This is a very common mistake, so when you’re installing your GFCI’s, try to keep the line and load wires straight. Finally, with the test lights on the GFCI’s glowing a peaceful green, all of my receptacles were working.
I happily plugged in the Shop-Vac and took the opportunity to clean up my workspace. It felt Fantastic to use outlets like a normal house, no more fussing around with extension cords. The electrical work has been the most time-consuming, frustrating process so far and I had a steep learning curve. It’s so rewarding to see that work pay off.
Lights
With the AC circuits finished, I moved on to the DC circuits. I found DC wiring to be much simpler and easier to work with. The wires are smaller and not as stiff and difficult as Romex triple-wire bundles. Also, there are only 2 wires to worry about, not three. Overall, much easier for a beginner.
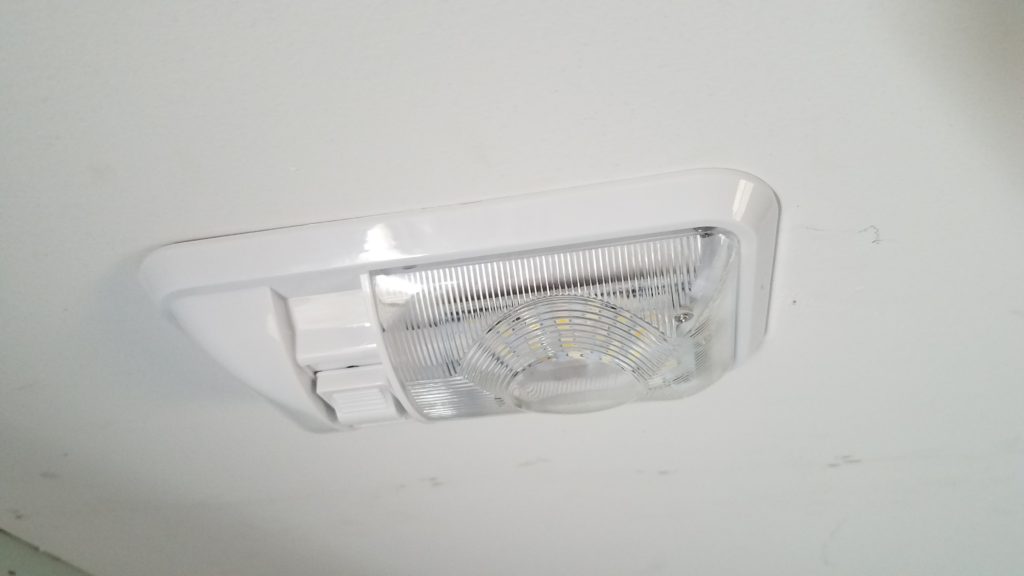
I decided to replace all of the old dome lights in the rear of the trailer with LED dome lights. I also added a few lights in the bedroom and bathroom area to accommodate the changes I was making, such as a light over the new sink and lights to illuminate our bedside wardrobes. It was simple to leave a small hole in the approximate area of the light with the two wires, hot and ground, sticking out, to be finished later. Now, it was time to turn those dangling wires into functioning light fixtures.
The RV dome lights I ordered come with a length of wire attached as well as quick crimp connectors. It was simple to crimp the wires on the dome light to the dangling wires in the ceiling, tape up the connections, and screw the light frame into the ceiling. This was made even simpler because the lights are non-polarized, so you don’t have to worry about mixing up the wires.
The LEDs are warm white (sometimes called natural white) and have an integrated switch. They are 420 lumens, which according to the internet is good for bedrooms and living rooms. I felt like they were bright without being too bright. They’re simple to install and easy to operate and I’m a huge fan. At first, I thought I wouldn’t want to have to reach up and turn the lights on and off all the time. But really, the ceiling is low, and being able to turn on exactly the light you want without turning on the others is kind of handy. Overall, I think it’s going to be an easy adjustment.
I decided not to use the dome lighting in the kitchen area. The kitchen/dining/living room takes up half of the trailer and it is the only large, open-ish space that we have. I wanted to preserve that feeling of relative spaciousness and I thought that dome lighting sticking down out of the ceiling and making my husband feel like he has to duck would not help. I also didn’t like the idea of coming home to a dark house and having to wave my hands in the air near the ceiling, arms full of grocery bags, trying to find the light to switch it on. I decided to use recessed LED lights in the front half of the trailer and put a switch next to the door.
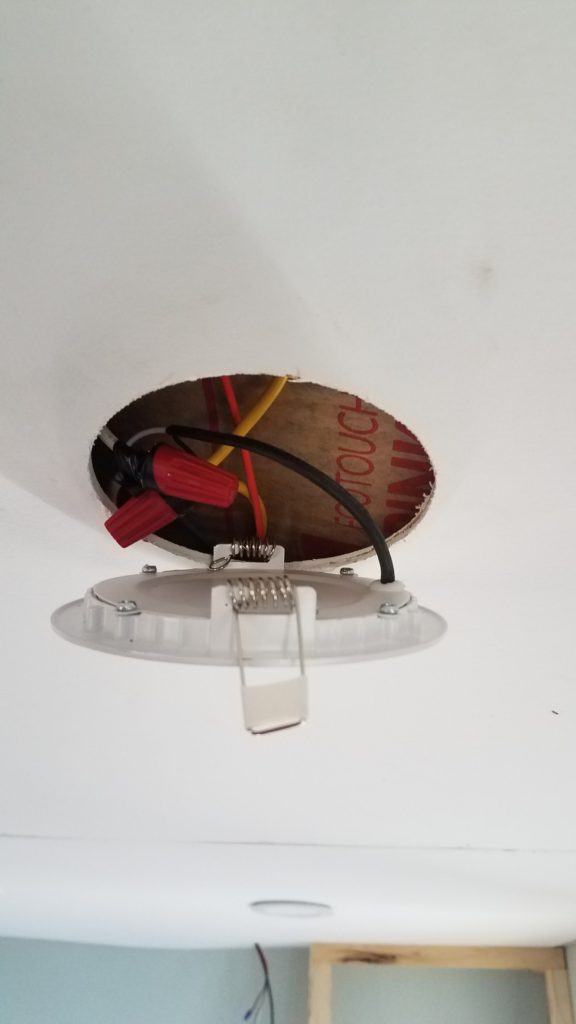
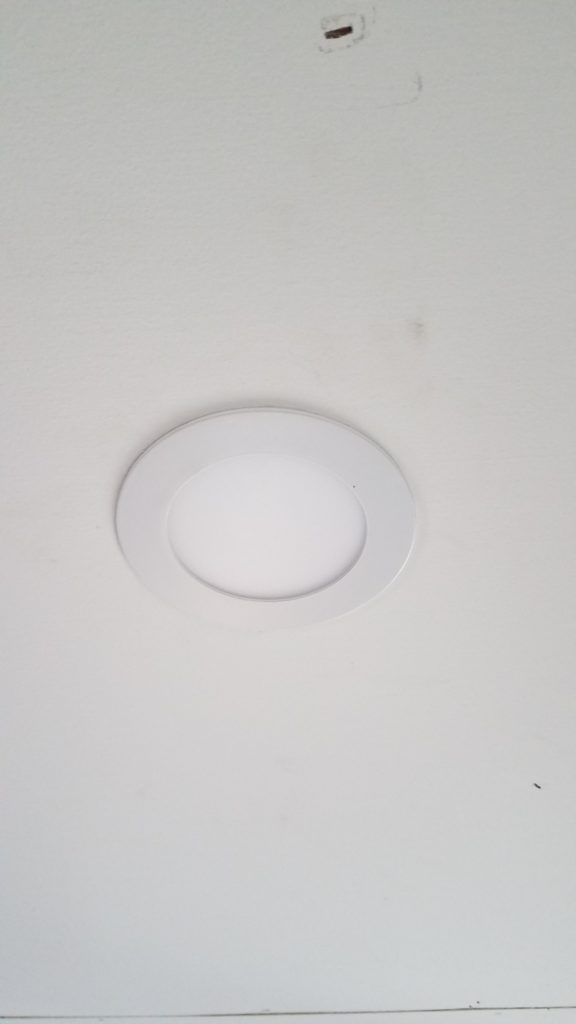
Amazingly, there is quite a variety of very thin, 12V, recessed lighting options for RVs, trailers, and marine uses. I used a 4.5″ diameter hole saw to cut holes where I wanted the lights. They hold themselves up by using a spring latch, and they’re very light so it doesn’t take much. The wires were dead simple to crimp together, however, they were polarized so just make sure it’s hot-to-hot and ground-to-ground. Installing all four lights took a few minutes.
The puck lights require a switch to turn on and off, and I planned to put the switch conveniently next to the door. I had run the wires from the lights to the switch as is needed and described in the earlier posts. The switch connections were hanging out of the wall, waiting to be connected.
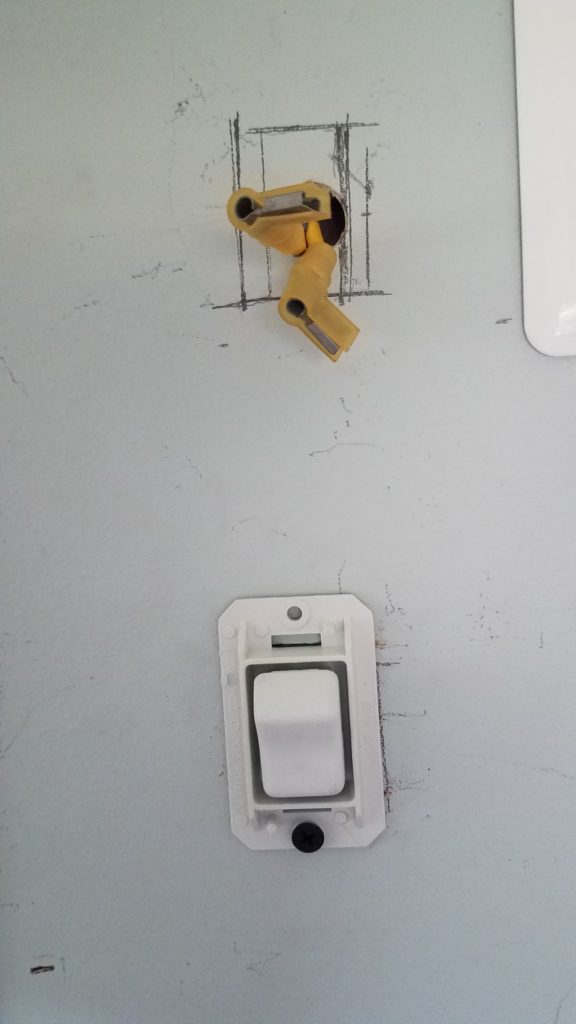
DC switches can be hard to find since many of them are very small, designed to be installed in dashboards and small electronics. I wanted a normal-sized switch that would be easy to find in the dark. I was able to find a few good options designed for RVs. These switches install with male paddle connectors that can be bought very cheaply in a set of DC connectors. Simply crimp the male paddle connectors on the end, insert the paddle, and you’re good to go.
The hardest part was cutting a perfectly-sized, square hole for the switch to be inset. Then I screwed the switch in and snapped the cover in place. I found out later that the switches were upside down (down was on, up was off), so I unscrewed them, flipped them around, and re-inserted them. If only they marked on the switch which direction was supposed to be up.
There were a few more DC dome lights to install around the rest of the trailer. I chose dimmer, reading-light dome LEDs for the ones that are over the couch. They’ll be much closer to our eyes as we sit on the couch, so I didn’t want them to be glaring. There is also a dome light under the overhead kitchen shelf that will provide task lighting for the countertop.
The vent fans I replaced earlier are 12V connections and were very easy to wire in. They even came with plastic trim to make them fit seamlessly into the decor.
The final lighting modification was updating the outdoor porch/security light. I found a really good recommendation for a bright LED porch light that has motion-sensing settings. The switch was fairly easy. I used a ladder to access the wiring, replaced the fixture, and then caulked around the edges to keep it waterproof. The switch for the outdoor fixture was already next to the door, so I simply replaced the switch fixture to match the one I added for the kitchen lights.
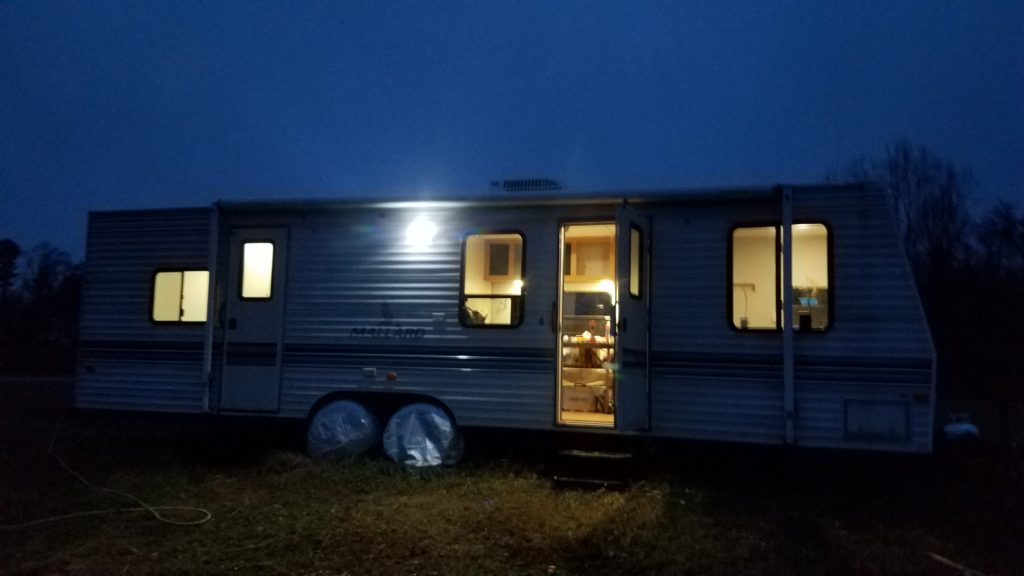
When I finished the rest of the DC circuit connections, I tested out the electrical wiring one circuit at a time. I removed all of the fuses and plugged them in one at a time to check the functionality. I kept my portable fire extinguisher close, just in case, but there were no problems. All of the lights turned on beautifully and illuminated the whole trailer.
I have to tell you, this was a huge turning point for me. With the lights on, the trailer started to look and feel like a home for the first time. Like a real, true home, cozy with warm lighting, its windows shining invitingly into the dark. My friends, it felt really good.
Check out the link below for the next installation in the series! We’re starting to see the finishing touches and it’s so satisfying to see the results of all our hard work.