Renovating our 1997 Fleetwood Mallard for Full-Time Living (Part 16)
This is the story of how my husband and I purchased a 20-year-old travel trailer and I DIYed the crap out of it to make it suitable for full-time living. In this series, I’m giving All of the details about the process step-by-step, as performed by me, a 26-year-old woman with No experience in construction. The first installment in this series details the purchasing process and the changes I planned to make. You can find that article in the link below and start at the beginning. Then, follow along in the series by clicking on the link for the next article at the bottom of each page.
Plans Make Perfect
This post is about the process of constructing my kitchen counters and shelving. For information about my planning process and my (amateur) design drawings, see Part 15. That post has my designs, my measurements, and all of the research that helped me decide how my kitchen will look. After doing all of the reading, thinking, deciding, measuring, and then drawing, I am finally ready to start Making.
Immediately I realized how incredibly helpful it is to have a drawn-out plan of what you’re going to build before you start building it. For a lot of the underlying structure of the trailer I was either copying pictures or memories of the original layout or designing on the fly, otherwise known as “winging it”. However, since the kitchen is going to be a highly visible part of the trailer once it’s finished, I decided to take more care in its design and come up with a plan before I started cutting.
This is So Much better than winging it. It’s a huge relief to be able to see the result you’re going for, understand how it will be put together, have written measurements for all of your cuts, and be able to do the work in logical stages; measure everything, cut all of the pieces, drill all pocket holes, screw everything together. It means a lot less going back and forth to the shop to cut each piece and then see if it fits. It means less waste of time and materials.
Obviously, this is known to every woodworking professional and hobbyist out there and I’m coming way late to the party. All I’m saying is; all of those people who say to plan everything first are right. Plan everything first!
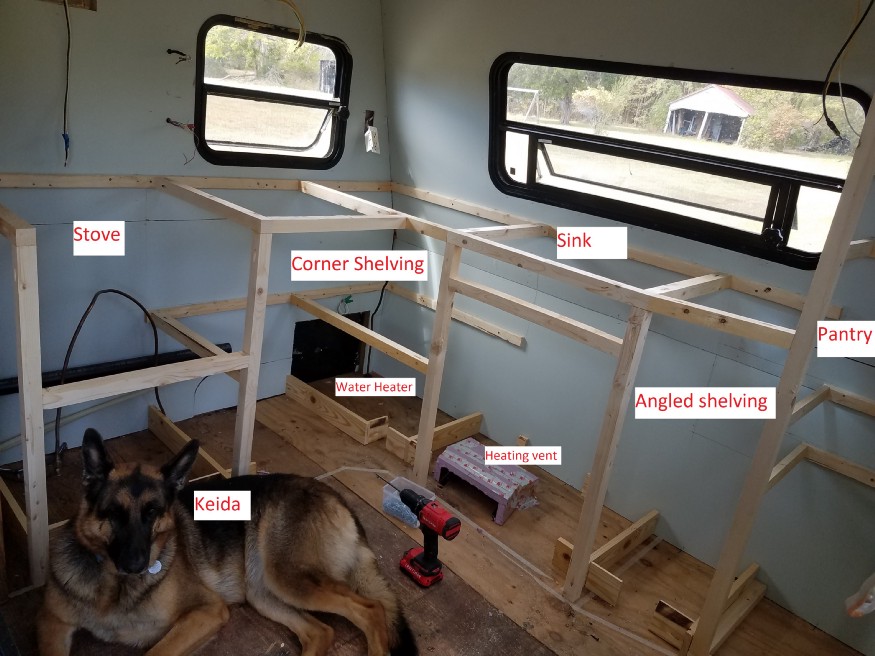
With the plan in hand, the first thing I did was double-check the measurements one at a time. Measure twice, cut once. I used a pencil to make marks on the walls for where my shelves would hang, where the countertop would be, and where each of the 5 parts of the kitchen would end. I used a sharpie to mark the plywood floor for the edges of the shelving and where the feet of the units would be screwed in.
Construction Part 1
The first part of the kitchen that I completed was screwing the brace boards to the wall. Brace boards are wonderful things since they work like shelving brackets but are much, much easier to build. I started with the brace boards because all of my other projects will screw into them and they’re very easy. Brace boards are also handy for providing a solid piece of wood to attach things to, rather than trying to screw into a flat plywood panel that may or may not hold the weight. Brace boards spread the weight out along a bigger surface, meaning each screw has less work to do and each piece of the wall is less likely to break. My brace boards are 1×2 furring strips and will support the back edges of the shelves and countertop.
The biggest issue here is that countertops and shelves should be as level as possible. You don’t want to deal with fruit rolling off or water pooling along the back edge. You can’t simply measure up from the floor to the mark because many subfloors are uneven. In the case of building in an RV or trailer, your trailer itself probably isn’t level either.
My solution was to place my carpenter’s level (it’s quite large and made of metal) on the floor directly under the brace board and make a note of where the edge of the bubble was. Then, I would place the level on top of the brace board and move the ends until the bubble matched the place it was on the floor. This ensures that the countertops will be exactly as level as the trailer is. If the trailer is level, my countertops will be level. Make sure to align the level with the direction of the brace board, because your trailer can be off level back to front as well as side to side. My trailer was surprisingly close to level, which made it pretty easy to keep the brace boards and the trailer aligned.
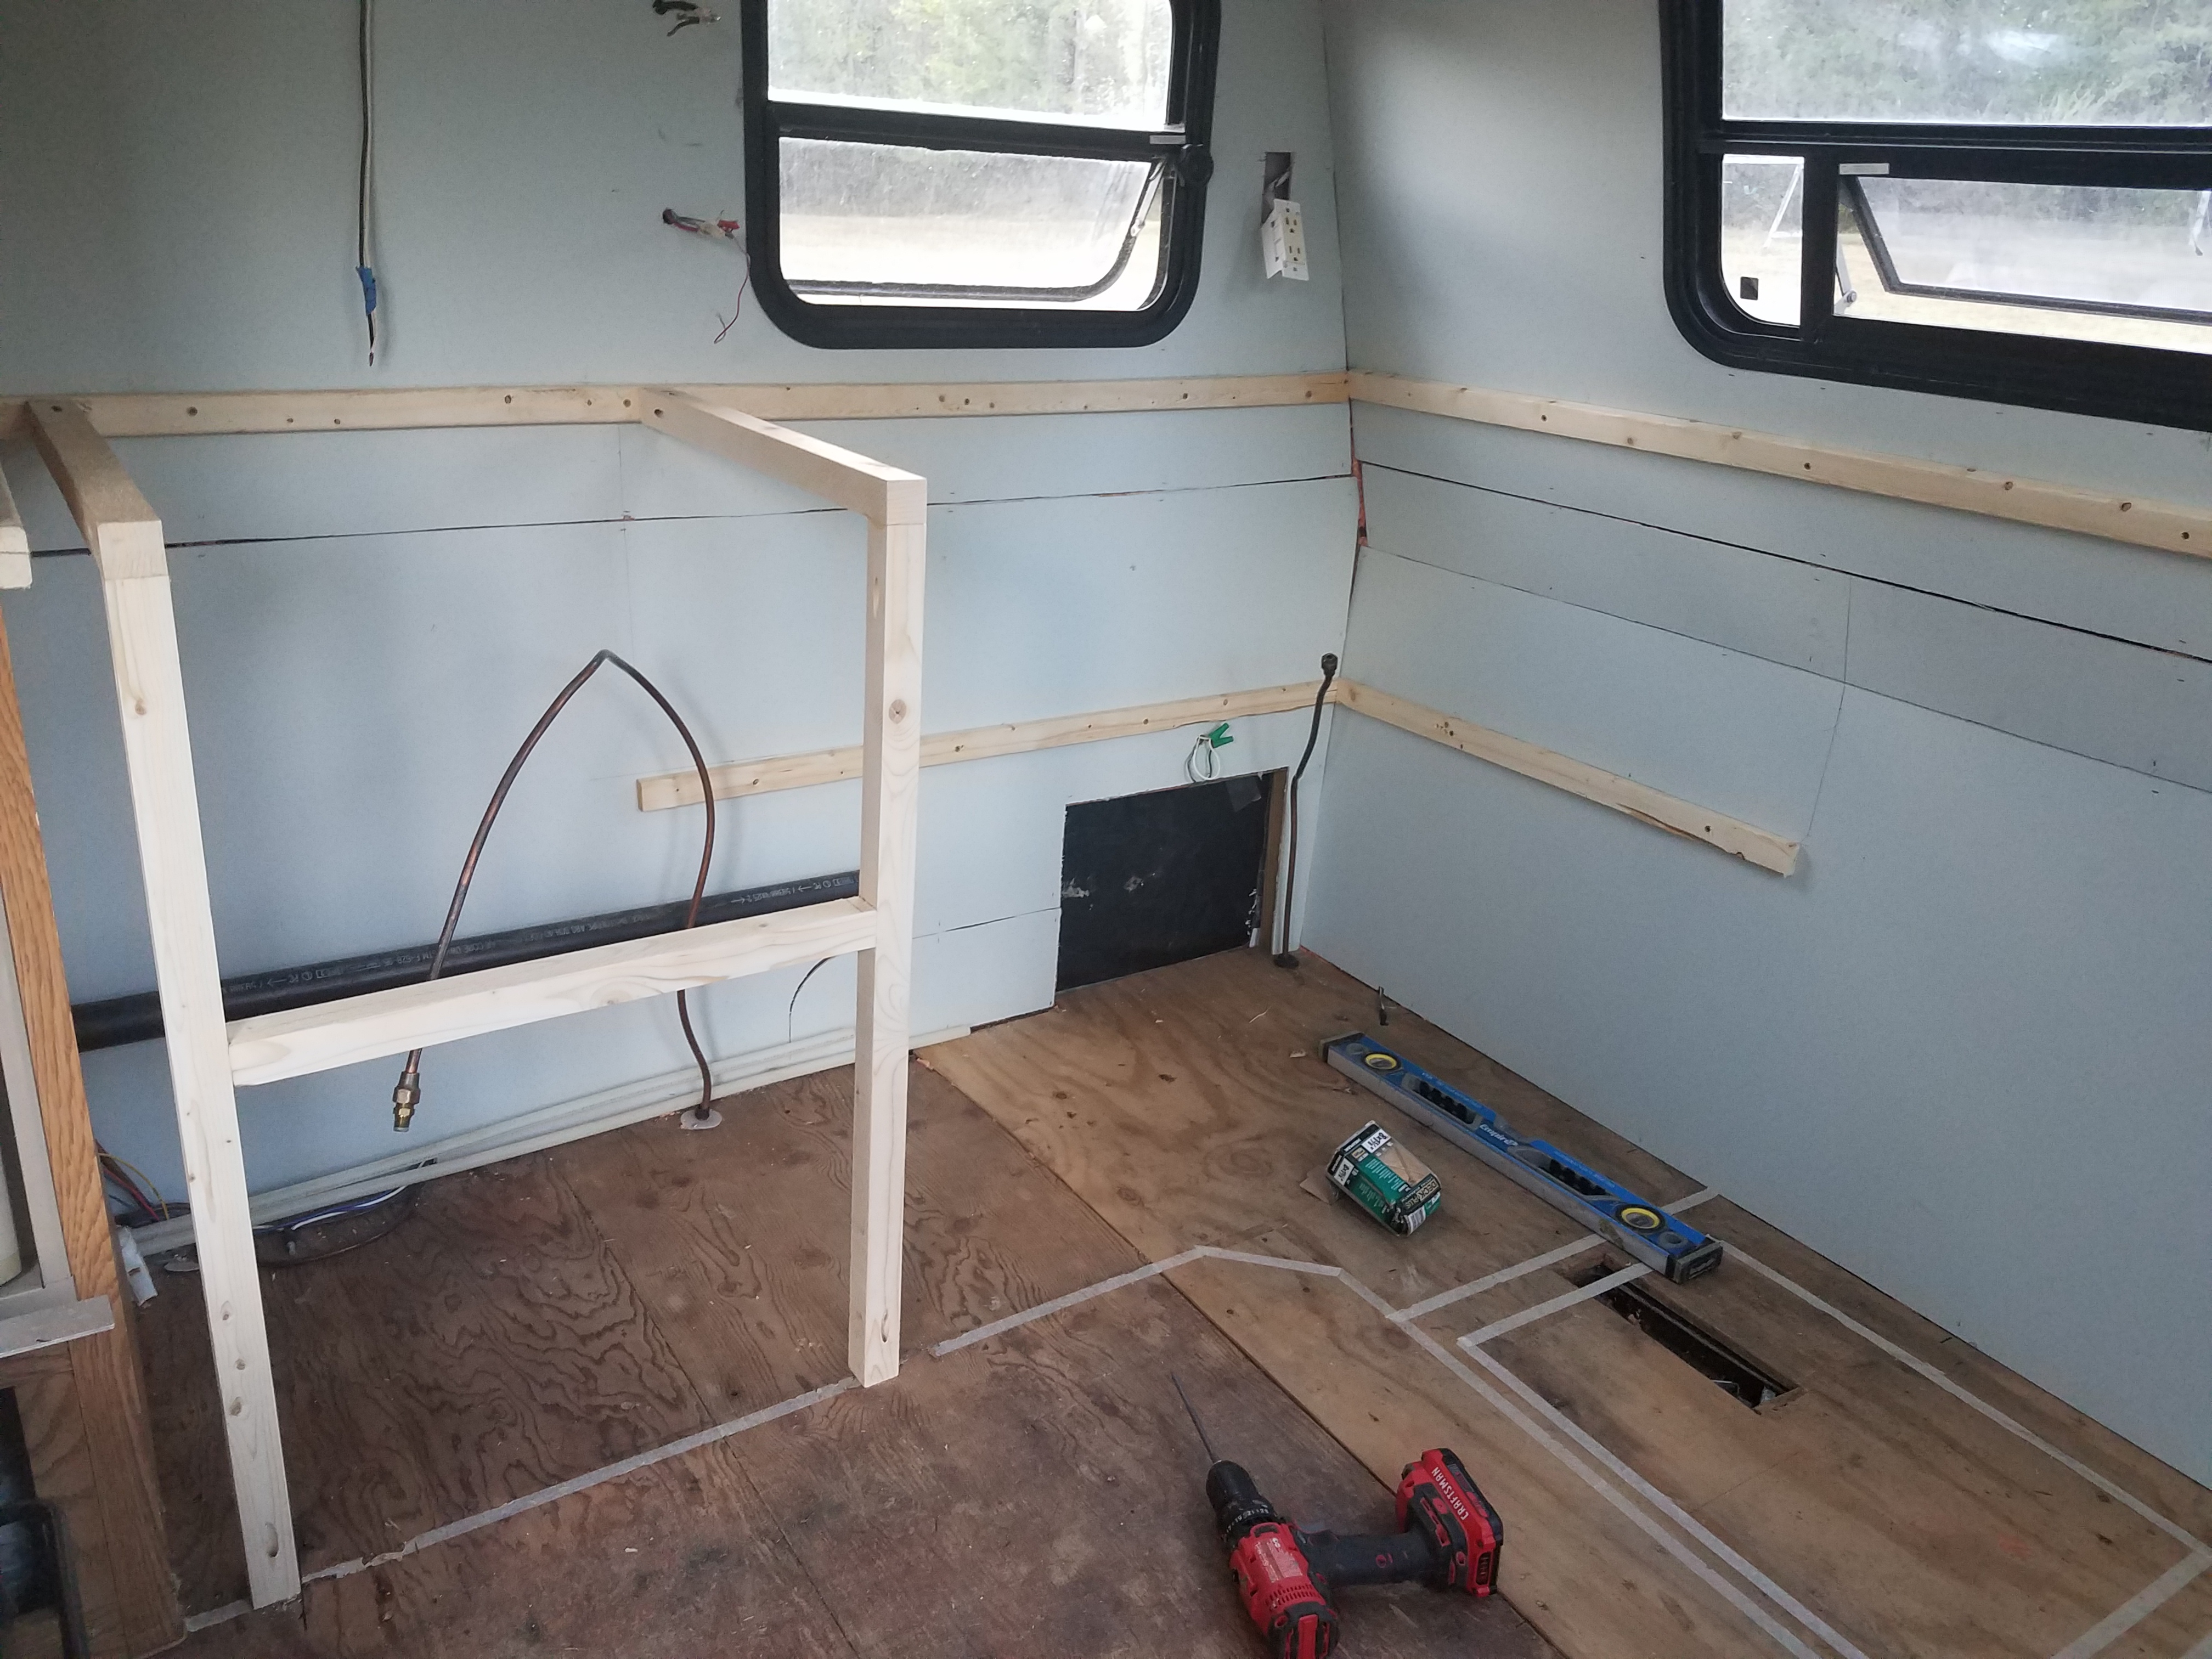
Once the boards were level, I screwed them into the studs. I do wish I had a stud finder for this step, but I couldn’t find one, so I just used the staples from when we attached the wall paneling as markers. After this bit of frustration, I purchased a stud finder. The model I bought also detects electrical lines, which is a great safety feature. Installing the brace boards didn’t take long, and the hardest part was choosing the straightest and least-twisted furring strips for these longer pieces.
All wood twists, bows, bends, or cracks when it dries. The thinner the piece of wood, the more it will twist/bow/crack. Furring strips are always imperfect, twisted, or bowed. However, they’re also thin enough to bend slightly to correct a bow, if you need to. I always sort through the whole stack at the hardware store to find the straightest pieces, but even that’s not saying much. When you’re cutting short pieces you can just find the straightest part of the board and cut from there, but with long pieces, you need to have straight boards.
Jointing and Woodwork
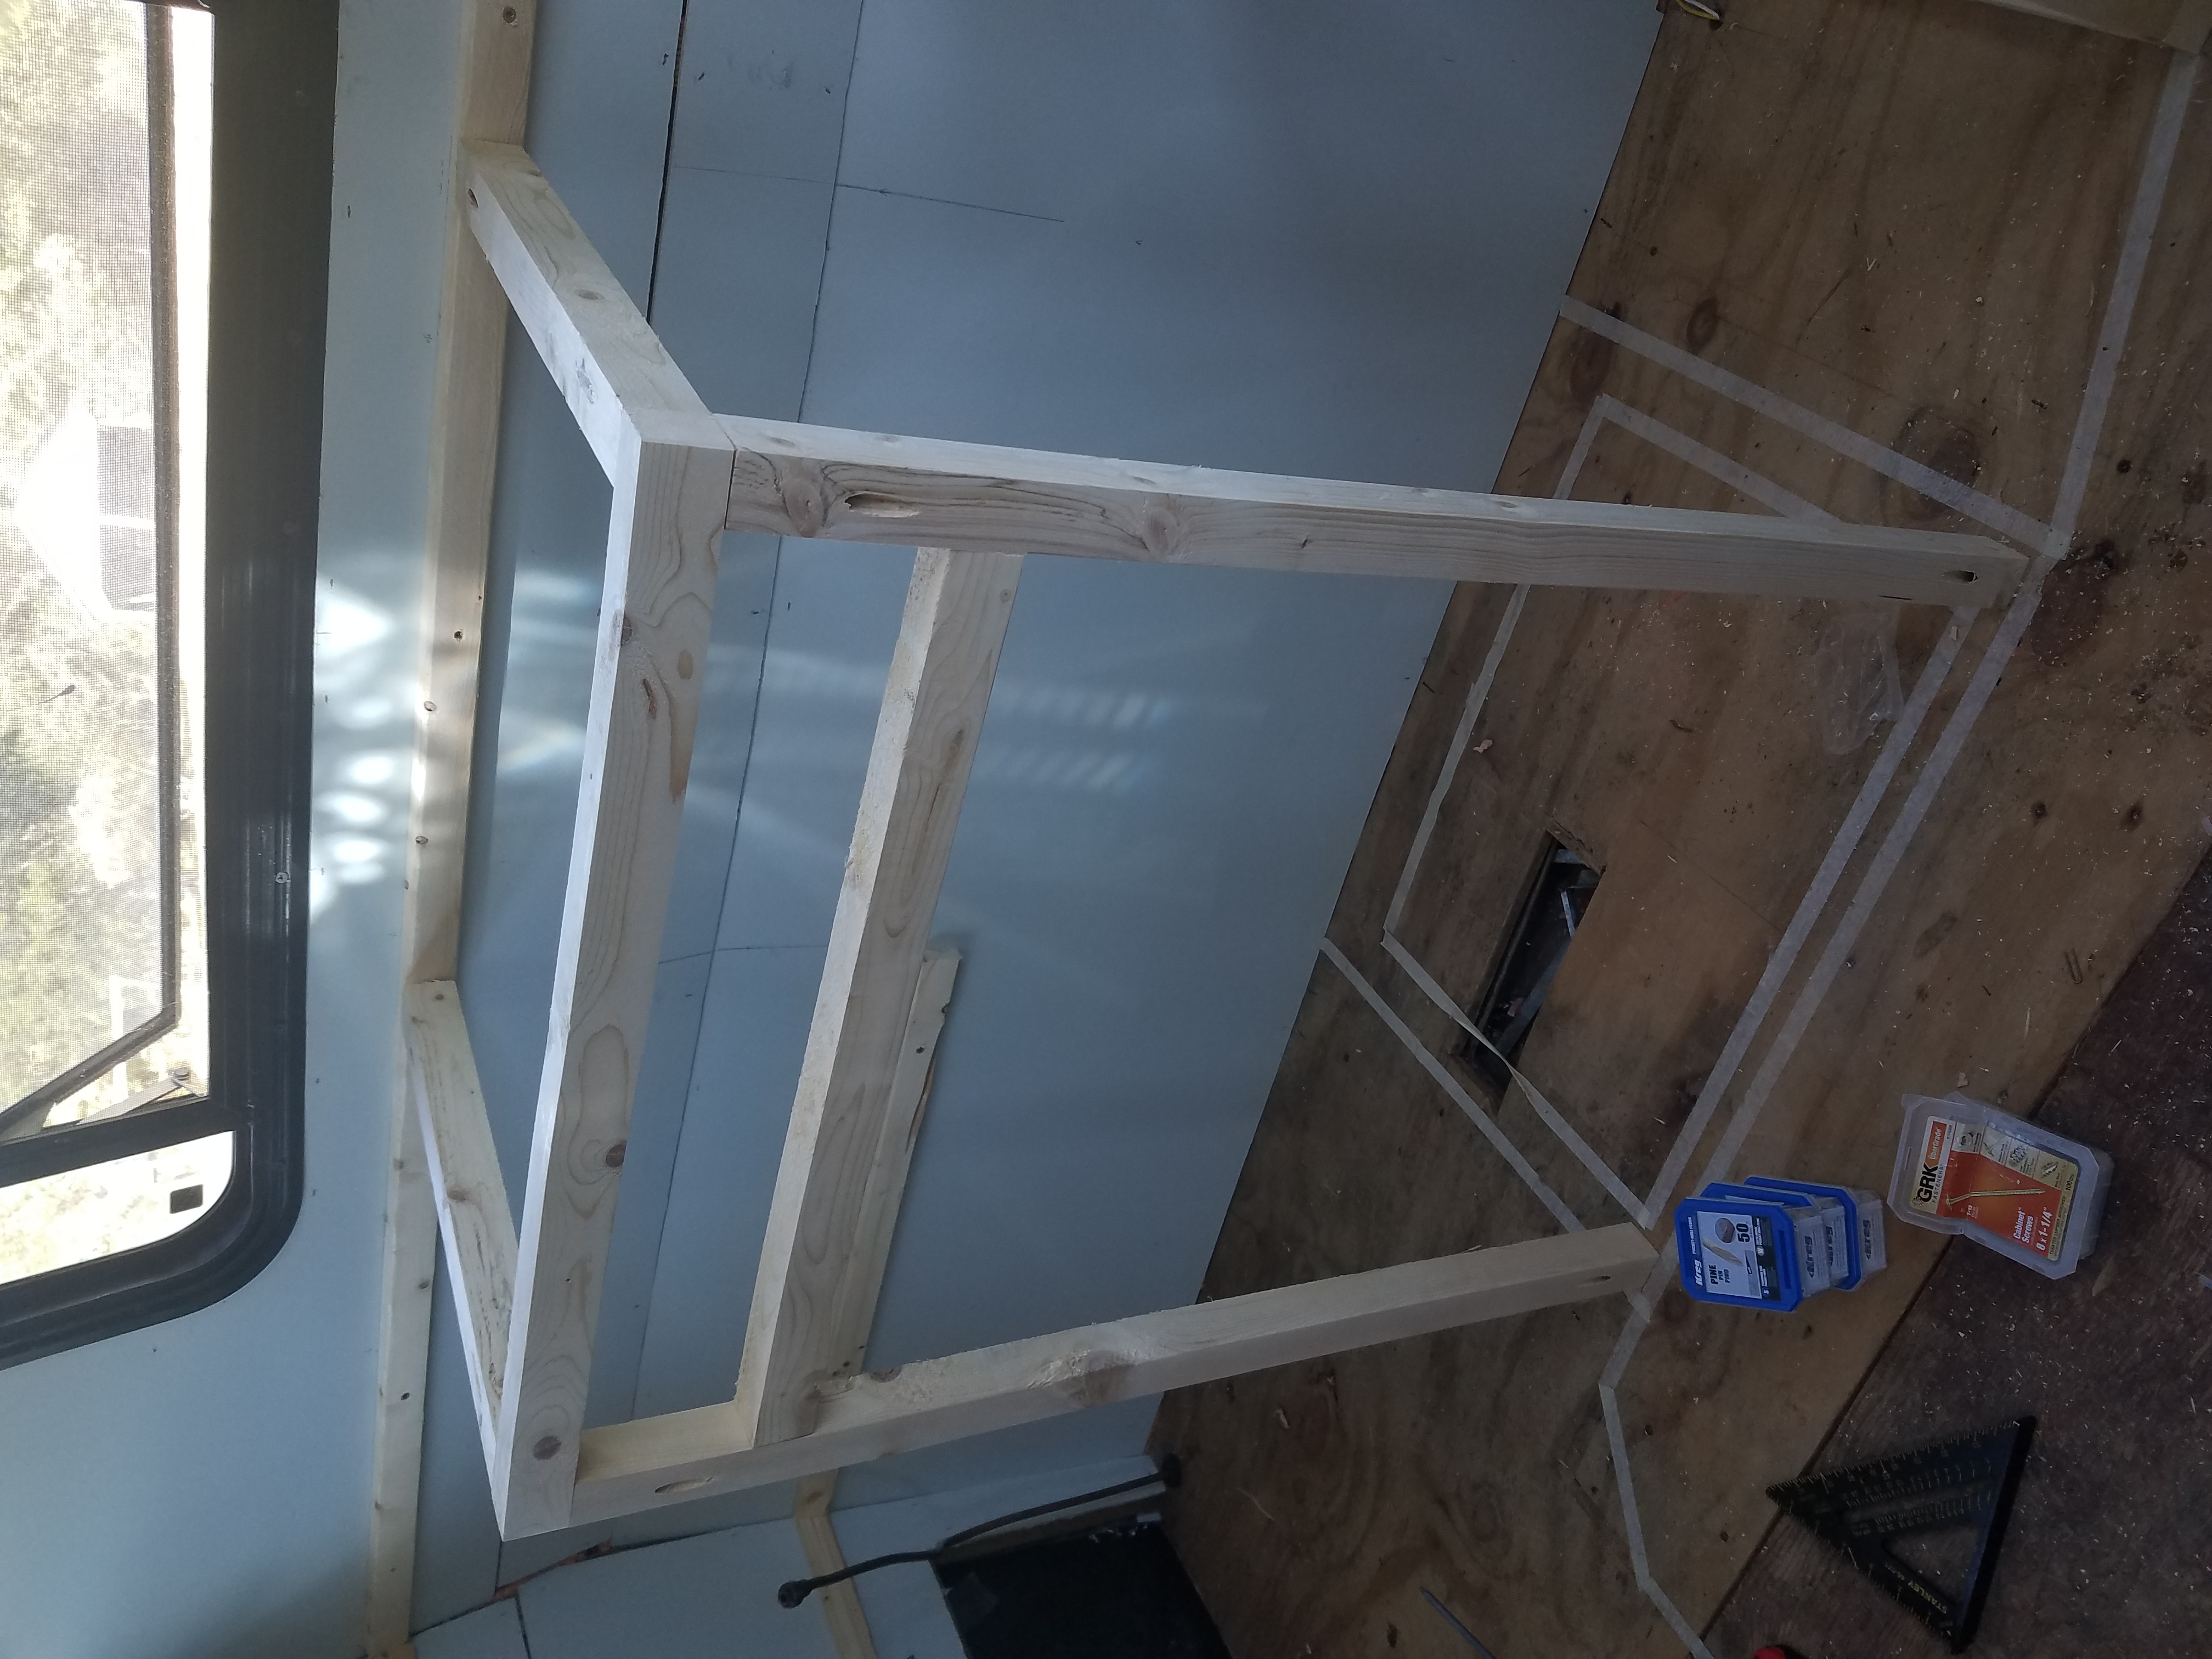
With the brace boards screwed in, I was ready to put together the simplest section of the kitchen; the range (stove/oven) cupboard. The range that came with the trailer is propane-fueled, has 3 burners, and includes a small oven. It doesn’t go all the way to the floor, but rather sits supported on the countertop. I made a couple of simple L-shaped wooden brackets to make sure the countertop is well-supported where the stove will be installed, and also to make a cabinet in the space below the oven.
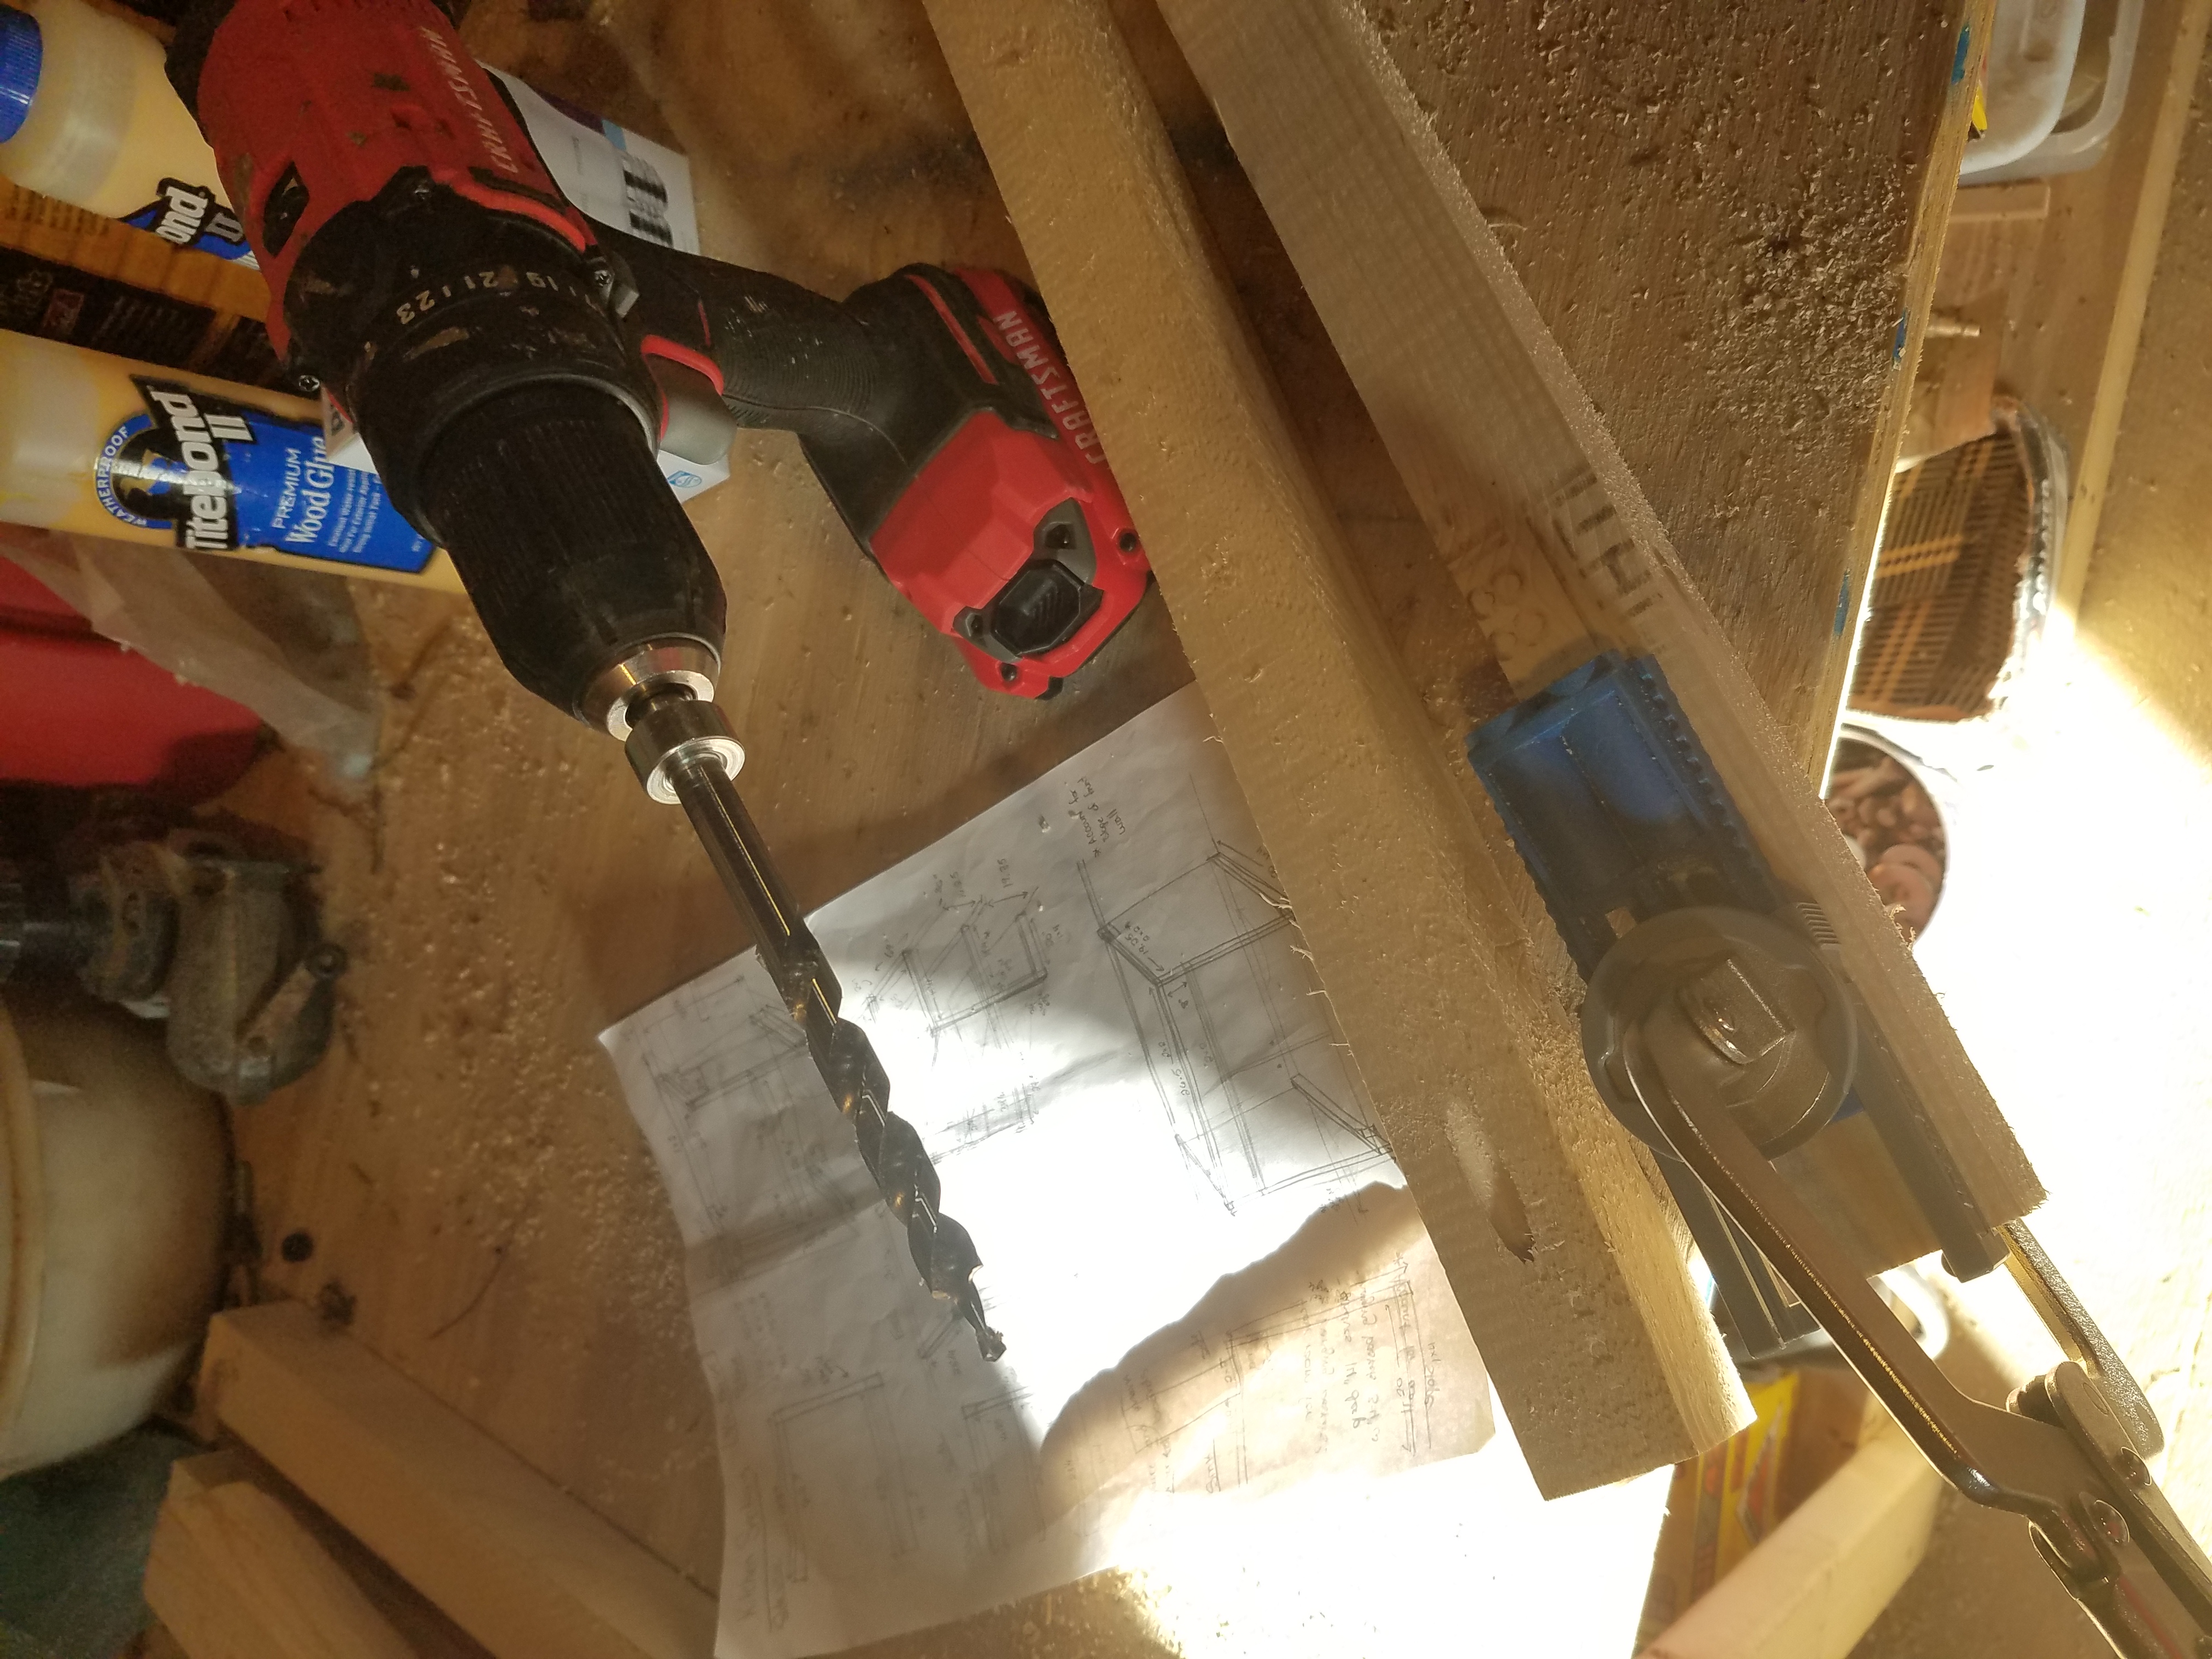
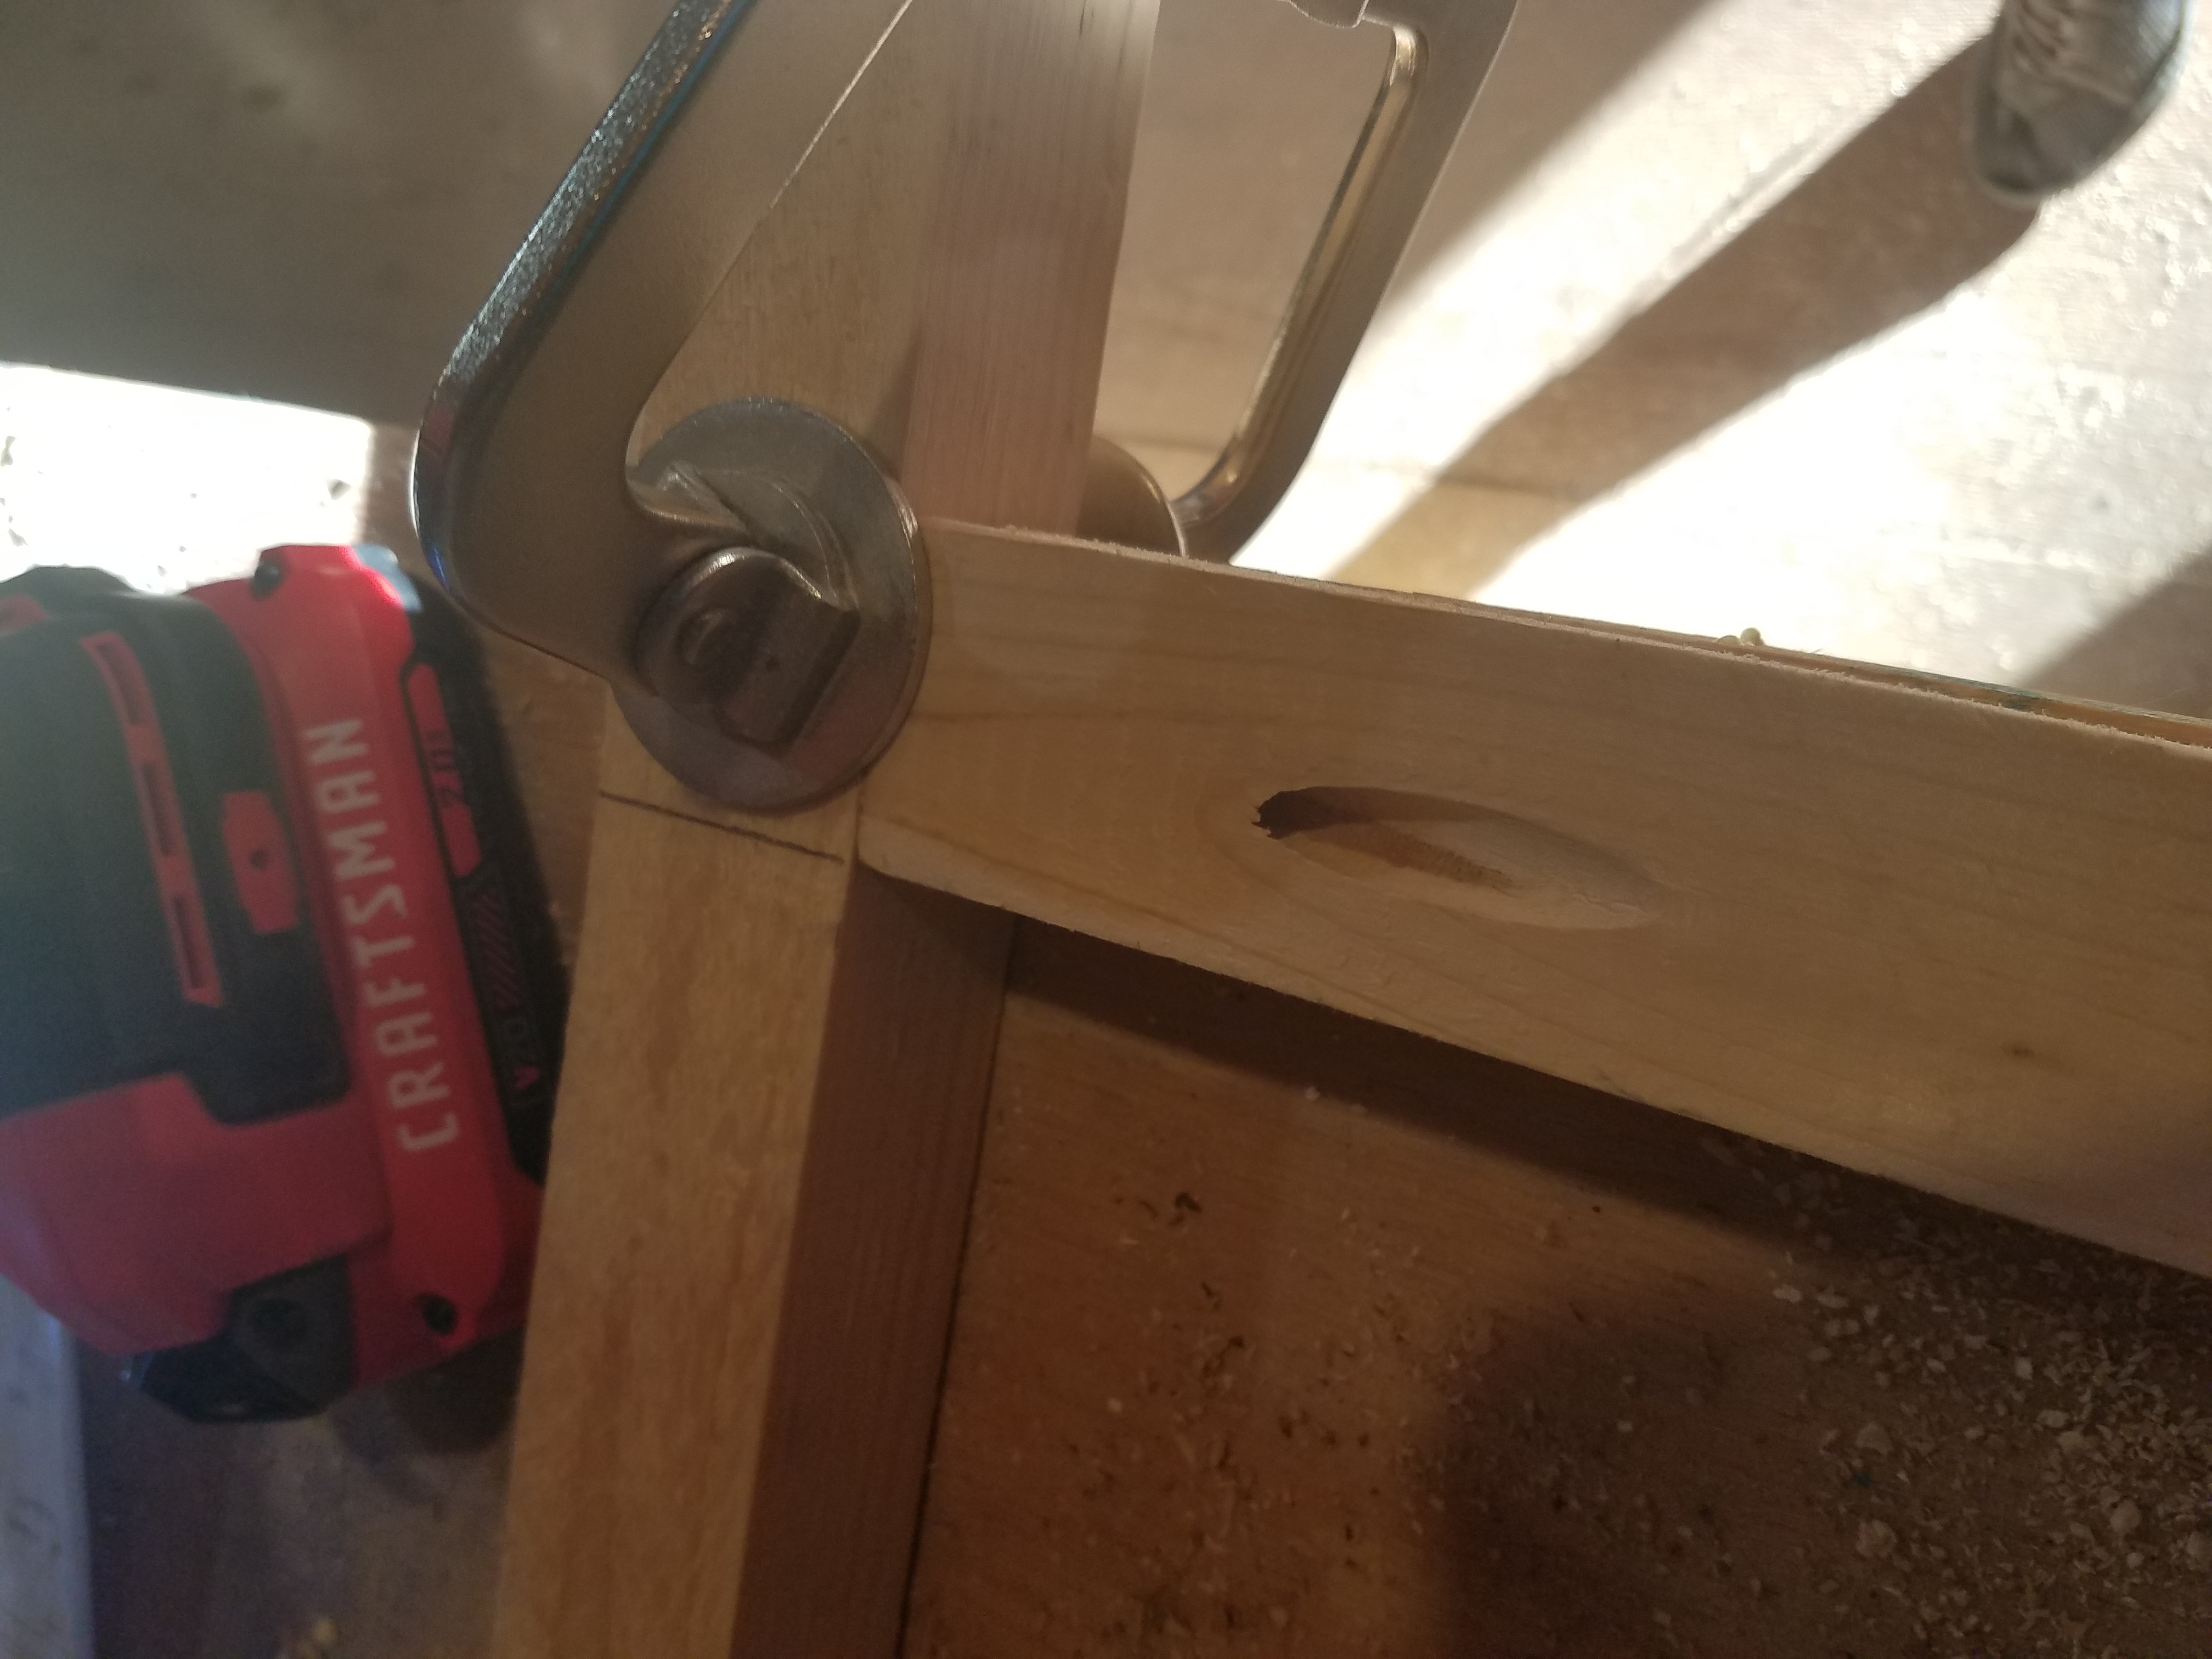
As with all of the other parts of the kitchen, I used pocket screws and wood glue at the joints to make strong 90-degree connections. The pocket screw system is designed to pull the pieces together at a 90-degree angle, and the glue bonds the wood so that it’s practically one piece. These joints don’t wobble, twist, or come apart and they’re very simple!
Here are a few good sites on how to use a Kreg jig (or similar pocket screw system) effectively.
Wood Magazine – Pocket-hole Pointers
Family Handyman – Learn to Use Pocket Screws
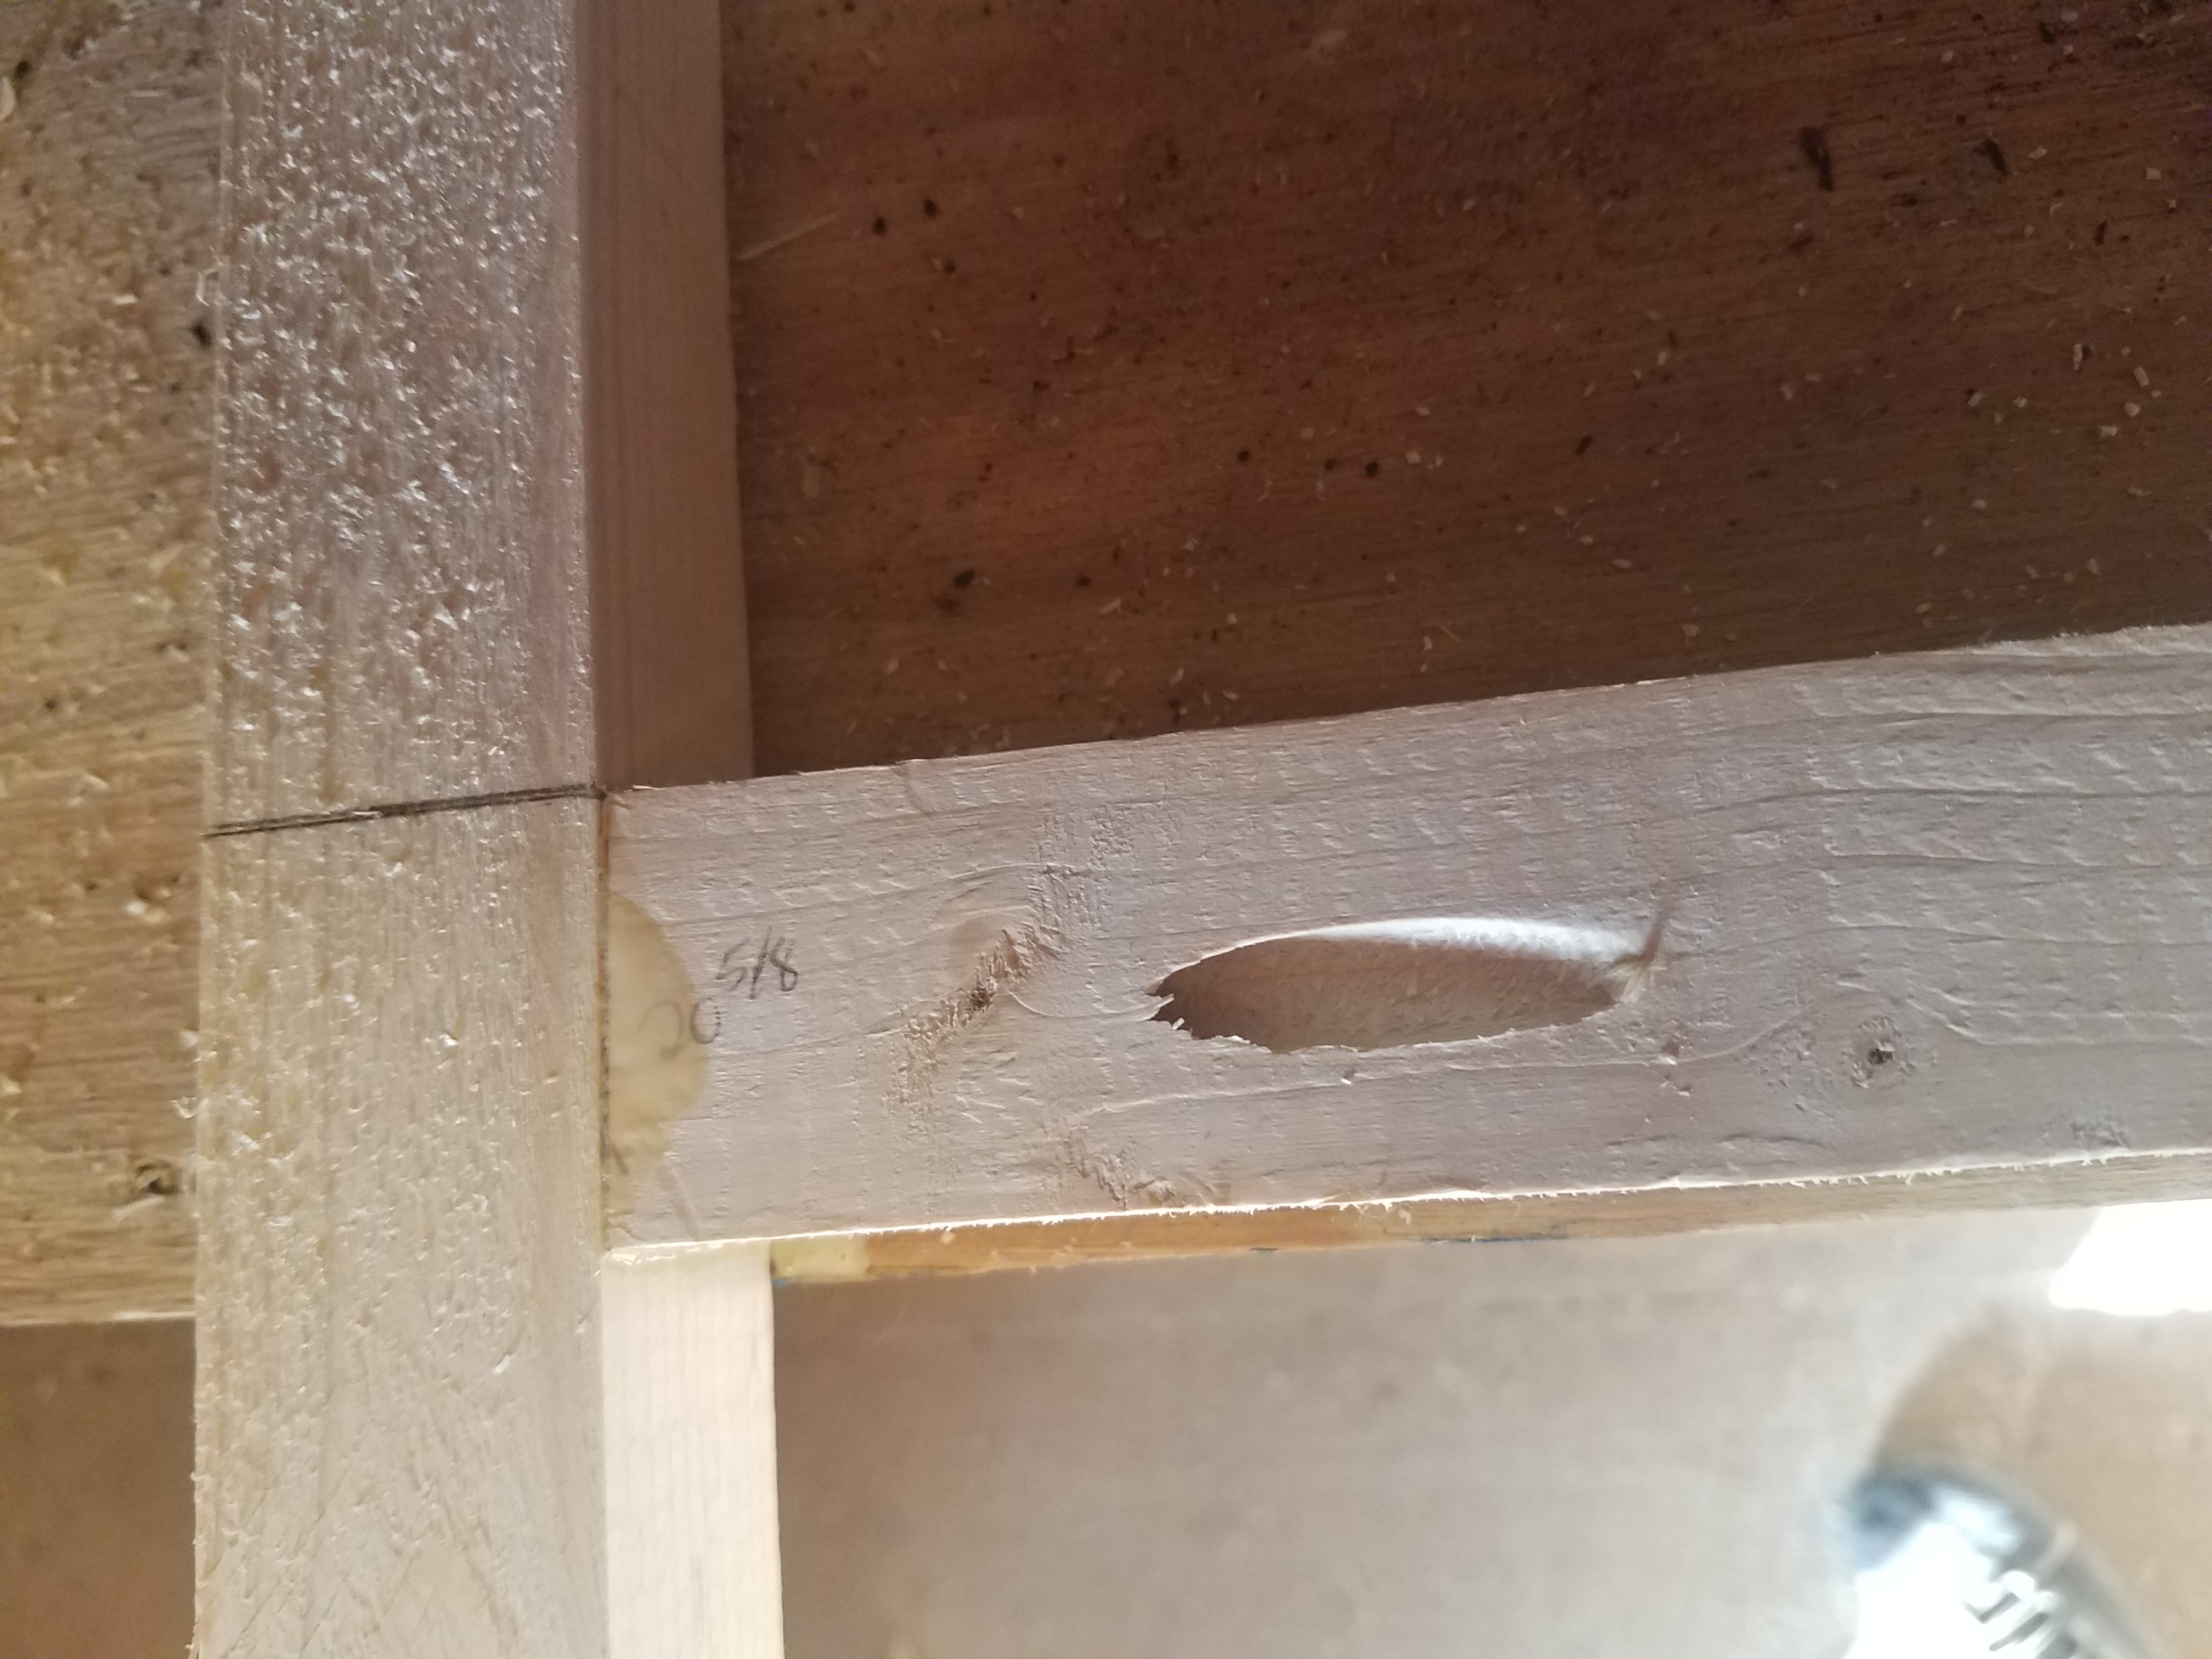
I purchased the Kreg Jig 3 because the larger versions were more than I needed, more than I wanted to spend, and not as portable for someone who plans to live in less than 200 square feet. The accompanying clamp is a must-have, as is a starter kit of different-sized pocket screws to get you going.
After I completed my first project (the desk) I bought a large box of 2″ pocket screws for attaching 2x2s and a few boxes of pine pocket-hole plugs, which hide the screws and disguise the hole. These plugs are useful for when the strongest joint requires drilling on an outside-facing or visible surface of the project.
I used Titebond II for these joints since I don’t expect them to get wet and I had it on hand. Titebond II is water-resistant, where Titebond III is waterproof. Titebond I is not resistant to water at all, so I’m not sure why anyone would use it. It seems like wood glue being at least water-resistant would always be useful, just in case.
The compound mitre saw (commonly called a chop saw) is the best tool for this kind of carpentry work. It cuts perfect right angles, and also any other angle you need. It quickly and easily chops all sizes of boards to the length you need.
Luckily, my father has a chop saw in his woodshop and I am very grateful to borrow his resources while building this trailer. I’ve learned how critical it is to have the right tools, not just to save time, but to save wasted materials and to make professional, sturdy products. The difference between trying to cut every board with my circular saw (dangerous as well as ineffective) and using the chop saw is like night and day.
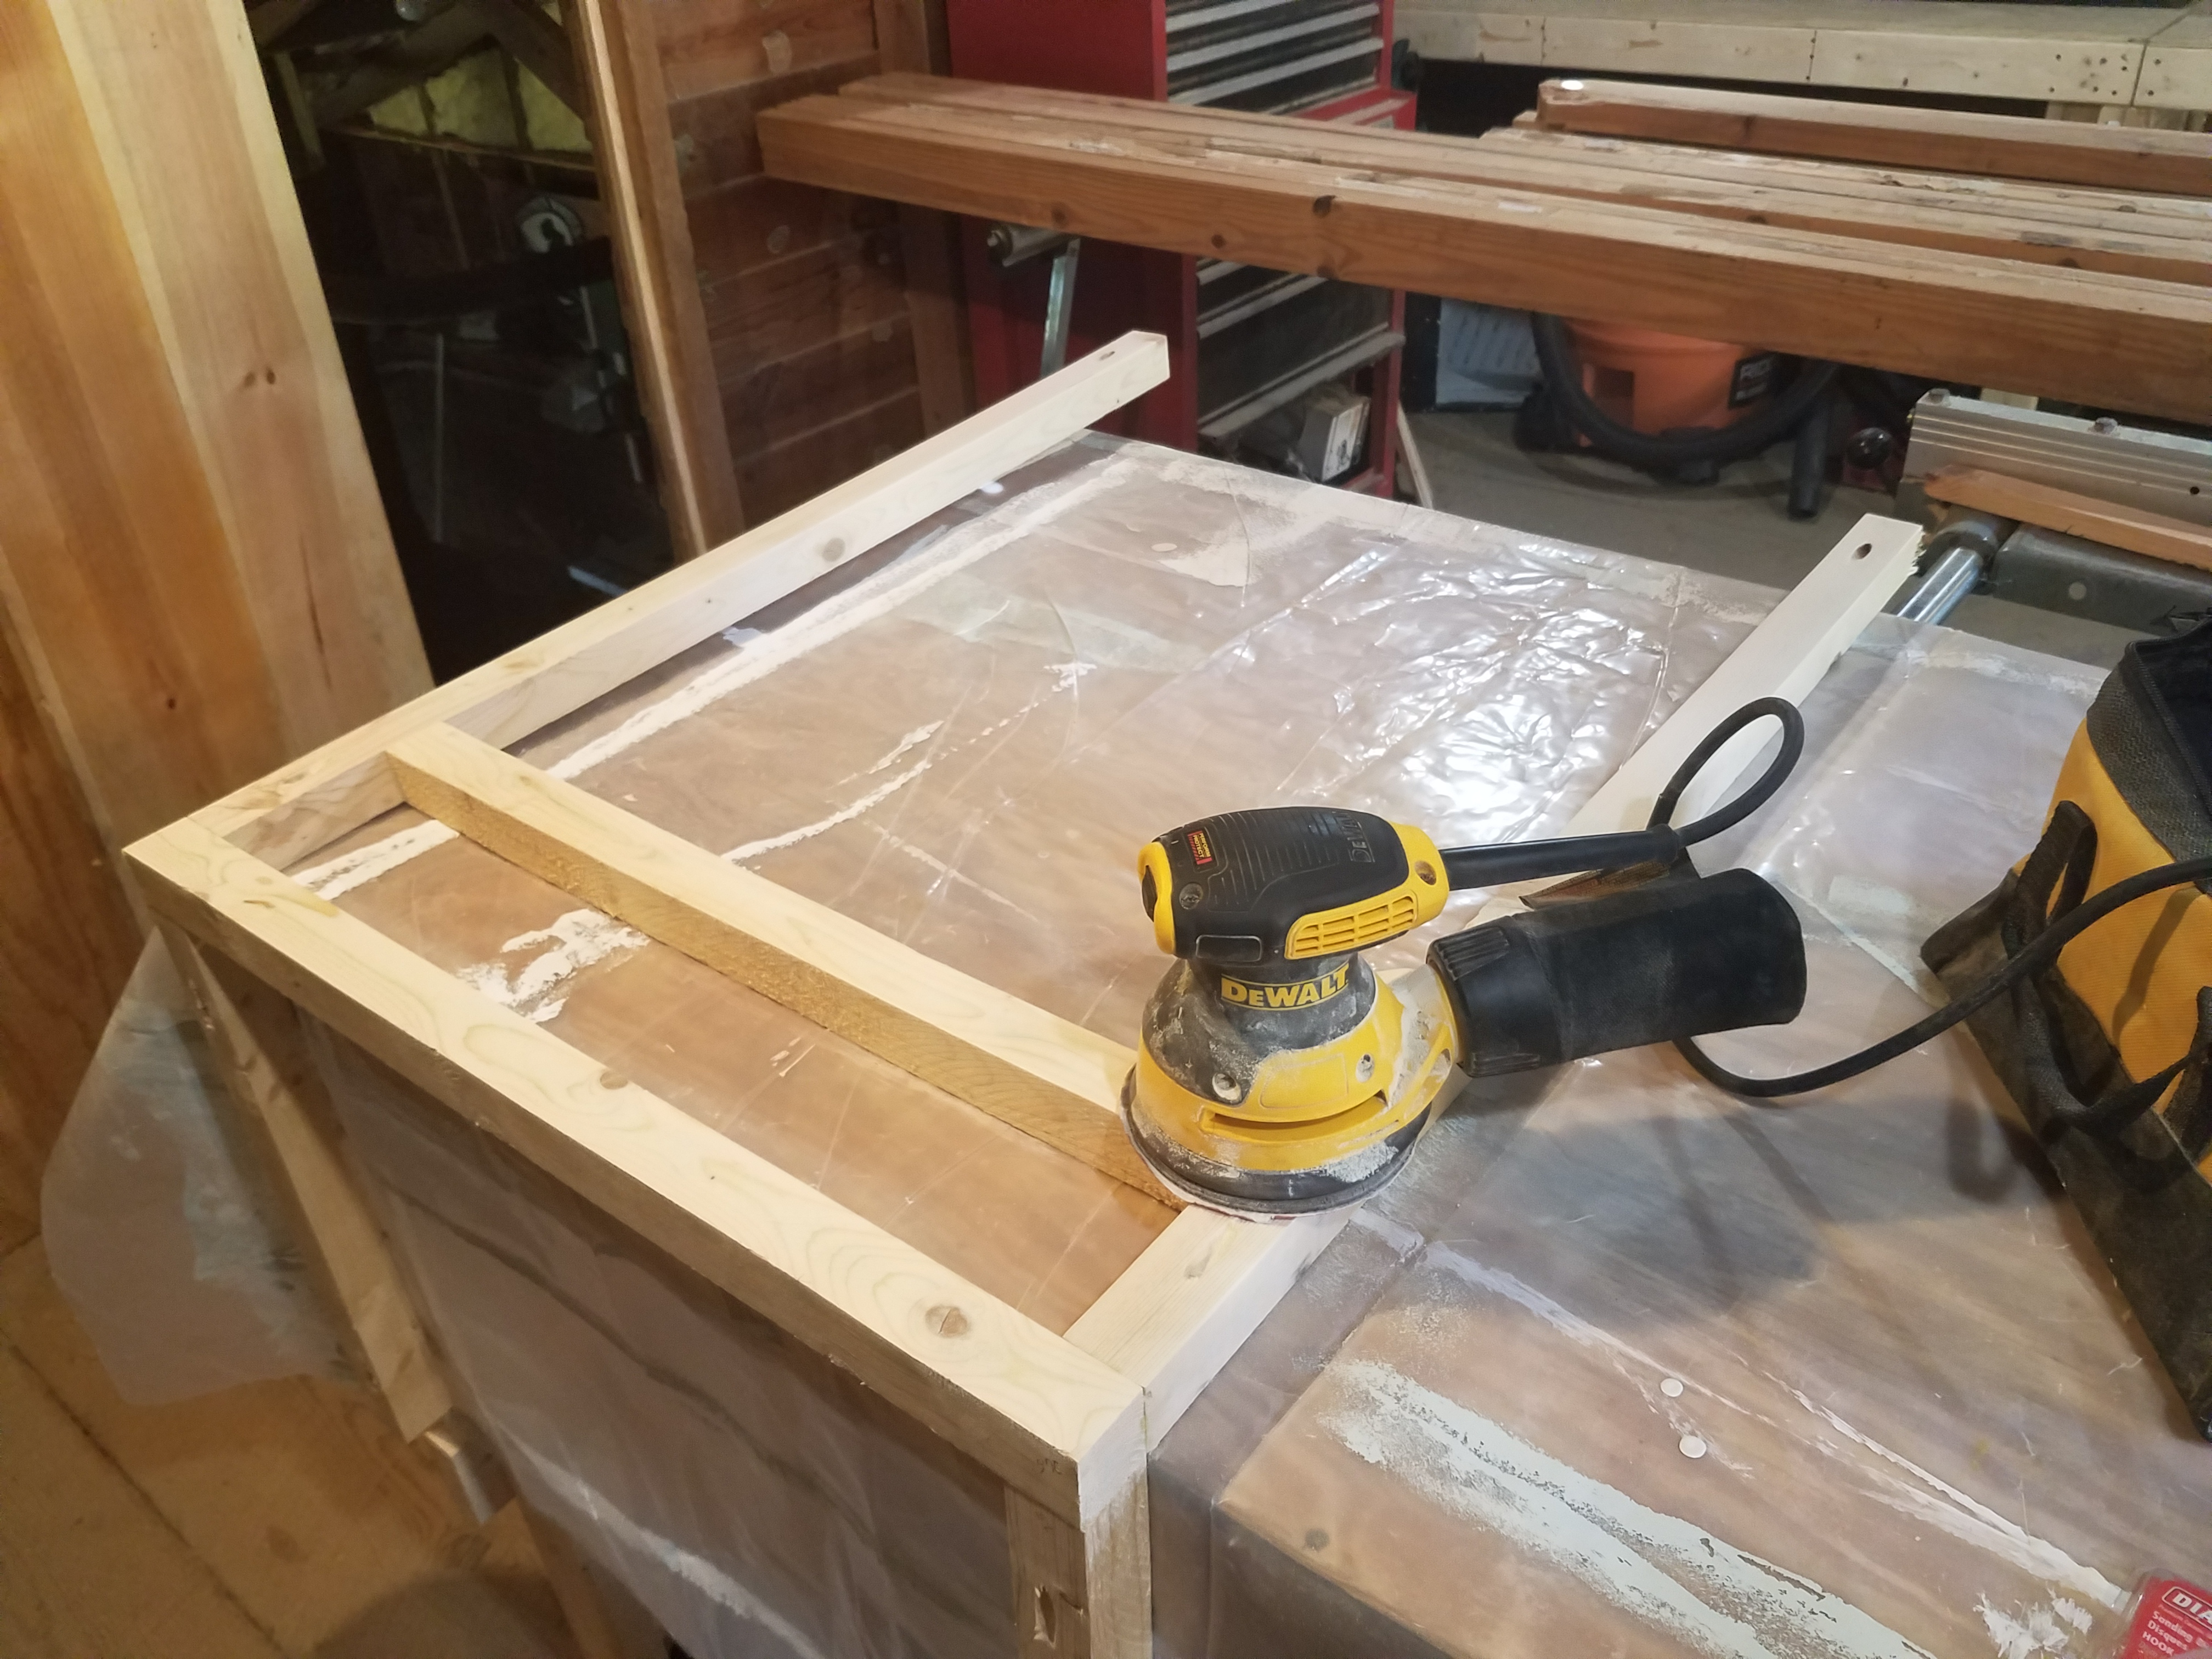
The chop saw used in addition to the Kreg jig made assembling this simple piece of cabinetry quick and easy. Once it was assembled I used a random orbital sander (corded DeWalt with a sawdust collection system) that I borrowed from my dad. I sanded down the “whiskered” edges of the boards and tried to remove machine marks from the other edges. I also rounded the outside corners slightly to make them less sharp and splintery.
Sanding is essential because your coat of paint will only accentuate any divots, whiskers, or flaws in the wood. The power sander makes this process relatively painless and quick, so it’s worth doing a good job with several different degrees of sanding, from 80 grit where you need to remove material, 120 grit where you’re polishing the surface, and 220 grit for between coats of paint or before applying polyurethane.
I recommend taking your time with this finishing step because you’re going to be looking at it forever and any mistakes will annoy you every time you see them. Or is that just me?
I won’t be painting the kitchen until it’s fully installed, so the final step was to bring the assembled piece to the trailer and install it. I used a carpenter’s quick square to make sure the legs were 90 degrees to the floor and wall and measured again before screwing them in. Then I had to unscrew them, fix the placement, and screw them back in a few more times before I was happy with how it looked. I test-fitted the stove and it fits nicely. So that’s one section of the kitchen completed!
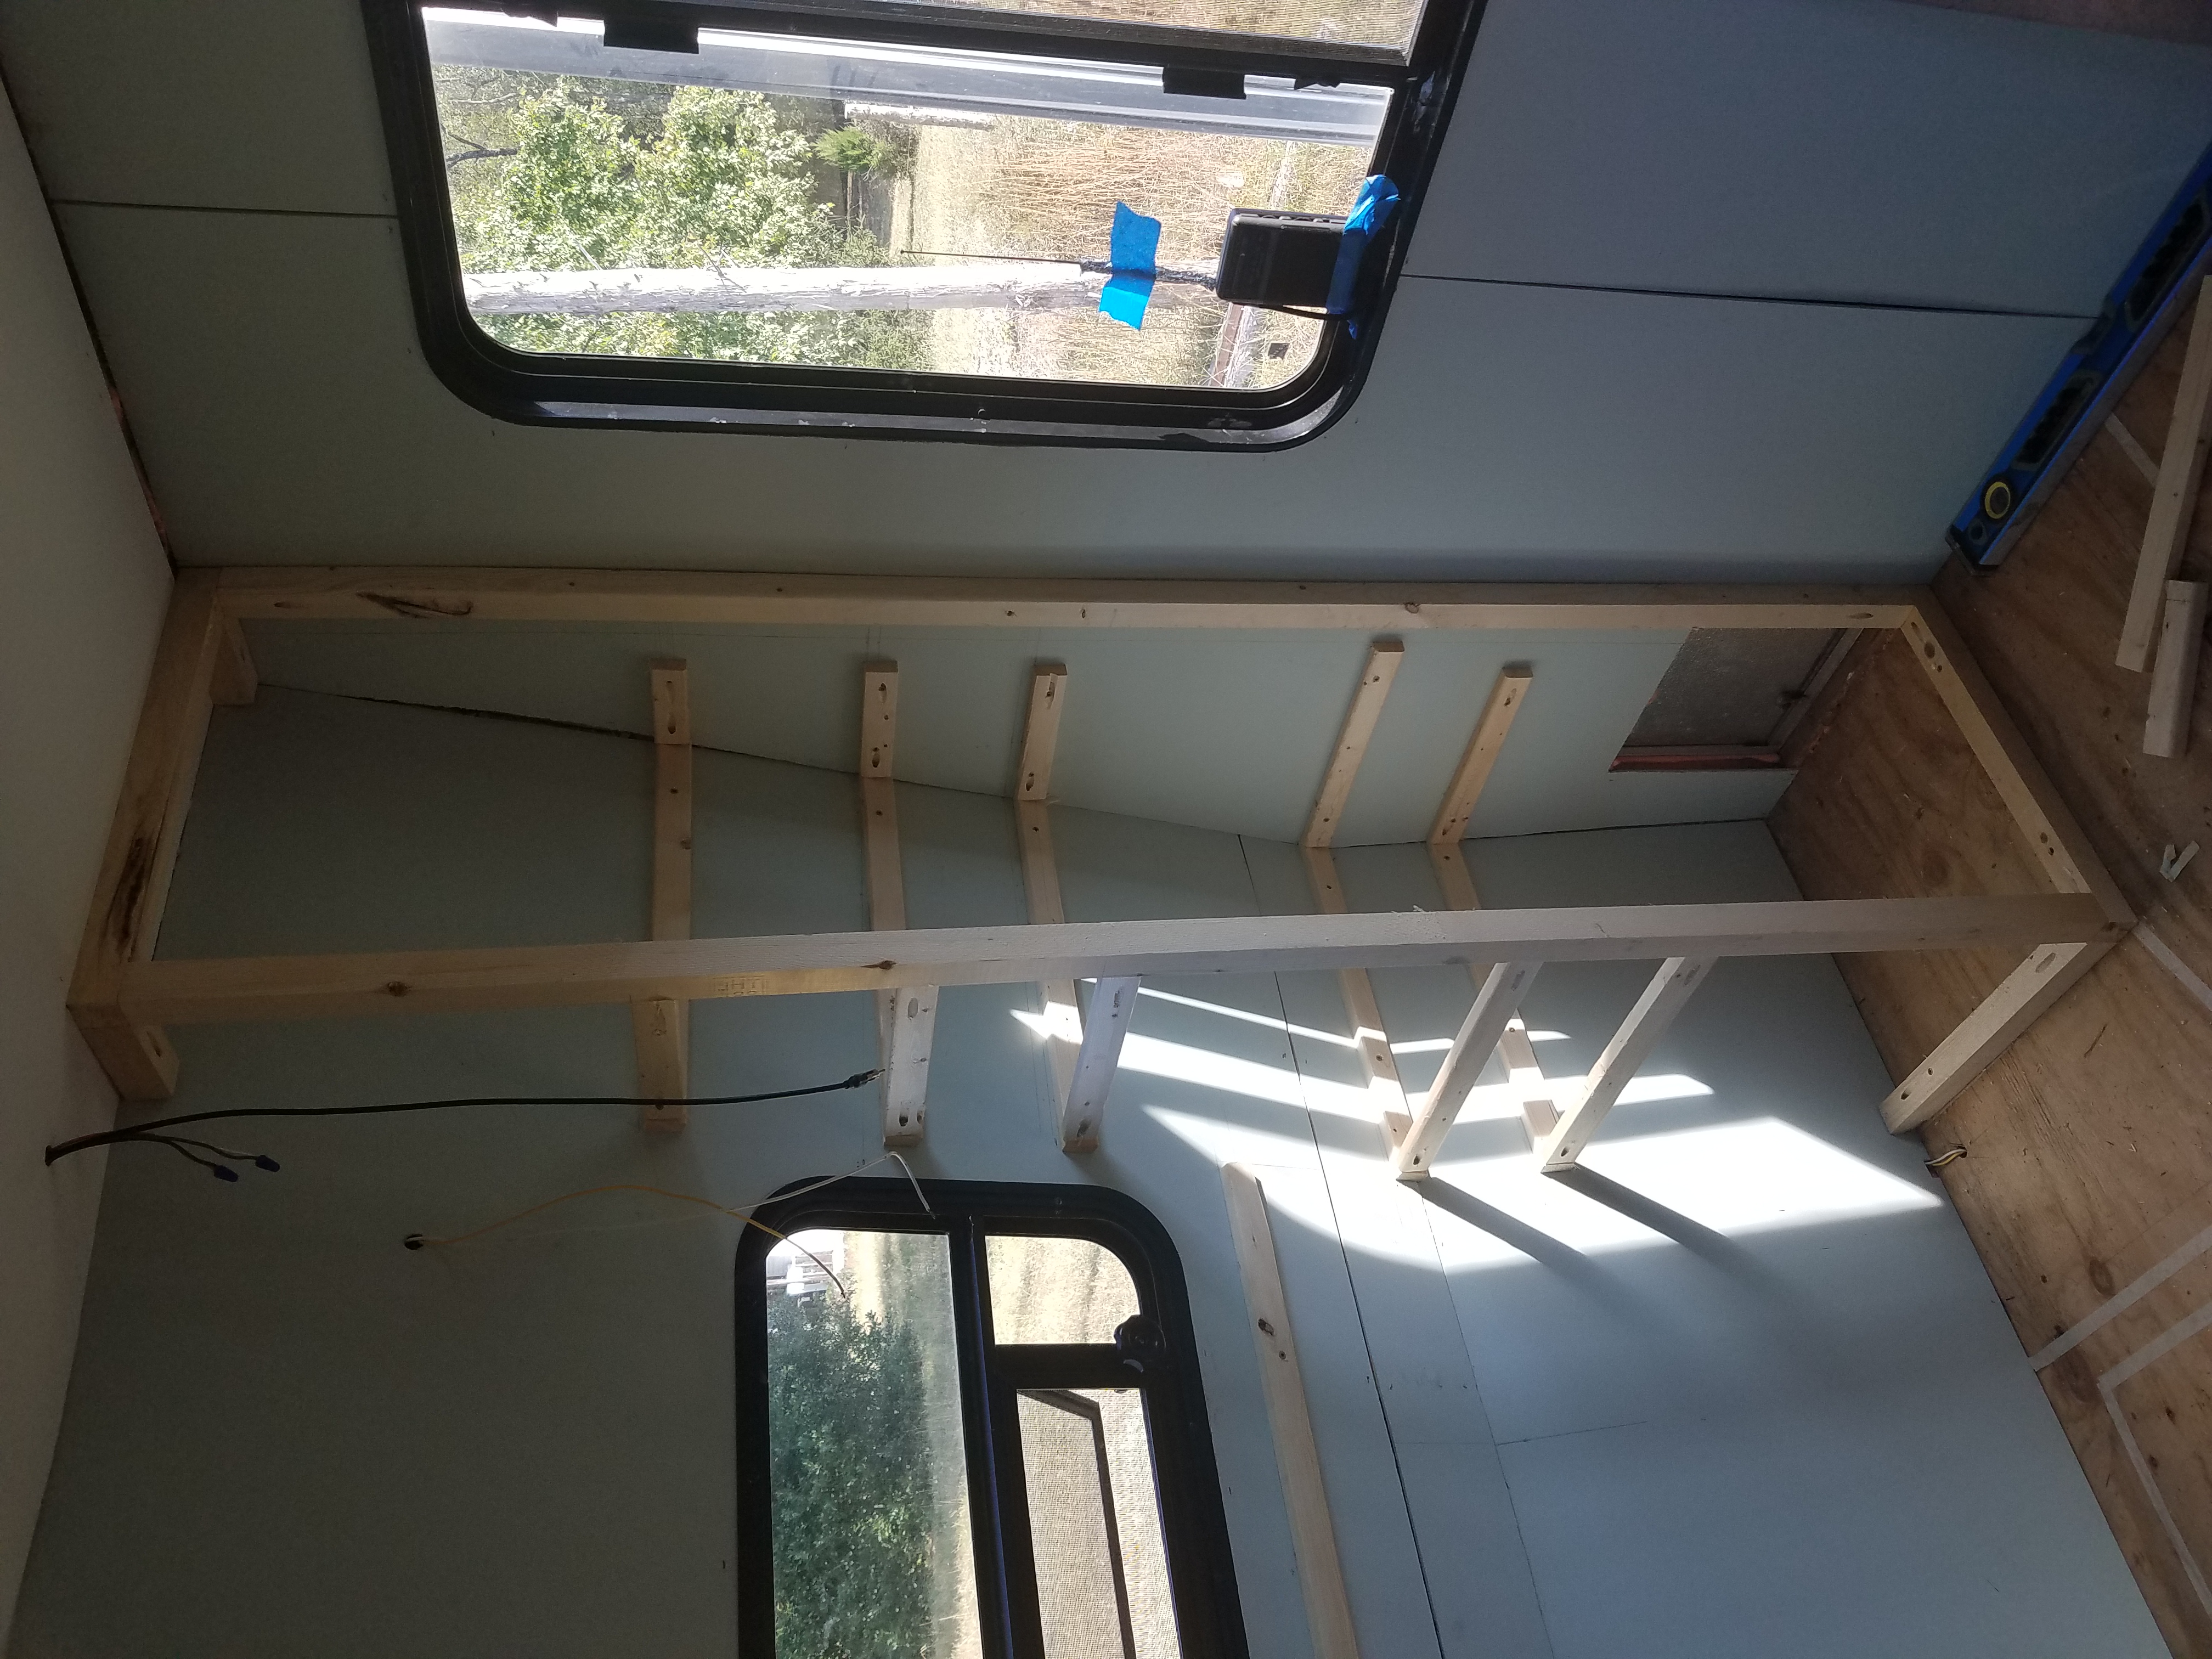
Building the Pantry
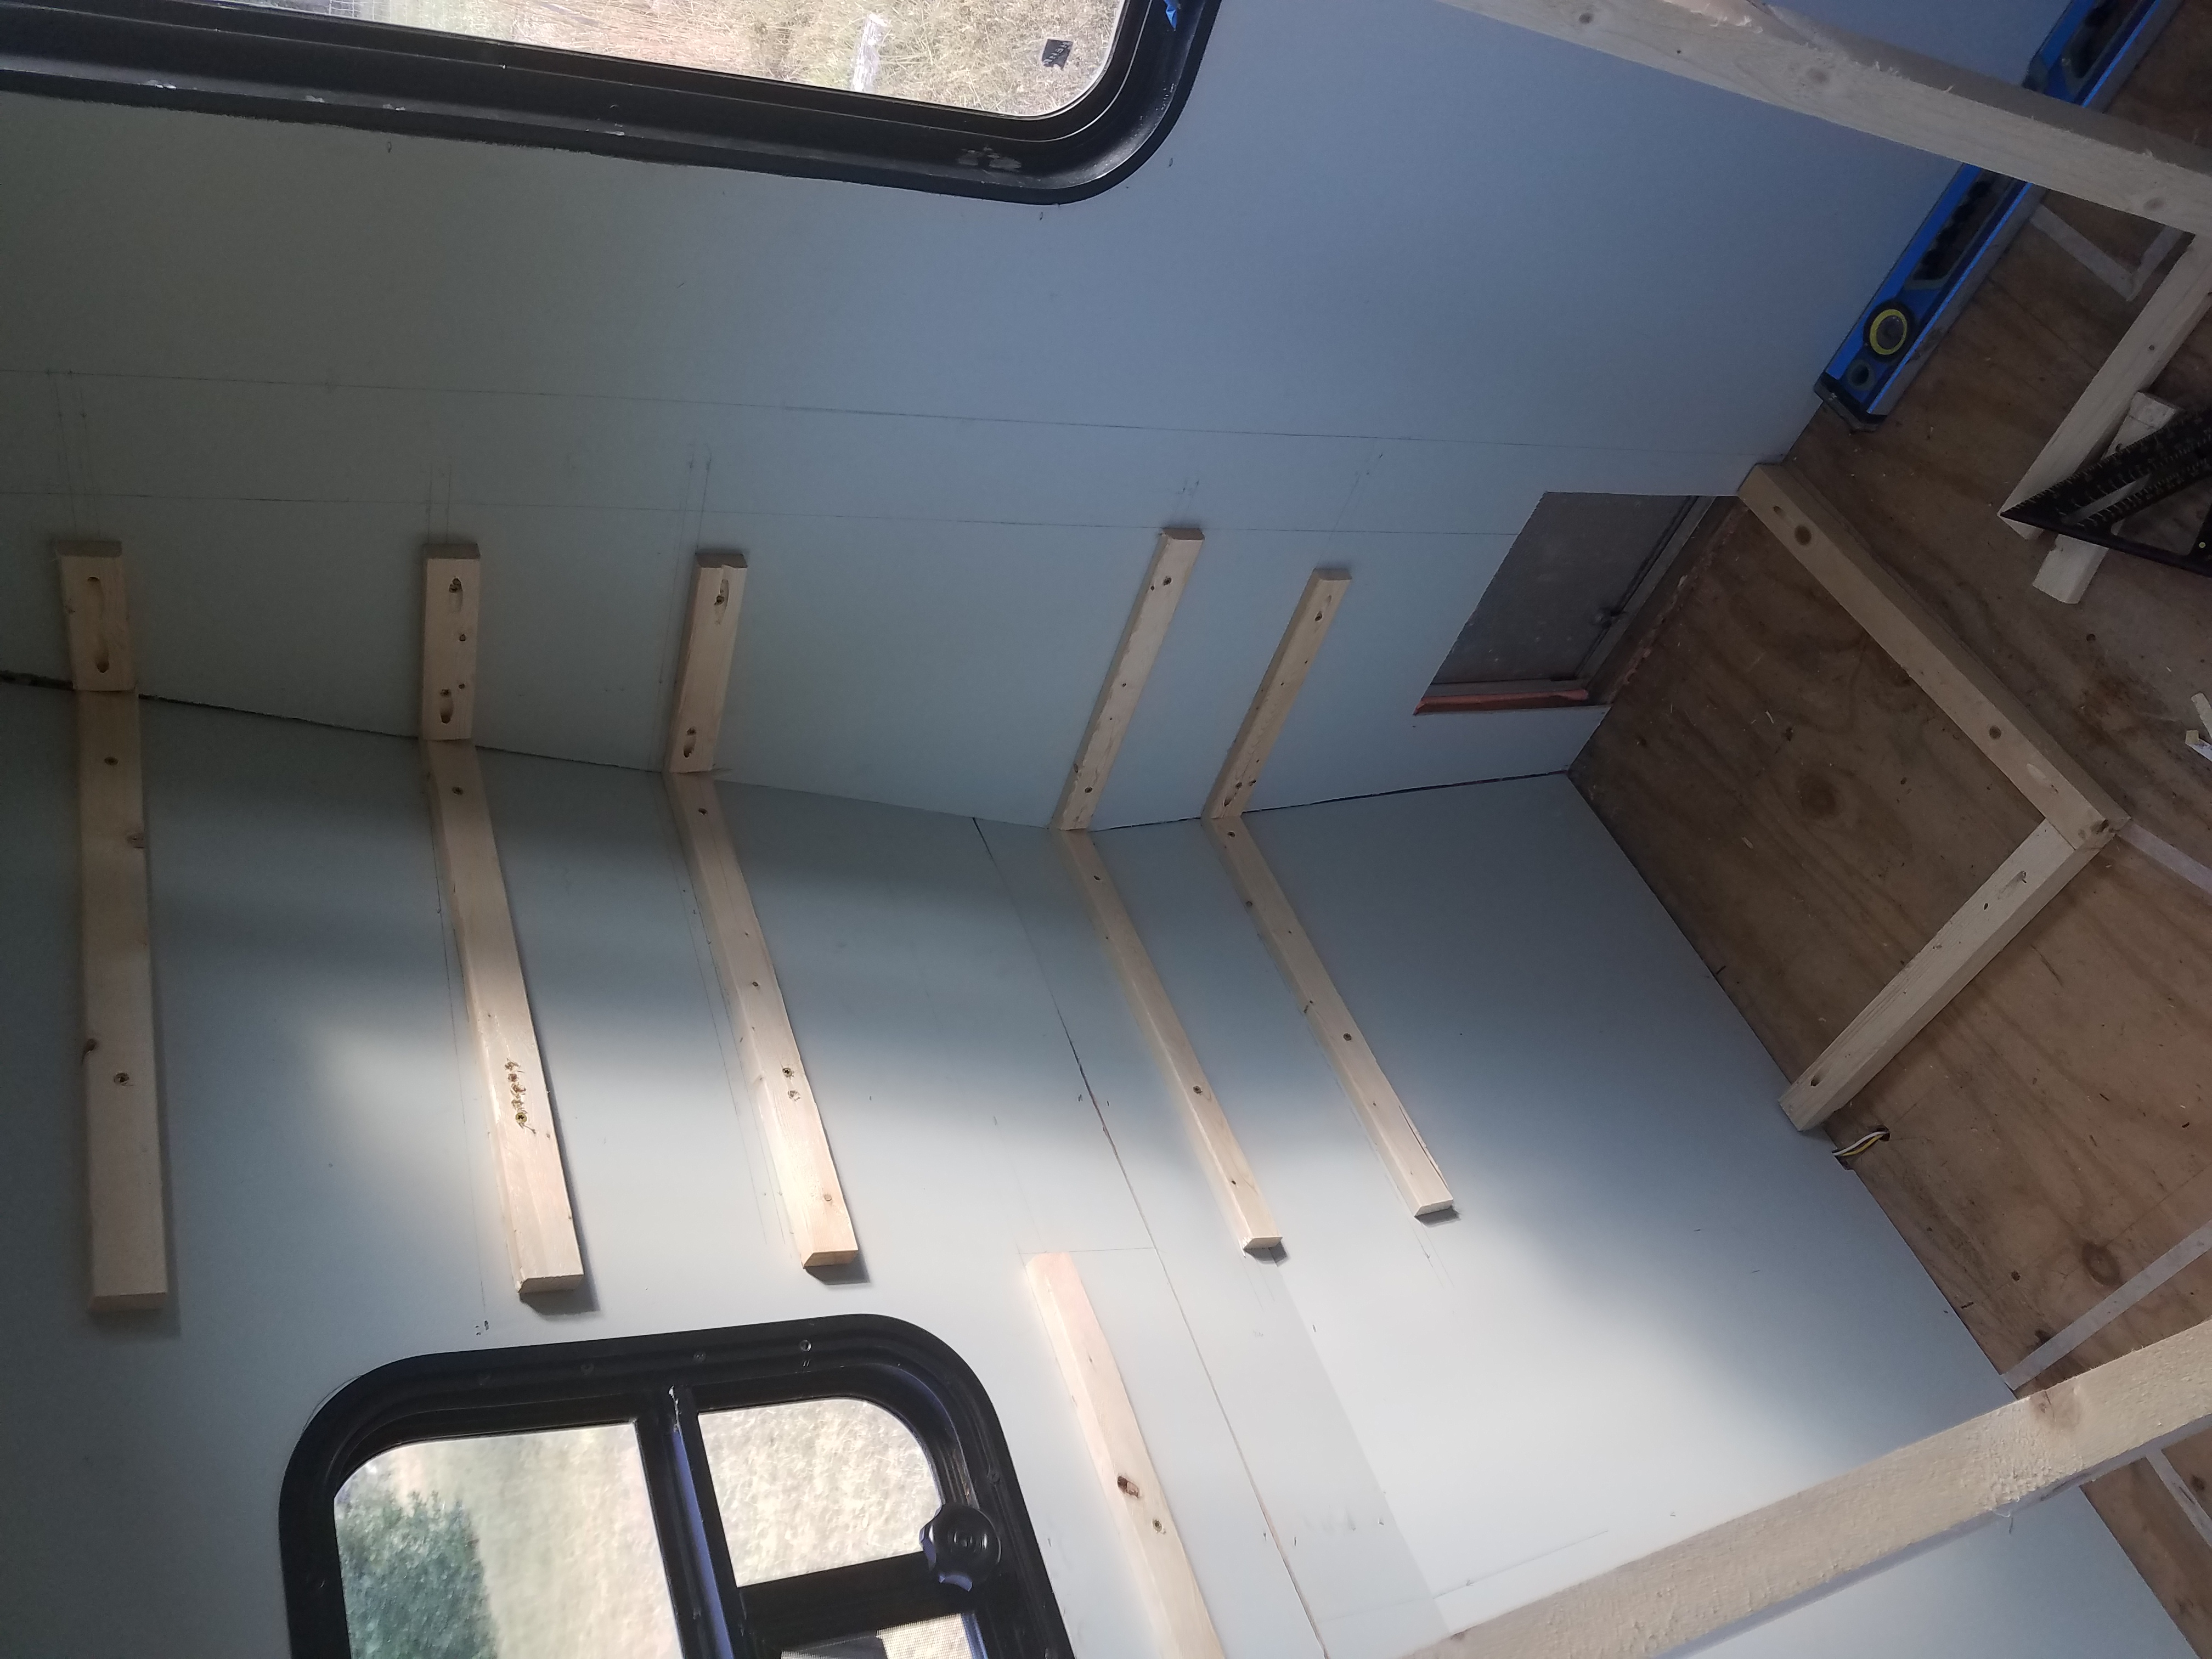
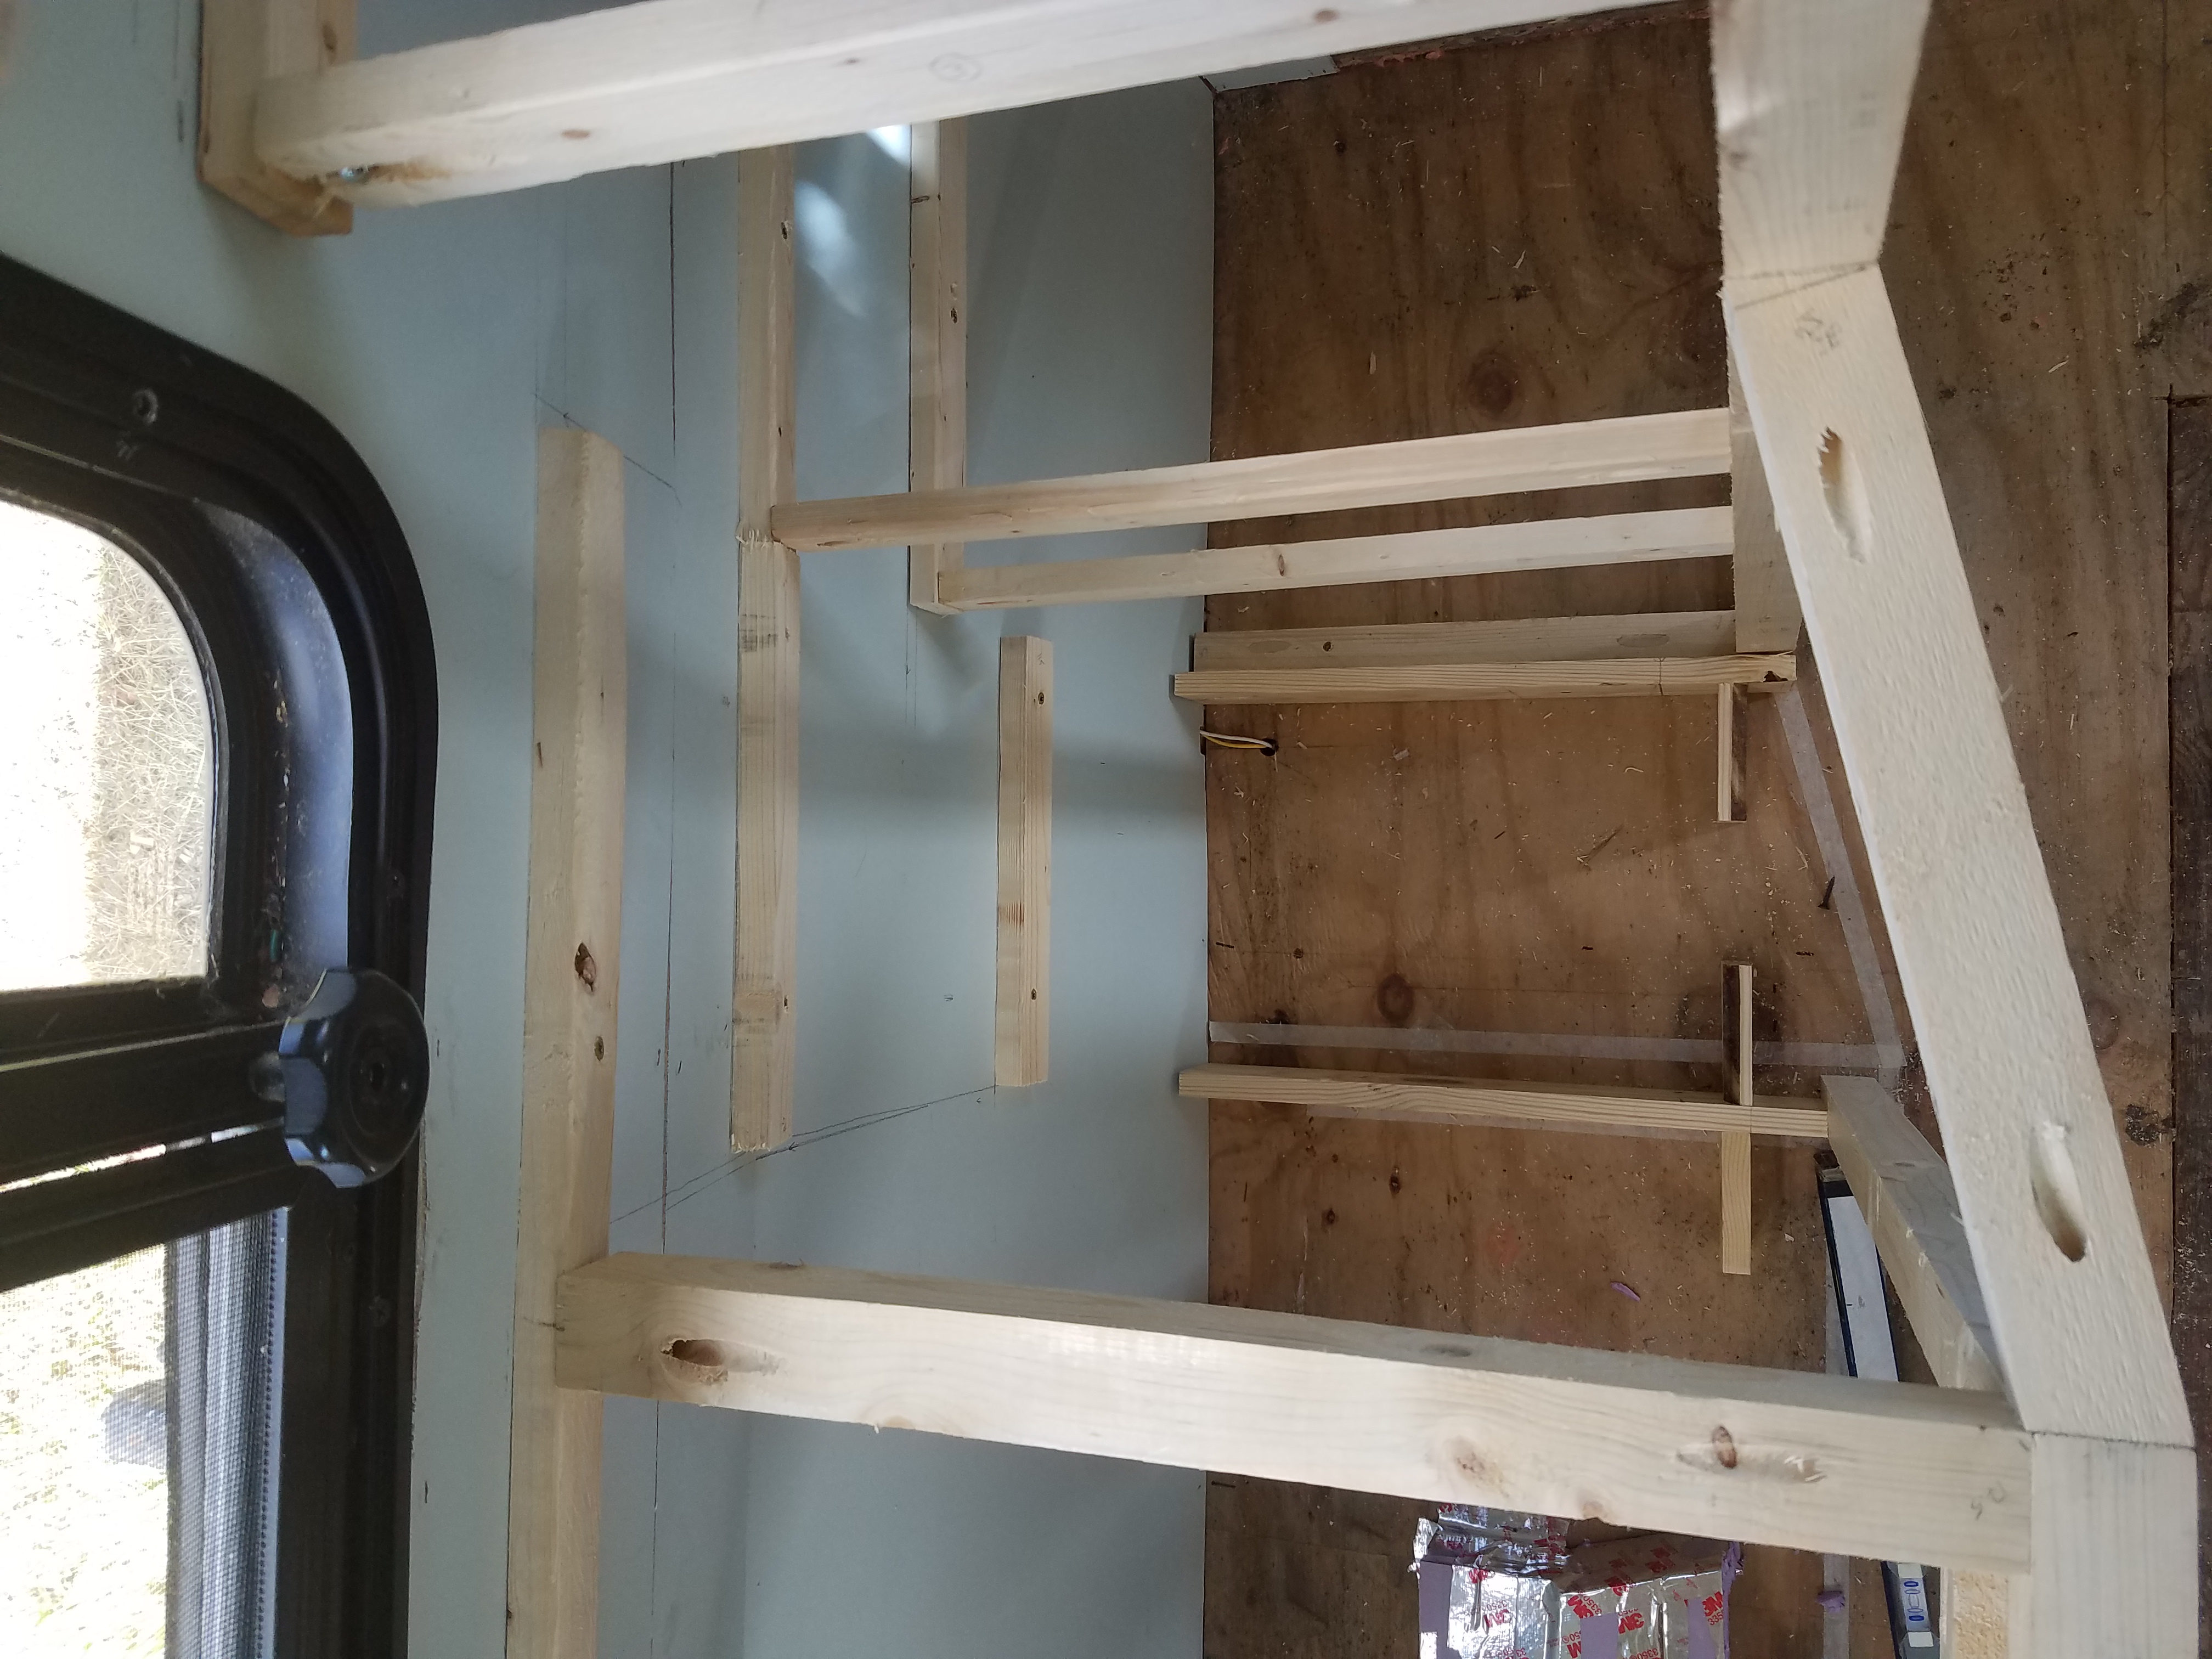
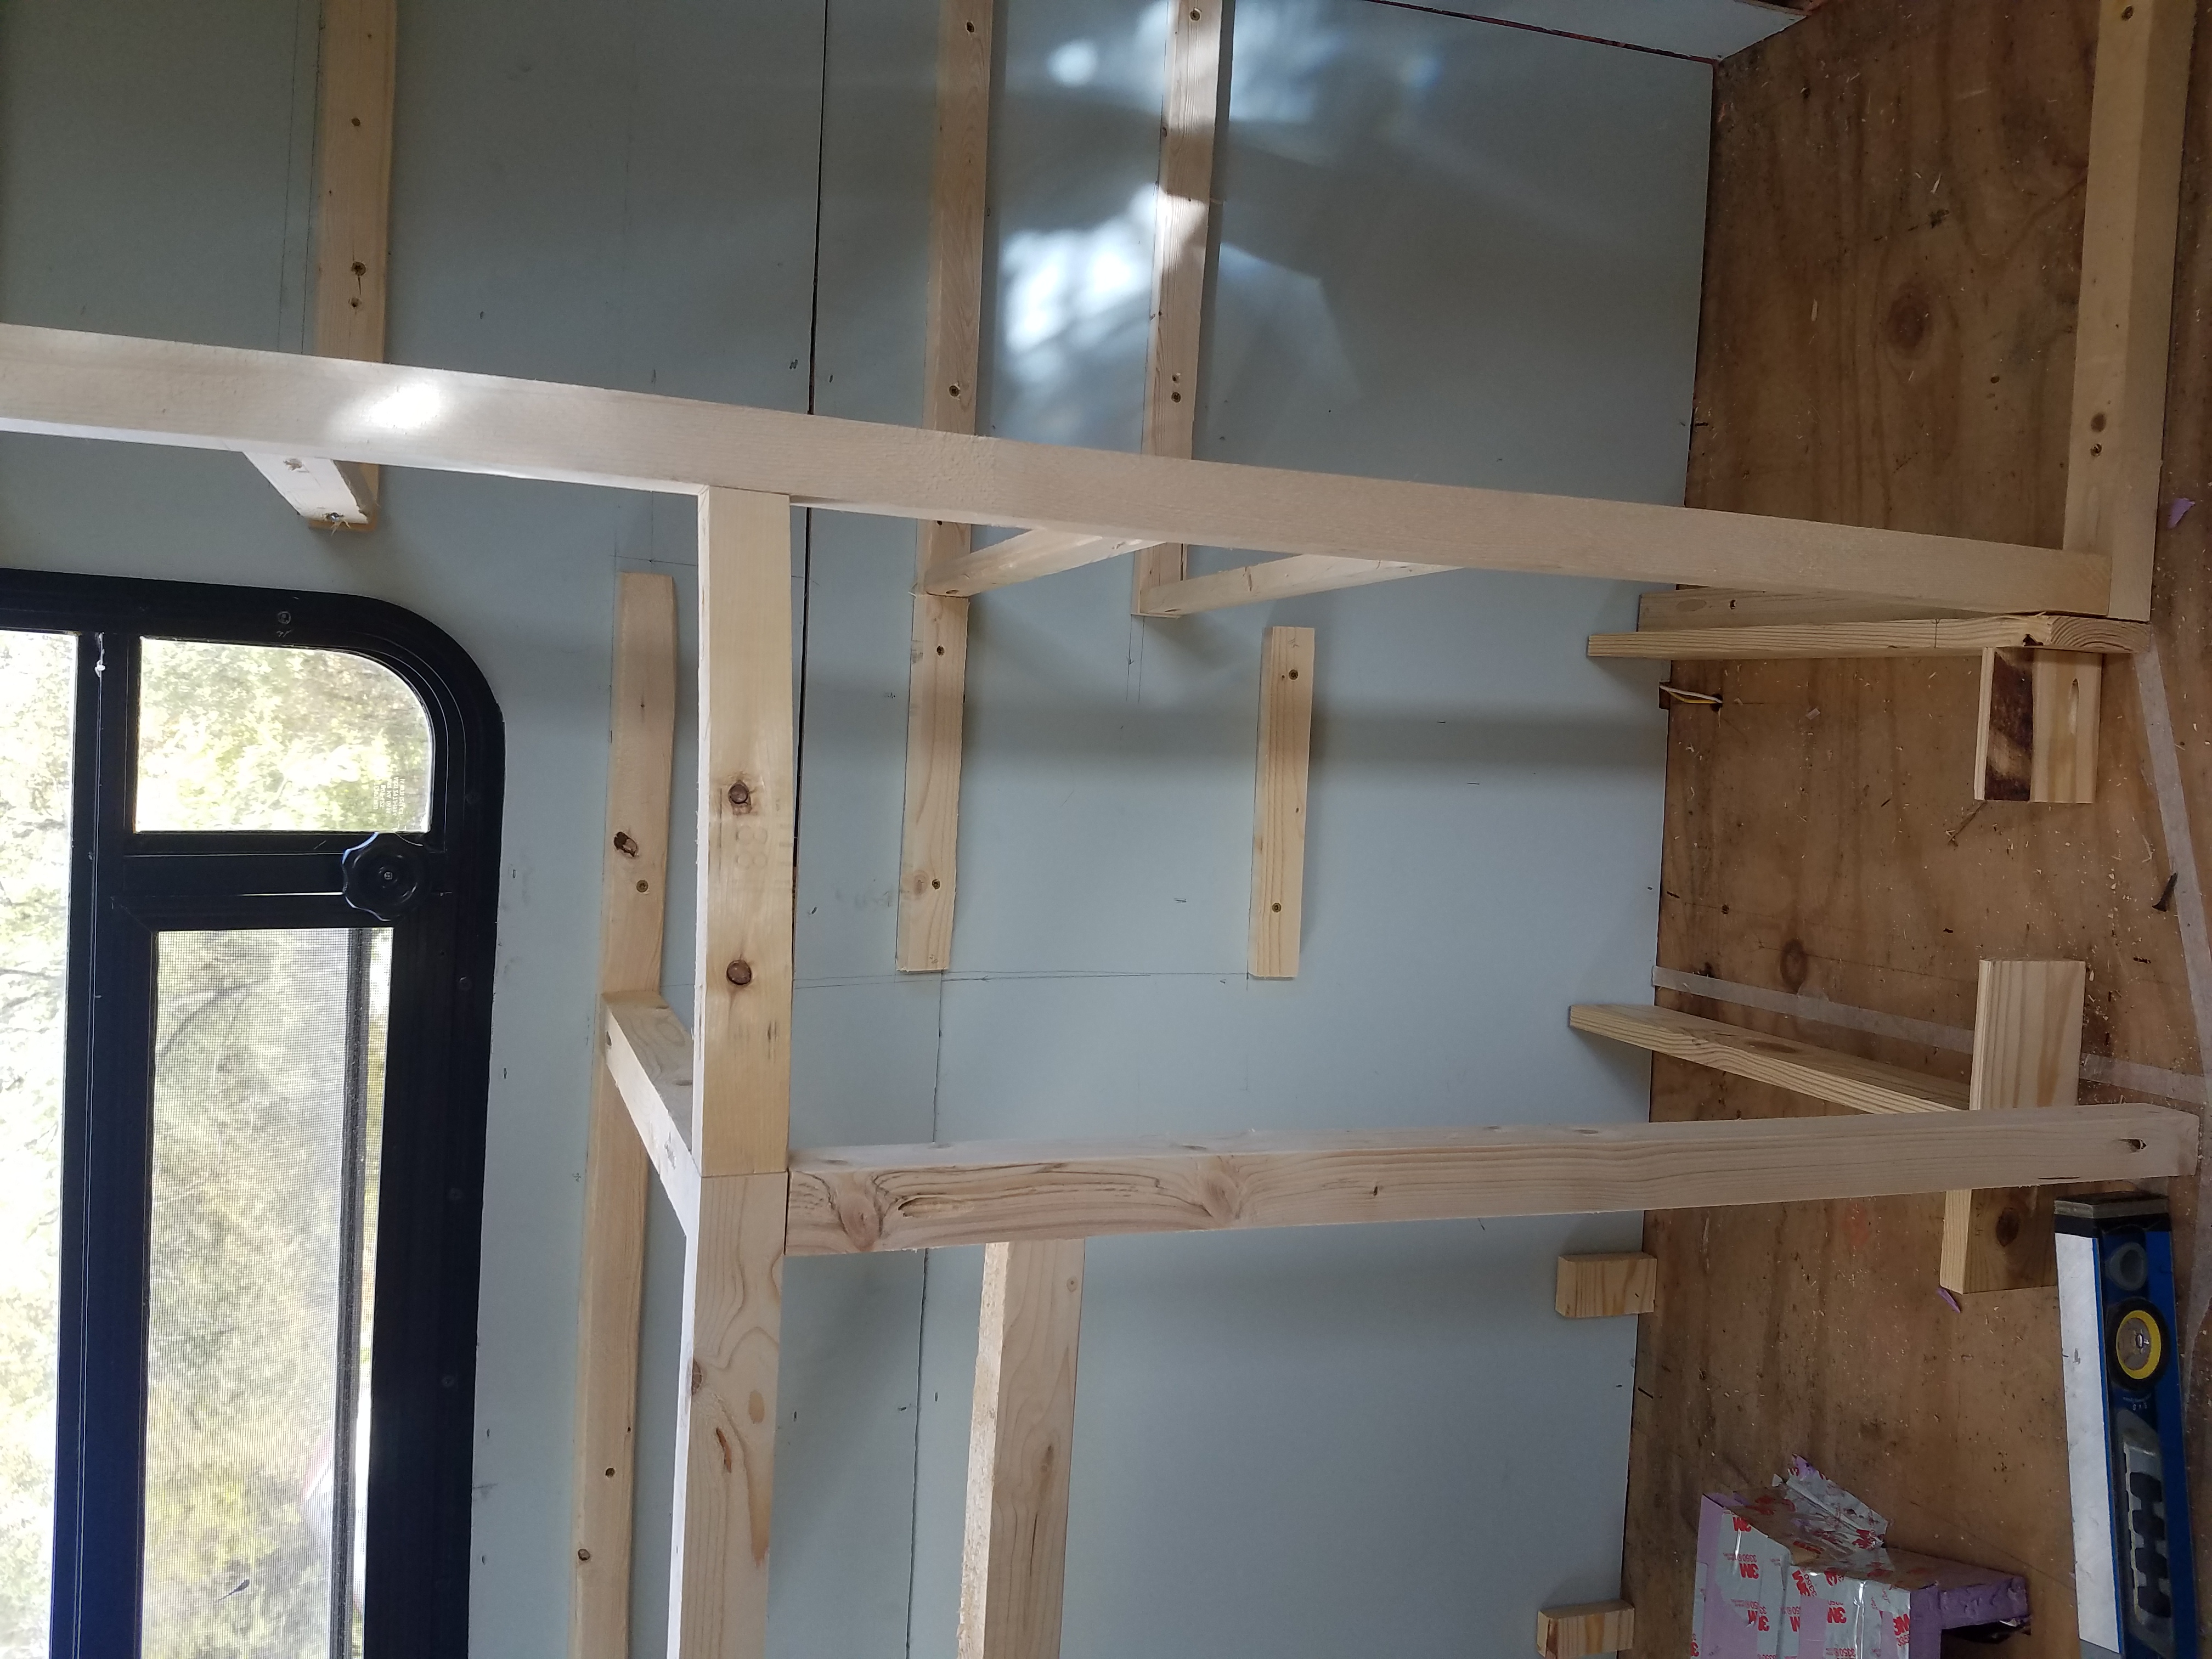
The next section to be completed was the pantry. I decided to start on both ends of the kitchen and work in, adjusting my measurements as I go to make sure everything continues to line up. The pantry presents more of a challenge than the range did because the front wall of the trailer leans out, then leans back in, meaning that each brace board will be a different length along the slant of the wall. It also makes it a lot harder to measure and mark.
Nevertheless, I persevered. It would be great to be able to do a simple adjustable shelving system for the pantry, but the angled wall makes that impossible. However, when you break it down, it’s a series of brace boards for the back and one side, a rectangle for the front, and 5 cross-supports on the side that are not against the wall.
I researched how tall to make pantry shelves, and also decided that they shouldn’t be too deep. I designed the pantry shelves to be 14″ deep, with 4 inches between the edges of the shelves and the door to provide for door-hung baskets. This splits the storage into 2 more easily accessible areas and also leaves vertical room for me to store a broom and hang an apron.
The Kitchn – This Is What Makes a Pantry Perfect, According to a Pro Closet Builder
Construction of the pantry was made particularly tricky by the sloping front wall. Each brace board for the shelving was a different length, and it was extra hard to get everything level. However, once I had everything measured and cut, the assembly was straightforward. Pocket holes and glue for the frame and the brace boards were screwed into the wall, although the lengths were so short that there was no available stud on one side.
Hopefully, the weight will be spread out enough along 3 sides that the brace boards won’t pull out of the 5mm plywood paneling. I used a carpenter’s square to make sure things were lined up, level, and 90 degrees (square).
The trickiest part of the pantry was the brace boards on the side that’s not touching a wall. These need to be screwed into the brace boards against the wall, and also into the upright corner support. Rather than become a contortionist and struggle to screw boards into the corner post while pressed up against the wall, I changed the equation. I marked the desired placement for each brace board on the upright corner post, then laid it down on the floor before screwing them in. This gave me a lot more elbow room and allowed me to use pocket screws for both joints.
Then, with the brace boards sticking out like piano keys, I put the corner support back into place and attached the other side of the boards to the wall.
Building the Sink
Once I had double-checked all of my shelves by comparing the level to the level of the floor, I was ready to move onto the sink cabinet.
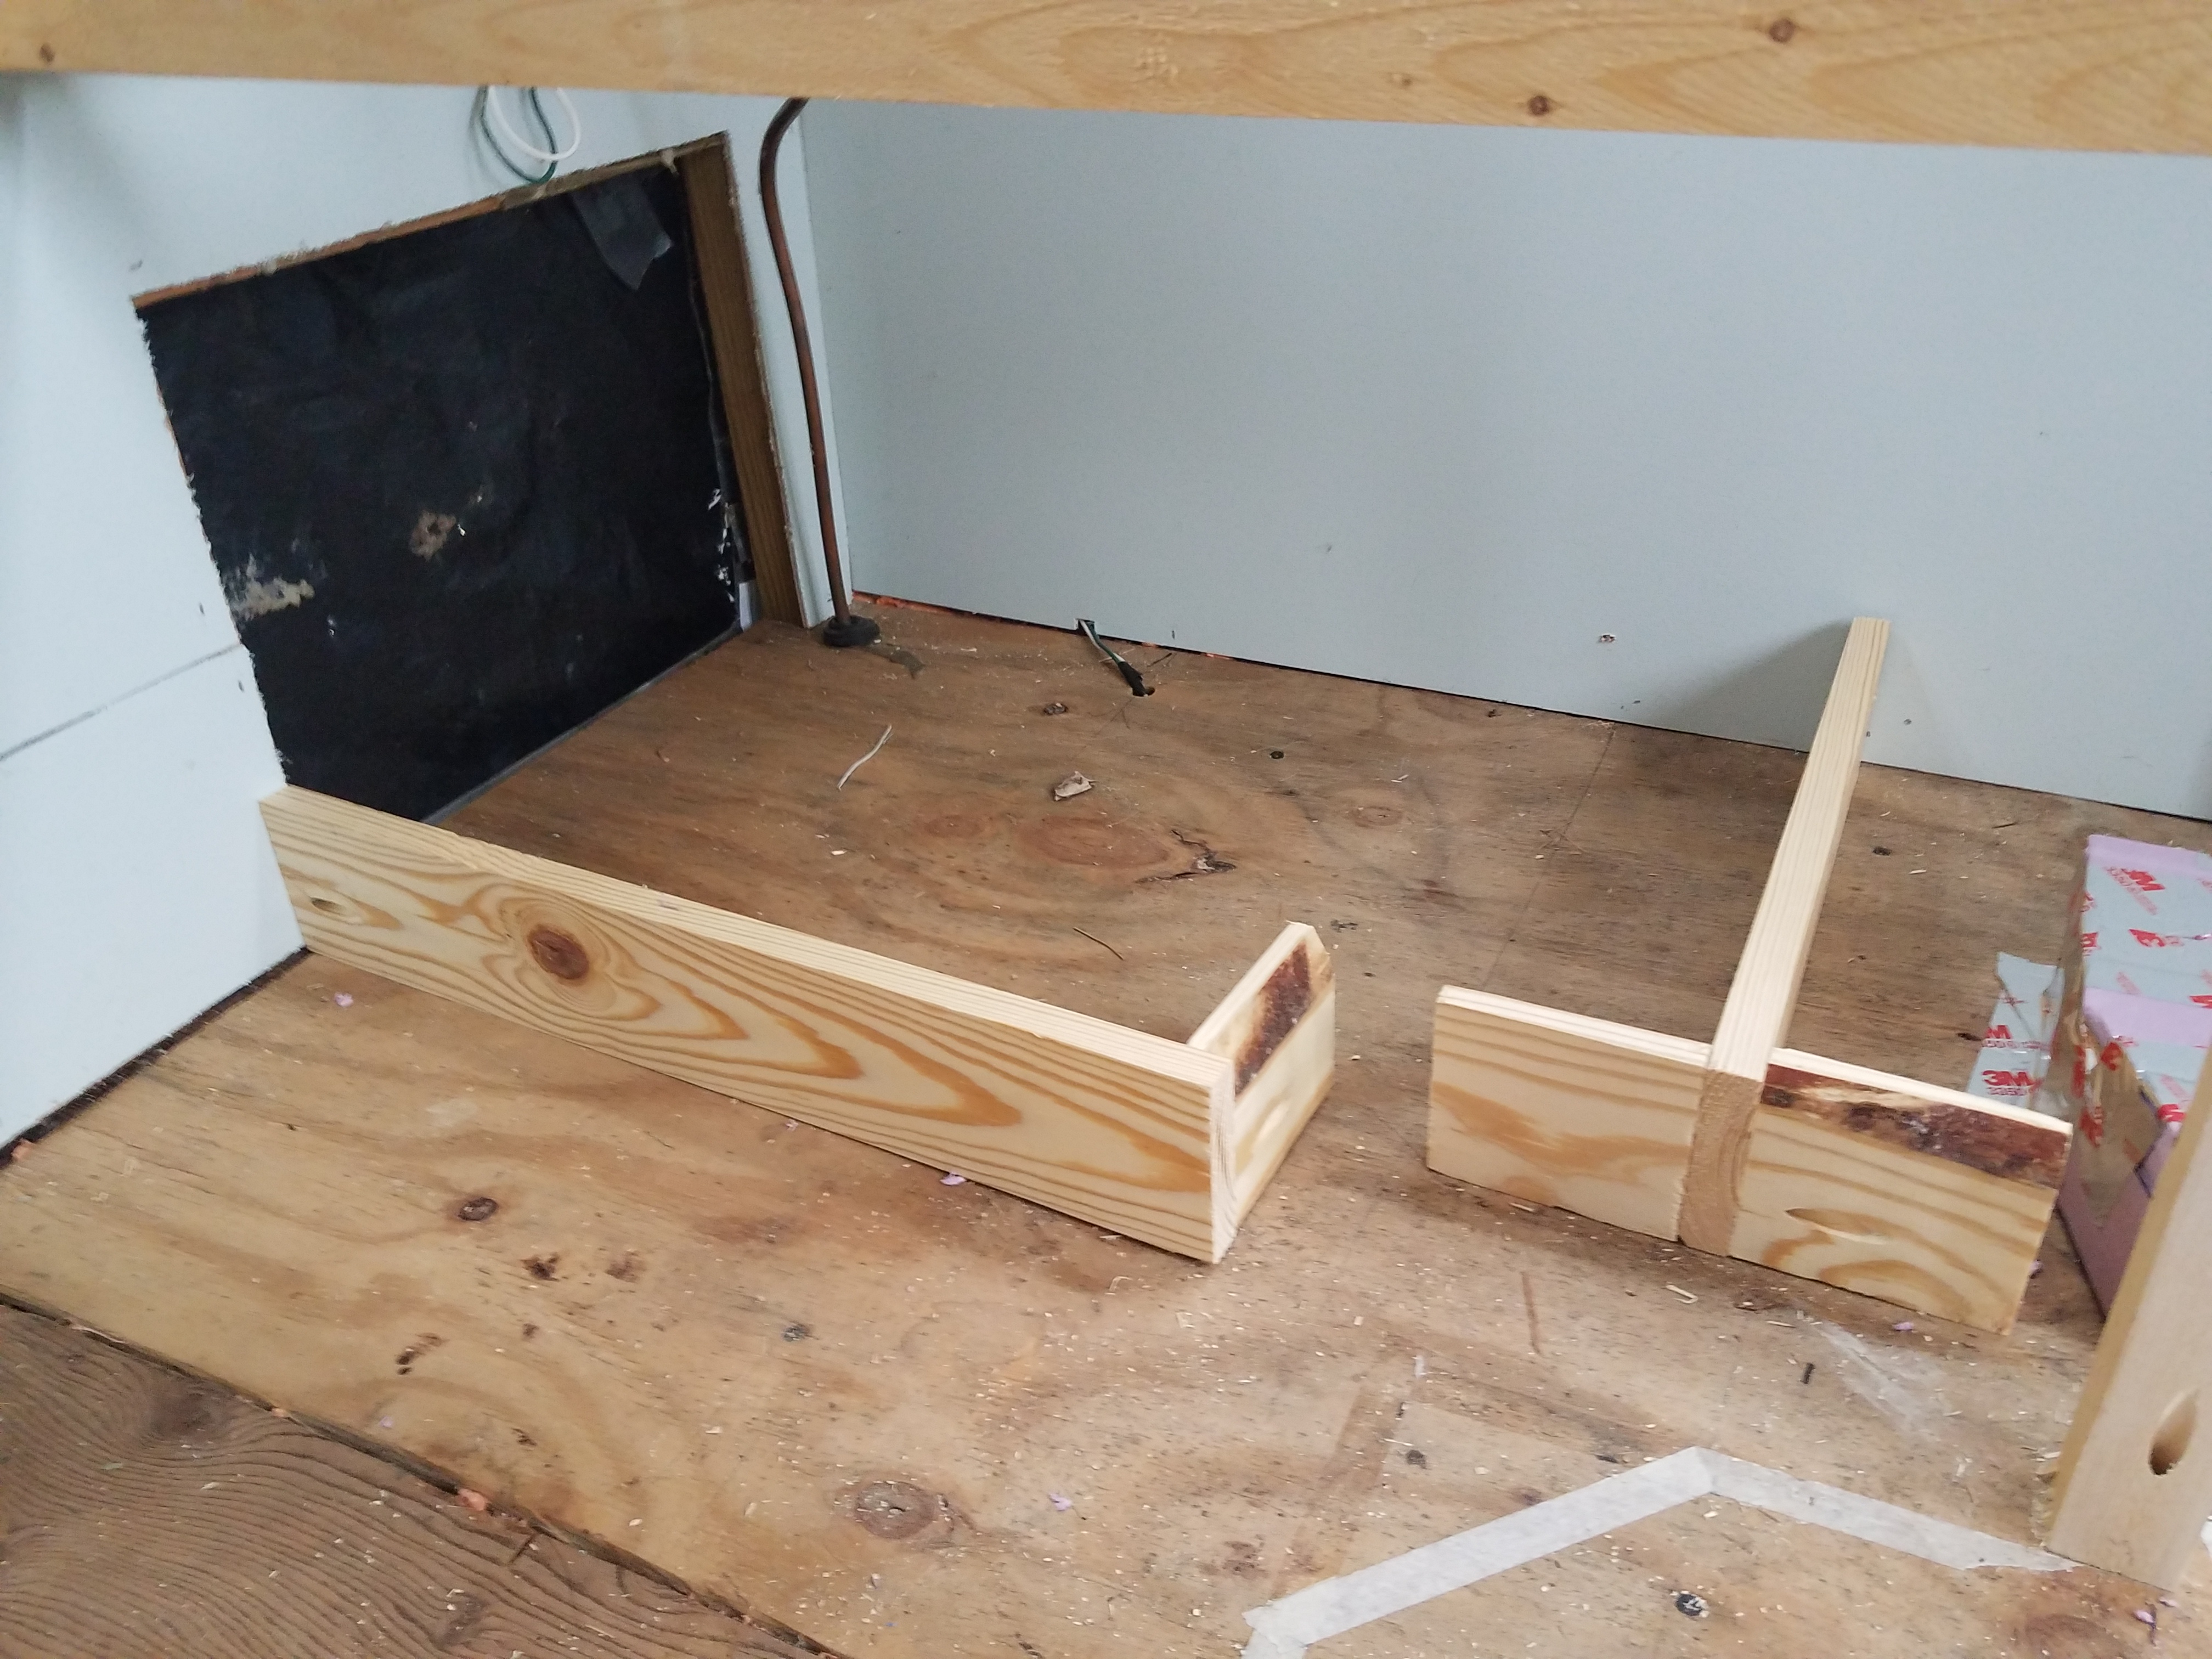
The sink cabinet is almost as easy as the stove, meant to provide some extra support for a heavy item. The sink is stainless steel and isn’t heavy in itself, but it will be heavy when it’s full of dirty pans and water. The weight will be distributed along the two upright supports, two horizontal supports, and the brace board along the back.
I did all of my cutting, gluing, screwing, and sanding in the woodshop, and then brought the already-assembled piece into the trailer to be screwed into place. I made sure to line it up to be in the center of the front window. I like the idea of having a window over the sink, although the front window is too low to look out of. On the bright side, it will let direct sunlight in on my sink and countertop (punny).
I designed the sink cabinet to hold a trash can and recycling can instead of shelving. To that end, it’s going to have doors and walls! Yay!
As with most sinks, the doors will start below the bottom of the sink and a plywood face will block the underside of the sink from view. I added an additional board level with the bottom of the sink to attach the plywood face and stop the cabinet doors. I am doing faceless Euro-style doors, mostly for the simplicity of construction, though I do appreciate the minimalist aesthetic.
As you might have noticed, I’m building this kitchen in a somewhat atypical manner. I decided to begin with the broad strokes, assembling the critical parts of the kitchen before going on to the finishing steps. I’d like to have the kitchen set up to be at least minimally functional as soon as possible since we don’t know when we might have to move and it could be on short notice.
To that end, I’m building it to facilitate putting on the countertop without necessarily having the shelves, doors, or toe-kick installed or anything painted. If we suddenly find out we need to leave in 2 weeks, I’ll be able to slap a plywood countertop on it, install the sink and stove, and have a useful kitchen area. Then I can work on the rest of it while we’re living in the trailer.
Now, I do hope to be able to finish everything before we have to move across the country and start living in the travel trailer, but there’s no guarantee. I’ve had to prioritize my work to “making it livable”, while “making it pretty” goes onto the bottom of the list.
Building Toe Kicks
Next, I installed the toe-kick supports that will hold up the bottom shelf of the cabinets and also provide backing for the trim underneath them.
Toe-kicks are essential for kitchen ergonomics. They allow you to stand close to the counter without smacking your feet into the bottom shelf. Toe-kicks are normally between 3–4″ wide and 3–4″ deep, so I bought a few lengths of 1×4 board that would be just the right height. 1×4 boards are actually 0.75″x3.5″ so that is perfect for a toe-kick. They’re strong enough to support the lower shelves and by placing small T’s I can staple my paneling right onto them to close up the toe-kick and prevent dust and nonsense from getting under the counters.
While installing the toe-kick, I had to reroute the heating vent to blow out of the toe-kick in front of the sink. I used leftover 1″ rigid foam board insulation and aluminum duct tape for the job. I routed the vent so it will blow right on my feet while I’m standing at the sink in the morning, which is something to look forward to. I made sure to keep the dimensions of the hole exact, so the vent cover I took out will fit into the hole I’ll cut in the toe-kick facing.
I also decided to place pieces of 1×4 board along the back wall to act as brace boards for the lower shelf, since I anticipate we’ll put our heaviest items on the lower shelf. This will help prevent any sag in the middle of the shelves. They don’t need to be large, just the right height to support the shelf.
Corner Shelving
The final parts of the “broad strokes” kitchen install are the corner shelving unit and the shelving between the sink and the pantry.
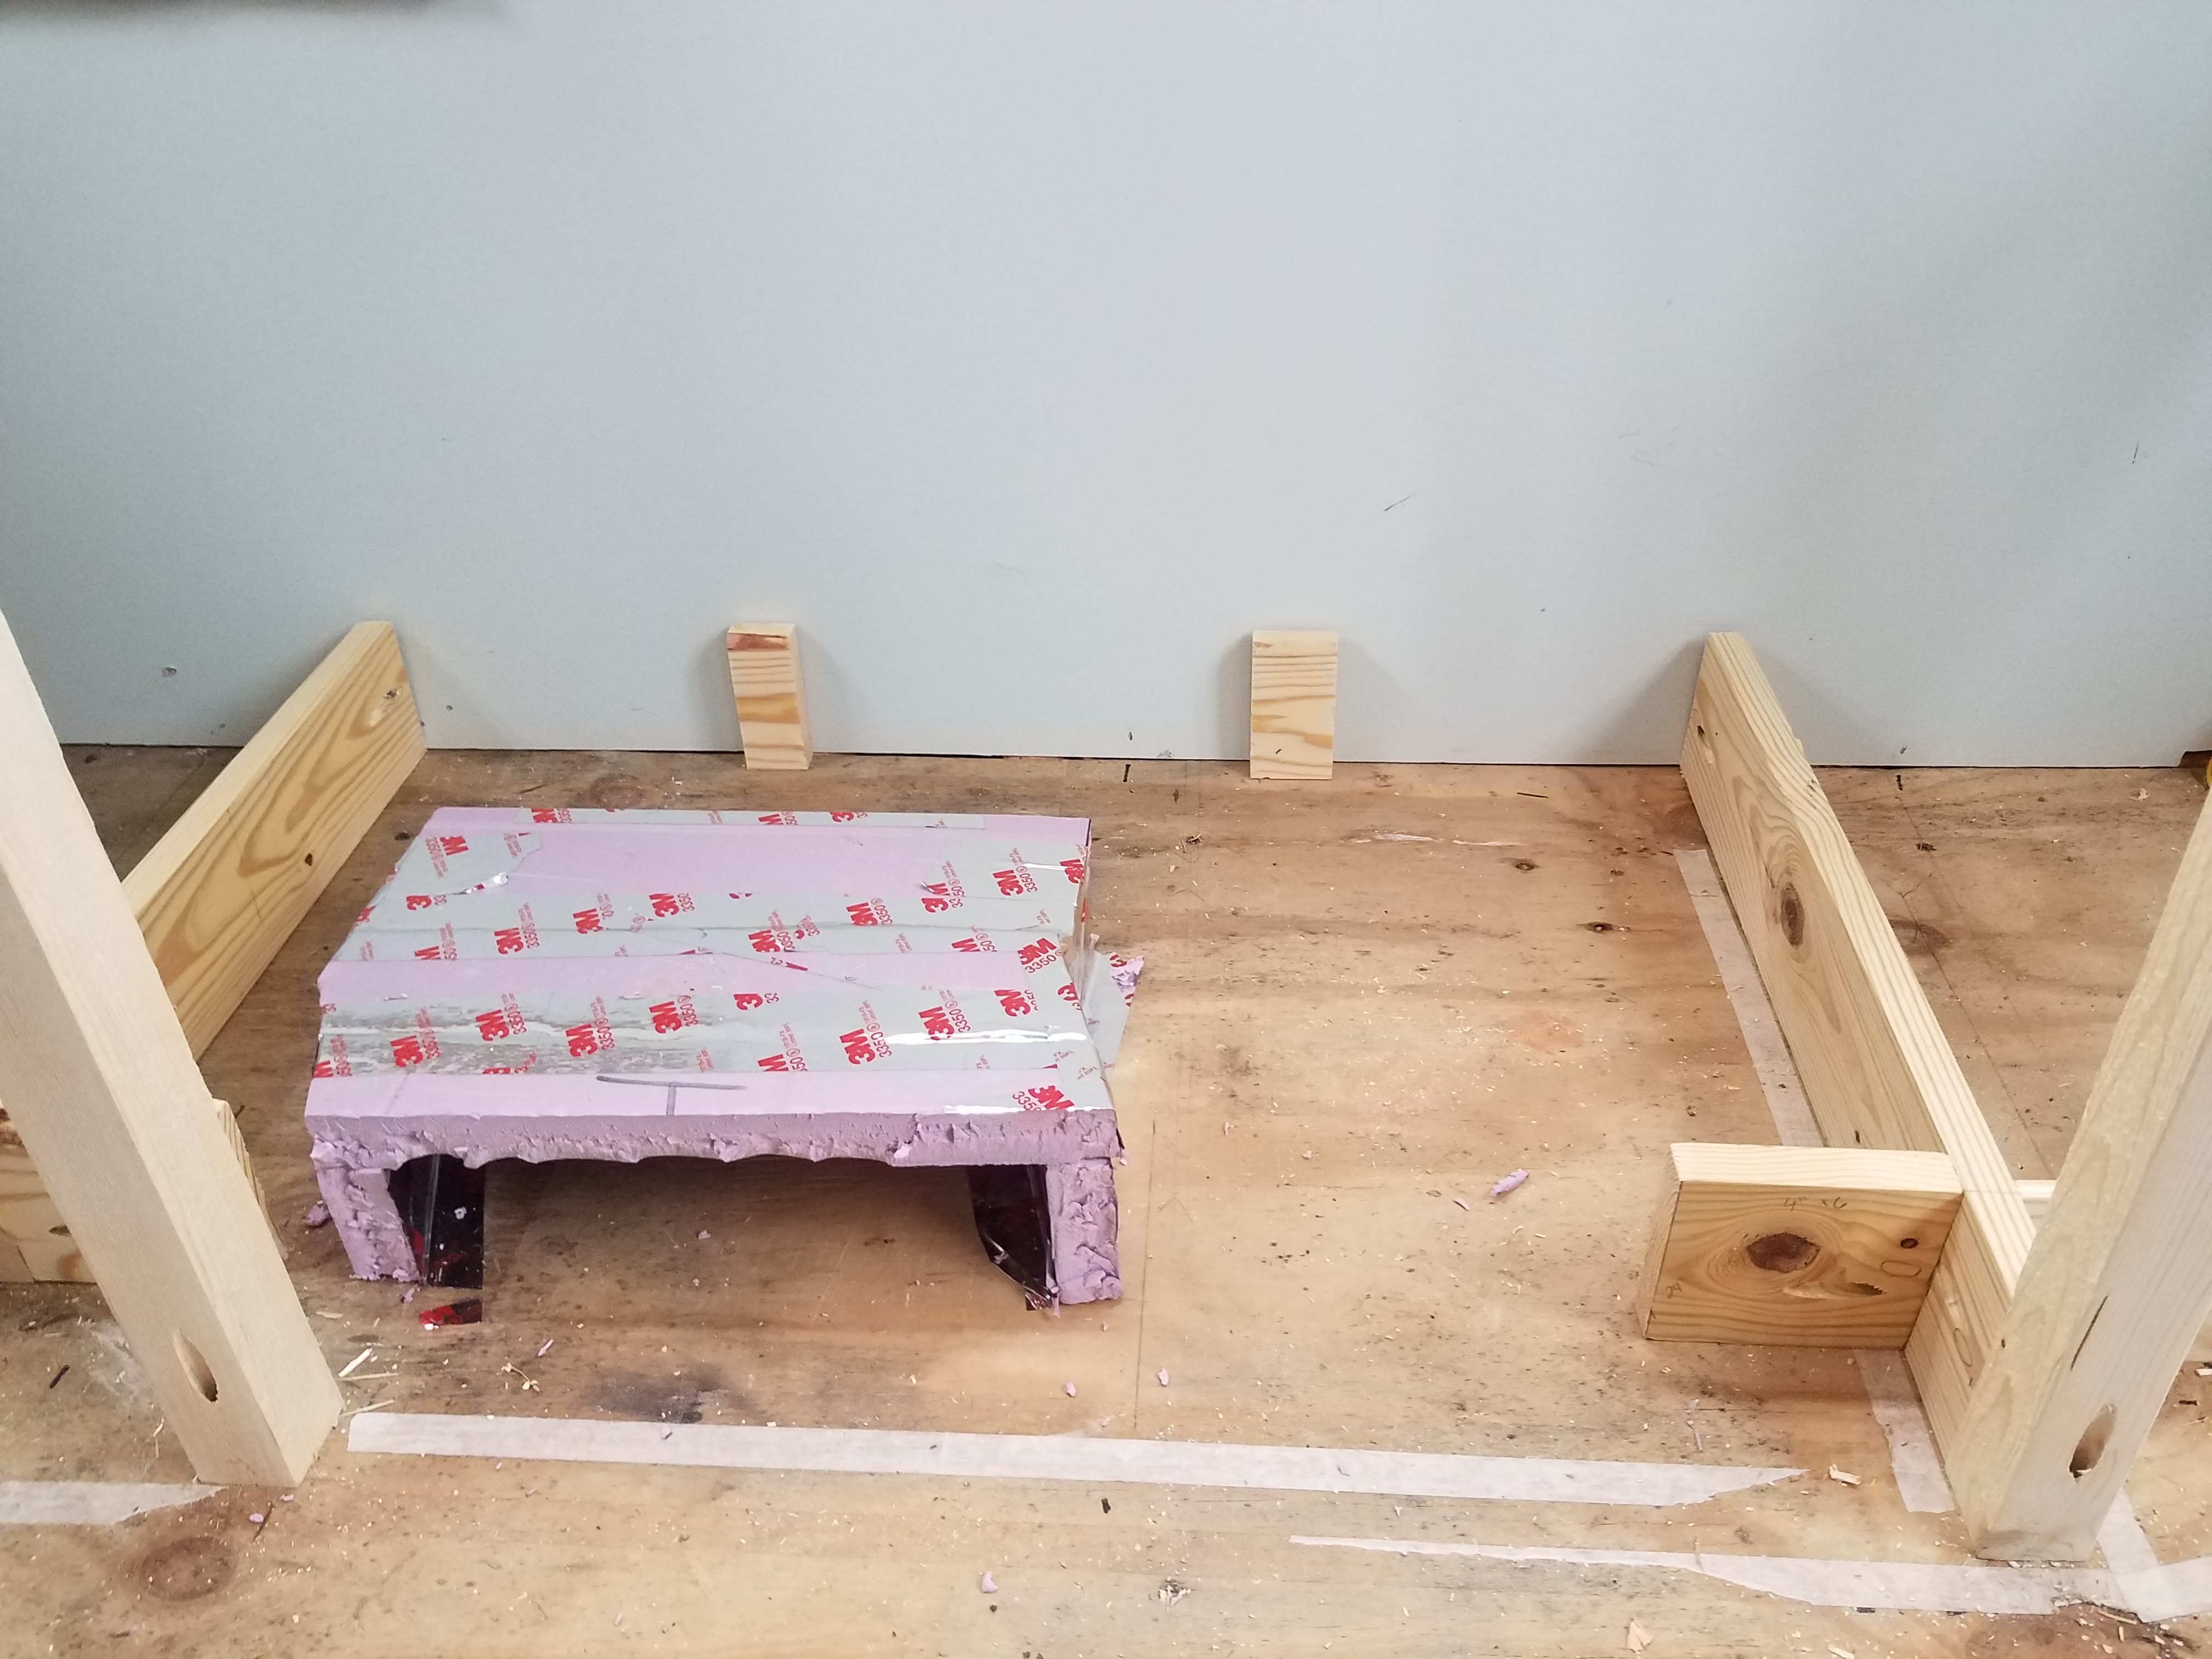
The corner shelving unit will house the tankless water heater. The new tankless water heater will fit into the same space as the old 6-gal water heater that came with the trailer. The dimensions are smaller ( Dimensions: Width: 12.5″, Height: 12.5″ Depth 15.5″) but it provides limitless hot water, as long as the propane doesn’t run out. This is a fantastic upgrade from a 6-gal which would give you about a 5-minute shower before you have to wait for it to heat up again.
I’ll leave space for the water heater to sit on the floor below the height of the toe-kick, and then build a small lip around the edge of the shelf so nothing will be touching the water heater directly.
I also need to leave space in the back of the shelving for the water input and sink drainage systems, as well as the propane connections for the stove and water heater. Having the water and propane connection accessible in the back of the shelving is reassuring. If there’s a leak, it will be easy to detect and easy to address.
The shelving unit between the sink and the pantry is small and also cuts the corner diagonally between the 20″ deep counter and the 18″ deep pantry to leave more floor space for dining table seating.
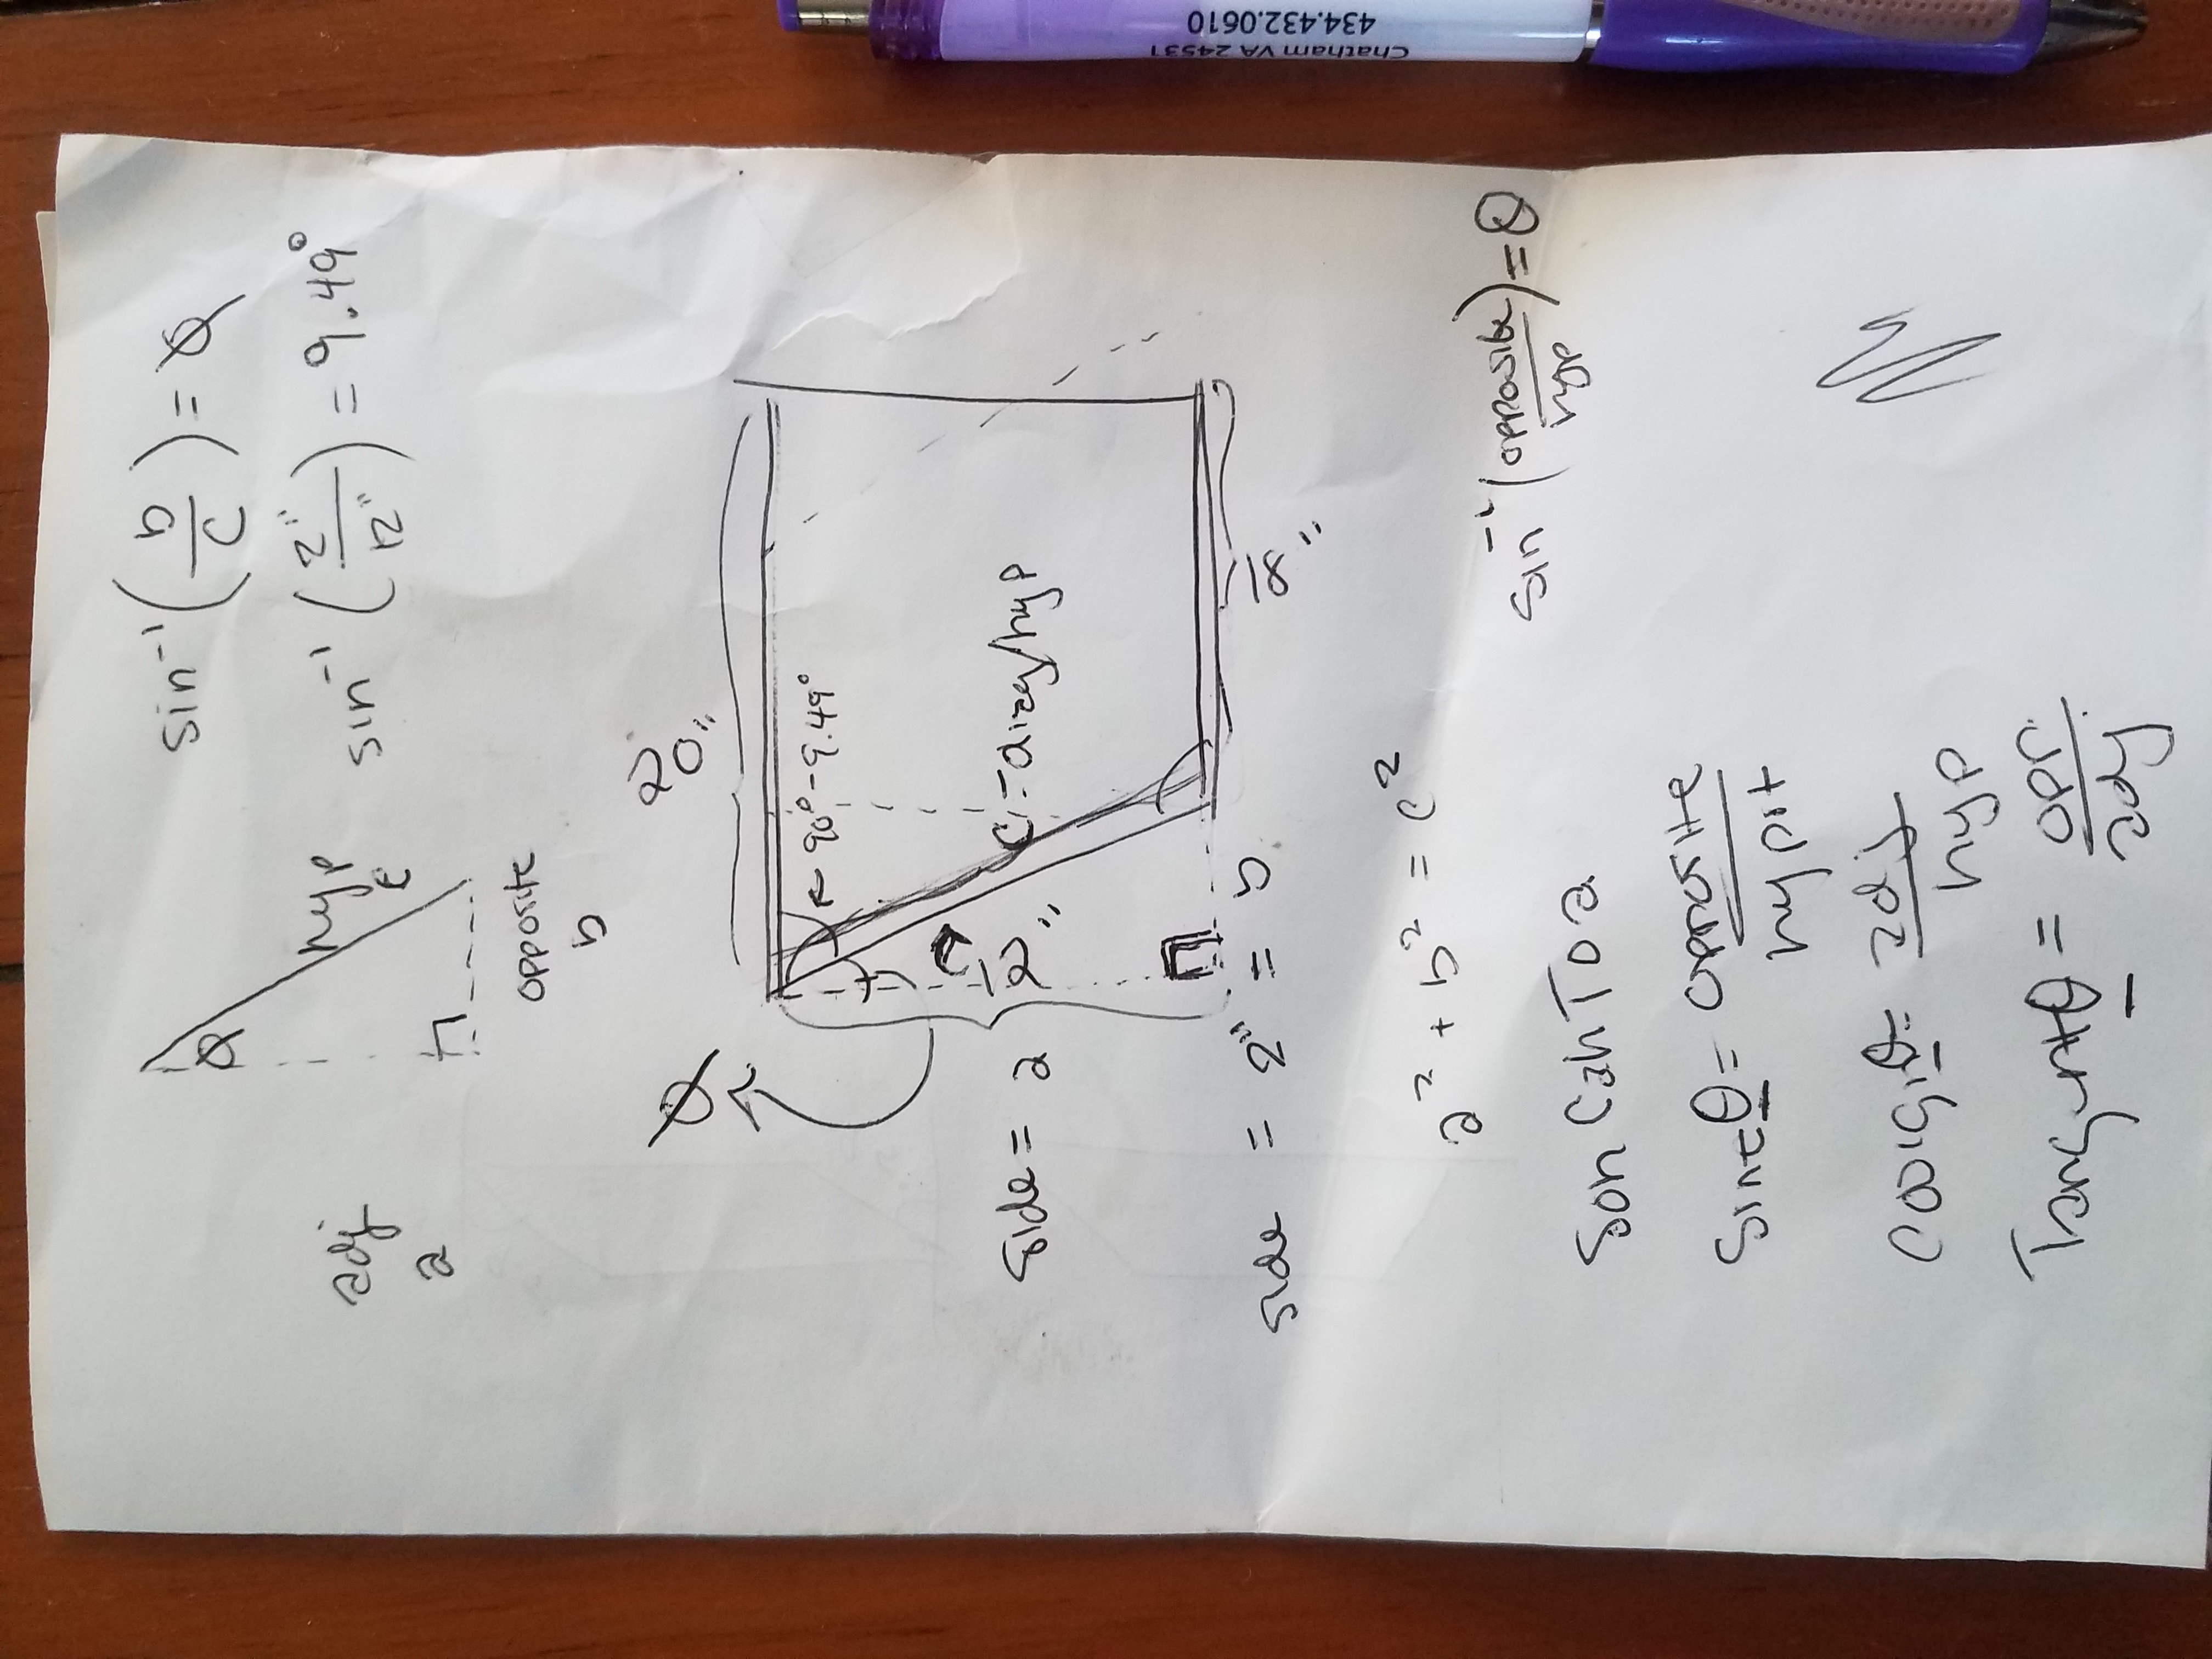
Figuring out how to cut the angle for the brace boards was way more complicated than it should have been. I tried a few guess-and-check cuts and then went to my little sister for help. She has a double major in computer and electrical engineering and tutored Calculus 2 in college for fun. She helped me figure out my angle using geometry that had retreated to the far back of my mind since middle school.
I could have bought a $50 tool to find the angle for me, but I didn’t want to. My carpenter’s square has angles on it, but it wasn’t precise enough for me.
By using the difference between the counter depths (2″) as one side of a right triangle, the distance between the two upright supports (12.5″) as another side of the right triangle, and using the inverse sine operation I was able to find the angle that I needed. There are definitely other ways to do this. I don’t recommend this way at all, it was very confusing. Also, to all the geometry teachers who constantly heard, “When am I going to use this in real life?” I apologize.
The next thing I had to figure out was that my piece of wood, once cut, would be a parallelogram, where the opposite angles are equal. So, when I finally went to the chop saw I set it at 13 degrees, cut one side of the wood at the mark, then flipped the wood around and cut the same 13 degrees angle at the mark on the other side, making a short, skinny parallelogram. It was a perfect fit! Thanks, Sister! As you can see, I attached it with two pocket screws.
I am a complete convert to pocket screw joinery. These shelves are Sturdy. They don’t rock, move, creak alarmingly, or do anything besides sitting as solid as a rock while I clamber all over them. Not all of the joints are glued at this point, just the most crucial ones. I wanted to leave myself a little grace to change things if it turns out I got it wrong the first time. I’ll go back and quickly unscrew, glue, and re-screw the T-joints before doing my finishing touches.
Finally, I installed a few more brace boards for the angled shelving, adjusted the lower shelving to be just a bit taller than I previously had it, and now the kitchen is ready for plywood shelves and finishing touches. Awesome!
The finishing touches on the kitchen will be described and pictured in a separate post since this one is already too long! Stay tuned for all of these random-looking wood sticks to turn into a functioning kitchen.